The brand-new Apple TV documentary Mr. Scorsese offers a wealth of fantastic anecdotes and fascinating insight into the storied history of the famous filmmaker. Unsurprisingly, but it’s interesting to note that Martin Scorsese didn’t start off making treasures like Taxi Driver and The Age of Innocence. Instead, he had to work up a little and go through some of the struggles he faced. ]
Also Martin Scorsese’s Life-Changing Bad Movie is Very Fine first appeared on Den of Geek.
World enthusiasts who have been waiting patiently for Stranger Things star Sadie Sink to appear on established have eventually received their desire as the shooting for Spider-Man: Brand New Day continues momentum. However, a first glimpse of Sink in the MCU has only fueled further fan speculation about the character she plays in the wall-crawling fourquel, with Marvel Studios and Sony Pictures yet to provide any details.
The first set photo to appear shows Sink in costume and conversing with director Destin Daniel Cretton ( Shang-Chi and the Legend of the Ten Rings ) during a set break. It reveals that Sink has kept her customary red hair on the part. She also appears to be wearing camouflage pants and boots, but the rest of her outfit is obscured by her oversized jacket.

Marvel Reportedly Won’t Let Tom Holland Be James Bond
Parker is his title, Peter Parker. And nothing else. That’s the story that is being spread in The Sun, at least. The report states that Tom Holland has been ruled out of contention for the role of the next James Bond as a result of an unknown source in the paper’s claim that he has signed a deal with Marvel and Sony to perform Spider-Man. It’s not so]… ]
The second article on Den of Geek was titled Marvel ReportedlyWon’t Allow Tom Holland Get James Bond.
World enthusiasts who have been waiting patiently for Stranger Things star Sadie Sink to appear on established have eventually received their desire as the shooting for Spider-Man: Brand New Day continues momentum. However, a first glimpse of Sink in the MCU has only fueled further fan speculation about the character she plays in the wall-crawling fourquel, with Marvel Studios and Sony Pictures yet to provide any details.
The first set photo to appear shows Sink in costume talking to director Destin Daniel Cretton ( Shang-Chi and the Legend of the Ten Rings ) during a break during filming. It reveals that Sink has kept her customary red hair on the part. She also appears to be wearing camouflage pants and boots, but her oversized jacket obscures the rest of her outfit.

Scott Derrickson Reveals the One Thing He Won’t Do for Black Phone 3
Many people have been killed by Scott Derrickson. And a amazing number of them were minors. Okay, no, Derrickson hasn’t really killed anyone, but he has imagined numerous murders and depicted them on screen, including the three disfigured tykes that the Grabber killed in Black Phone 2. Black Phone 2]… ]
Scott Derrickson Reveals the One Thing HeWon’t Do for Black Phone 3 primary appeared on Den of Geek.
World enthusiasts who have been waiting patiently for Stranger Things sun Sadie Sink to appear on established have eventually received their hope as Spider-Man: Brand New Day shooting continues apace. However, a first glimpse of Sink in the MCU has only fueled further fan speculation about the character she’s portraying in the wall-crawling fourquel, with Marvel Studios and Sony Pictures yet to provide any details.
The first set photo to appear shows Sink in costume talking to director Destin Daniel Cretton ( Shang-Chi and the Legend of the Ten Rings ) during a break during filming. It reveals that Sink has kept her customary red hair on the part. She also appears to be wearing camouflage pants and boots, but the rest of her outfit is obscured by her oversized jacket.

How Bruce Springsteen Stole the Title of His Hit Song From Paul Schrader
When cowboy chairman Paul Schrader discusses pop music these days, he’s typically praising Taylor Swift as” the lighting that gives meaning our lives.” However, Schrader had the Boss on his head when it was early 1980s. And in a recent discussion with Deadline, Schrader reveals how an abandoned video project starring Bruce Springsteen […]…
The first article on Den of Geek: How Bruce Springsteen Stole the Title of his hit track from Paul Schrader was originally published here.
World enthusiasts who have been waiting patiently for Stranger Things star Sadie Sink to appear on established have eventually received their desire as the shooting for Spider-Man: Brand New Day continues momentum. However, a first glimpse of Sink in the MCU only fueled further fan speculation about the character she portrays in the wall-crawling fourquel, with no details being made public by Marvel Studios and Sony Pictures.
The first set photo to appear shows Sink in costume and conversing with director Destin Daniel Cretton ( Shang-Chi and the Legend of the Ten Rings ) during a set break. It reveals that Sink has kept her customary red hair on the part. She also appears to be wearing camouflage pants and boots, but the rest of her outfit is obscured by her oversized jacket.
Voice Content and Usability
We’ve been conversing for a long time. Whether to present information, perform transactions, or just to check in on one another, people have yammered aside, chattering and gesticulating, through spoken discussion for many generations. Only recently have we begun to write our discussions, and only recently have we outsourced them to the system, a system that exhibits a significantly higher affection for written letter than for the vernacular rigors of spoken language.
Laptops have trouble because between spoken and written speech, talk is more primitive. Machines must wrestle with the complexity of human statement, including the disfluencies and pauses, the gestures and body speech, and the variations in term choice and spoken dialect, which may impede even the most skillfully crafted human-computer interaction. In the human-to-human scenario, spoken language also has the privilege of face-to-face contact, where we can readily interpret nonverbal social cues.
In contrast, written language develops its own fossil record of dated terms and phrases as we record it and retain usages long after they are no longer relevant in spoken communication ( for example, the salutation” To whom it may concern” ). Because it tends to be more consistent, polished, and formal, written text is fundamentally much easier for machines to parse and understand.
Spoken language is not a luxury in this regard. Besides the nonverbal cues that decorate conversations with emphasis and emotional context, there are also verbal cues and vocal behaviors that modulate conversation in nuanced ways: how something is said, not what. Our spoken language reaches far beyond what the written word can ever deliver, whether it’s rapid-fire, low-pitched, high-decibel, sarcastic, stilted, or sighing. So when it comes to voice interfaces—the machines we conduct spoken conversations with—we face exciting challenges as designers and content strategists.
Voice-to-voice interactions
We interact with voice interfaces for a variety of reasons, but according to Michael McTear, Zoraida Callejas, and David Griol in The Conversational Interface, those motivations by and large mirror the reasons we initiate conversations with other people, too ( ). We typically strike up a discussion in the following ways:
- we need something done ( such as a transaction ),
- we want to know something, some kind of information, or
- we are social beings and want someone to talk to ( conversation for conversation’s sake ).
These three categories, which I refer to as transactional, informational, and prosocial, also apply to virtually every voice interaction: a single conversation that begins with the voice interface’s first greeting and ends with the user leaving the interface. Note here that a conversation in our human sense—a chat between people that leads to some result and lasts an arbitrary length of time—could encompass multiple transactional, informational, and prosocial voice interactions in succession. In other words, a voice interaction is a conversation, but it is not always just one voice interaction.
Purely prosocial conversations are more gimmicky than captivating in most voice interfaces, because machines don’t yet have the capacity to really want to know how we’re doing and to do the sort of glad-handing humans crave. Users are also debating whether or not they prefer the kind of organic human conversation that starts with a prosocial voiceover and progresses seamlessly into other types. In fact, in Voice User Interface Design, Michael Cohen, James Giangola, and Jennifer Balogh recommend sticking to users ‘ expectations by mimicking how they interact with other voice interfaces rather than trying too hard to be human—potentially alienating them in the process ( ).
That leaves two different types of conversations we can have with one another that a voice interface can also have easily, including one that is transactional and one that is informational, teaching us something new ( “discuss a musical” ).
Transactional voice interactions
When you order a Hawaiian pizza with extra pineapple, you’re typically having a conversation and a voice interaction when you’re tapping buttons on a food delivery app. Even when we walk up to the counter and place an order, the conversation quickly pivots from an initial smattering of neighborly small talk to the real mission at hand: ordering a pizza ( generously topped with pineapple, as it should be ).
Alison: Hey, how are things going?
Burhan: Hi, welcome to Crust Deluxe! It’s chilly outside. How can I help you?
Alison, can I get a pineapple-onion pizza in Hawaii?
Burhan: Sure, what size?
Large, Alison.
Burhan: Anything else?
Alison: No, that’s it.
Burhan: Something to drink?
I’ll have a bottle of Coke, Alison.
Burhan: You got it. It will cost about$ 15 and take fifteen minutes to complete.
Each progressive disclosure in this transactional conversation reveals more and more of the desired outcome of the transaction: a service rendered or a product delivered. Conversations that are transactional have certain characteristics: they are direct, concise, and cost-effective. They quickly dispense with pleasantries.
Informational voice interactions
Meanwhile, some conversations are primarily about obtaining information. Alison might visit Crust Deluxe with the sole intention of placing an order, but she might not want to leave with a pizza at all. She might be just as interested in whether they serve halal or kosher dishes, gluten-free options, or something else. Even though we have a prosocial mini-conversation once more at the beginning to establish politeness, we’re after much more.
Alison: Hey, how are things going?
Burhan: Hi, welcome to Crust Deluxe! It’s chilly outside. How can I help you?
Alison: Can I ask a few questions?
Burhan: Of course! Go right ahead.
Do you have any halal options available on the menu, Alison?
Burhan: Absolutely! On request, we can make any pie halal. We also have lots of vegetarian, ovo-lacto, and vegan options. Do you have any other dietary restrictions in mind?
Alison: What about gluten-free pizzas?
Burhan: For both our deep-dish and thin-crust pizzas, we can definitely make a gluten-free crust for you, without a problem. Anything else I can answer for you?
Alison: That’s it for the moment. Good to know. Thank you!
Burhan: Anytime, come back soon!
This dialogue is radically different. Here, the goal is to get a certain set of facts. Informational conversations are research expeditions that seek the truth through information gathering. Voice interactions that are informational might be more long-winded than transactional conversations by necessity. Responses are typically longer, more in-depth, and carefully communicated so that the customer is aware of the important lessons.
Voice Interfaces
Voice interfaces, in essence, use speech to assist users in accomplishing their objectives. But simply because an interface has a voice component doesn’t mean that every user interaction with it is mediated through voice. We’re most concerned with pure voice interfaces, which depend entirely on spoken conversation and lack any visual component, making multimodal voice interfaces much more nuanced and challenging to deal with because they can lean on visual components like screens as crutches.
Though voice interfaces have long been integral to the imagined future of humanity in science fiction, only recently have those lofty visions become fully realized in genuine voice interfaces.
IVR ( interactive voice response ) systems
Though written conversational interfaces have been fixtures of computing for many decades, voice interfaces first emerged in the early 1990s with text-to-speech ( TTS ) dictation programs that recited written text aloud, as well as speech-enabled in-car systems that gave directions to a user-provided address. We became familiar with the first real voice interfaces that could actually be spoken to without having to deal with overburdened customer service representatives as a result of the development of interactive voice response ( IVR ) systems.
IVR systems allowed organizations to reduce their reliance on call centers but soon became notorious for their clunkiness. When you call an airline or hotel company, which is a common practice in the corporate world, these systems were primarily intended as metaphorical switchboards to direct customers to a real phone agent (” Say Reservations to book a flight or check an itinerary” ), which are more likely to happen when you call one. Despite their functional issues and users ‘ frustration with their inability to speak to an actual human right away, IVR systems proliferated in the early 1990s across a variety of industries (, PDF).
IVR systems have a reputation for having less scintillating conversations than we’re used to in real life ( or even in science fiction ), despite being extremely repetitive and monotonous conversations that typically don’t veer from a single format.
Screen readers
The invention of the screen reader, a tool that converts visual content into synthesized speech, was a development of IVR systems in parallel. For Blind or visually impaired website users, it’s the predominant method of interacting with text, multimedia, or form elements. Perhaps the closest thing we have today to an out-of-the-box delivery of content via voice is represented by screen readers.
Among the first screen readers known by that moniker was the Screen Reader for the BBC Micro and NEEC Portable developed by the Research Centre for the Education of the Visually Handicapped (RCEVH) at the University of Birmingham in 1986 ( ). The first IBM Screen Reader for text-based computers was created by Jim Thatcher in the same year, which was later recreated for a computer with graphical user interfaces ( GUIs ) ( ).
With the rapid growth of the web in the 1990s, the demand for accessible tools for websites exploded. Screen readers started facilitating quick interactions with web pages that ostensibly allow disabled users to traverse the page as an aural and temporal space rather than a visual and physical one with the introduction of semantic HTML and especially ARIA roles in 2008, enabling speedy interactions with the pages. In other words, screen readers for the web “provide mechanisms that translate visual design constructs—proximity, proportion, etc. in A List Apart, writes Aaron Gustafson, “into useful information.” ” At least they do when documents are authored thoughtfully” ( ).
There’s a big deal with screen readers: they’re difficult to use and relentlessly verbose, despite being incredibly instructive for voice interface designers. The visual structures of websites and web navigation don’t translate well to screen readers, sometimes resulting in unwieldy pronouncements that name every manipulable HTML element and announce every formatting change. Working with web-based interfaces takes a cognitive toll for many screen reader users.
In Wired, accessibility advocate and voice engineer Chris Maury considers why the screen reader experience is ill-suited to users relying on voice:
I hated the way Screen Readers operated from the beginning. Why are they designed the way they are? It makes no sense to present information visually before converting it to audio only after that. All of the time and energy that goes into creating the perfect user experience for an app is wasted, or even worse, adversely impacting the experience for blind users. __ _ _ _ _ _ _ _ _ _ _ _ _ _ _ _ _ _ _ _ _ _ _ _ _ _ _ _ _ _ _ _ _ _ _ _ _ _ _ _ _ _ _ _ _ _ _ _ _ _ _ _ _ _ _ _ _ _ _ _ _ _ _ _ _ _ _ _ _ _ _ _ _ _ _ _ _ _ _ _ _ _ _ _ _ _ _ _ _ _ _ _ _ _ _ _ _ _ _ _ _ _ _ _ _ _ _ _ _ _ _
In many cases, well-designed voice interfaces can speed users to their destination better than long-winded screen reader monologues. After all, users of the visual interface have the advantage of freely scurrying around the viewport to find information without worrying about it. Blind users, meanwhile, are obligated to listen to every utterance synthesized into speech and therefore prize brevity and efficiency. Users with disabilities who have long had no choice but to use clumsy screen readers might find that voice interfaces, especially more contemporary voice assistants, provide a more streamlined experience.
Voice assistants
Many of us immediately associate voice assistants with the popular subset of voice interfaces found in living rooms, smart homes, and offices with the film Star Trek or with Majel Barrett’s voice as the omniscient computer. Voice assistants are akin to personal concierges that can answer questions, schedule appointments, conduct searches, and perform other common day-to-day tasks. And because of their assistive potential, they are quickly gaining more and more attention from accessibility advocates.
Before the earliest IVR systems found success in the enterprise, Apple published a demonstration video in 1987 depicting the Knowledge Navigator, a voice assistant that could transcribe spoken words and recognize human speech to a great degree of accuracy. Then, in 2001, Tim Berners-Lee and others created their vision for a Semantic Web “agent” that would carry out routine tasks like” checking calendars, making appointments, and finding locations” (, behind paywall ). It wasn’t until 2011 that Apple’s Siri finally entered the picture, making voice assistants a tangible reality for consumers.
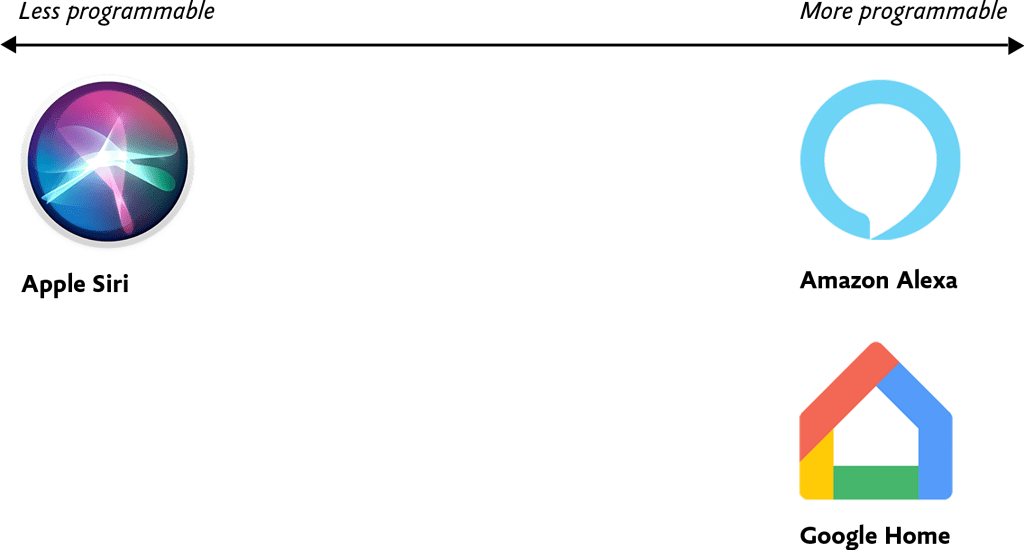
There is a significant variation in how programmable and customizable some voice assistants are compared to others due to the sheer number of voice assistants available today ( Fig. 1 ). At one extreme, everything except vendor-provided features is locked down, for example, at the time of their release, the core functionality of Apple’s Siri and Microsoft’s Cortana couldn’t be extended beyond their existing capabilities. There are no other means of developers communicating with Siri at a low level, aside from predefined categories of tasks like messaging, hailing rideshares, making restaurant reservations, and other things, which are still possible today.
At the opposite end of the spectrum, voice assistants like Amazon Alexa and Google Home offer a core foundation on which developers can build custom voice interfaces. For this reason, developers who feel stifled by the limitations of Siri and Cortana are increasingly using programmable voice assistants that are capable of customization and extensibility. Amazon offers the Alexa Skills Kit, a developer framework for building custom voice interfaces for Amazon Alexa, while Google Home offers the ability to program arbitrary Google Assistant skills. Users today have the option to choose from among the thousands of custom-built skills available in the Google Assistant and Amazon Alexa ecosystems.
As businesses like Amazon, Apple, Microsoft, and Google continue to occupy their positions, they’re also selling and open-sourcing an unheard array of tools and frameworks for designers and developers that aim to make creating voice interfaces as simple as possible, even without code.
Often by necessity, voice assistants like Amazon Alexa tend to be monochannel—they’re tightly coupled to a device and can’t be accessed on a computer or smartphone instead. In contrast, many development platforms, such as Google’s Dialogflow, have omnichannel capabilities that allow users to create a single conversational interface that then manifests as a voice interface, textual chatbot, and IVR system upon deployment. I don’t prescribe any specific implementation approaches in this design-focused book, but in Chapter 4 we’ll get into some of the implications these variables might have on the way you build out your design artifacts.
Voice Content
Simply put, voice content is content delivered through voice. Voice content must be free-flowing and organic, contextless and concise in order to preserve what makes human conversation so compelling in the first place. Everything written content is not.
Our world is replete with voice content in various forms: screen readers reciting website content, voice assistants rattling off a weather forecast, and automated phone hotline responses governed by IVR systems. We’re most concerned with the content in this book being delivered auditorically, not as an option but as a necessity.
For many of us, our first foray into informational voice interfaces will be to deliver content to users. There is only one issue: any content we already have isn’t in any way suitable for this new environment. So how do we make the content trapped on our websites more conversational? And how do we create fresh copy that works with voice-recognition?
Lately, we’ve begun slicing and dicing our content in unprecedented ways. Websites are, in many ways, massive vaults of what I call macrocontent: lengthy prose that can last for miles in a browser window while being viewed in microfilm format in newspaper archives. Back in 2002, well before the present-day ubiquity of voice assistants, technologist Anil Dash defined microcontent as permalinked pieces of content that stay legible regardless of environment, such as email or text messages:
An example of microcontent can be a day’s weather forecast [sic], the arrival and departure times for an airplane flight, an abstract from a lengthy publication, or a single instant message. __ _ _ _ _ _ _ _ _ _ _ _ _ _ _ _ _ _ _ _ _ _ _ _ _ _ _ _ _ _ _ _ _ _ _ _ _ _ _ _ _ _ _ _ _ _ _ _ _ _ _ _ _ _ _ _ _ _ _ _ _ _ _ _ _ _ _ _ _ _ _ _ _ _ _ _ _ _ _ _ _ _ _ _ _ _ _ _ _ _ _ _ _ _ _ _ _ _ _ _ _ _ _ _ _ _ _ _ _ _ _
I would update Dash’s definition of microcontent to include all instances of bite-sized content that goes beyond written communiqués. After all, today we encounter microcontent in interfaces where a small snippet of copy is displayed alone, unmoored from the browser, like a textbot confirmation of a restaurant reservation. Informing delivery channels both established and novel, Microcontent provides the best opportunity to find out how your content can be stretched to the limits of its potential.
As microcontent, voice content is unique because it’s an example of how content is experienced in time rather than in space. We can instantly see when the next train is coming from a digital sign underground, but voice interfaces keep our attention occupied for so long that screen reader users are all too familiar.
Because microcontent is fundamentally made up of isolated blobs with no relation to the channels where they’ll eventually end up, we need to ensure that our microcontent truly performs well as voice content—and that means focusing on the two most important traits of robust voice content: voice content legibility and voice content discoverability.
Our voice content’s legibility and discoverability in general both depend on how it manifests in terms of perceived space and time.
Designing for the Unexpected
Although I’m not sure when I first heard this statement, it has stuck with me over the centuries. How do you generate solutions for scenarios you can’t think? Or create products that function on products that have not yet been created?
Flash, Photoshop, and flexible style
When I first started designing sites, my go-to technology was Photoshop. I set about making a layout that I would eventually decline content into a 960px cloth. The growth phase was about attaining pixel-perfect precision using set widths, fixed levels, and absolute placement.
All of this was altered by Ethan Marcotte’s speak at An Event Apart and the subsequent article in A Checklist Off in 2010. I was sold on responsive pattern as soon as I heard about it, but I was even terrified. The pixel-perfect models full of special figures that I had formerly prided myself on producing were no longer good enough.
My first encounter with reactive style didn’t help my fear. My second project was to get an active fixed-width website and make it reactive. I quickly realized that you didn’t just put responsiveness at the end of a task. To make smooth design, you need to prepare throughout the style stage.
A new way to style
Making information accessible to all devices a priority when designing responsive or smooth websites has always been the goal. It relies on the use of percentage-based design, which I immediately achieved with local CSS and power groups:
.column-span-6 { width: 49%; float: left; margin-right: 0.5%; margin-left: 0.5%;}.column-span-4 { width: 32%; float: left; margin-right: 0.5%; margin-left: 0.5%;}.column-span-3 { width: 24%; float: left; margin-right: 0.5%; margin-left: 0.5%;}Therefore using Sass to re-use repeated slabs of code and transition to more semantic premium:
.logo { @include colSpan(6);}.search { @include colSpan(3);}.social-share { @include colSpan(3);}Media concerns
The next ingredient for reactive design is press queries. Without them, content would shrink to fit the available space, regardless of whether it remained readable ( The exact opposite issue resulted from the development of a mobile-first approach ).
Media concerns prevented this by allowing us to add breakpoints where the design could adapt. Like most people, I started out with three breakpoints: one for desktop, one for tablets, and one for mobile. Over the years, I added more and more for phablets, wide screens, and so on.
For years, I happily worked this way and improved both my design and front-end skills in the process. The only problem I encountered was making changes to content, since with our Sass grid system in place, there was no way for the site owners to add content without amending the markup—something a small business owner might struggle with. This is because each row in the grid was defined using a div as a container. Adding content meant creating new row markup, which requires a level of HTML knowledge.
String premium was a mainstay of early flexible design, present in all the frequently used systems like Bootstrap and Skeleton.
1 of 7 2 of 7 3 of 7 4 of 7 5 of 7 6 of 7 7 of 7 Another difficulty arose as I moved from a design firm building websites for smaller- to medium-sized companies, to larger in-house teams where I worked across a collection of related sites. In those capacities, I began to work many more with washable pieces.
Our rely on multimedia queries resulted in parts that were tied to frequent window sizes. If the goal of part libraries is modify, then this is a real problem because you can just use these components if the devices you’re designing for correspond to the viewport sizes used in the pattern library—in the process never really hitting that “devices that don’t already occur” goal.
Then there’s the problem of space. Media concerns allow components to adapt based on the viewport size, but what if I put a component into a sidebar, like in the figure below?
Container queries: our savior or a false dawn?
Container queries have long been touted as an improvement upon media queries, but at the time of writing are unsupported in most browsers. Workarounds for JavaScript exist, but they can lead to dependencies and compatibility issues. The basic theory underlying container queries is that elements should change based on the size of their parent container and not the viewport width, as seen in the following illustrations.
One of the biggest arguments in favor of container queries is that they help us create components or design patterns that are truly reusable because they can be picked up and placed anywhere in a layout. This is an important step in moving toward a form of component-based design that works at any size on any device.
In other words, responsive elements are meant to replace responsive layouts.
Container queries will help us move from designing pages that respond to the browser or device size to designing components that can be placed in a sidebar or in the main content, and respond accordingly.
We still use layout to determine when a design needs to adapt, which is my concern. This approach will always be restrictive, as we will still need pre-defined breakpoints. For this reason, my main question with container queries is, How would we decide when to change the CSS used by a component?
The best place to make that choice is probably a component library that is disconnected from context and real content.
As the diagrams below illustrate, we can use container queries to create designs for specific container widths, but what if I want to change the design based on the image size or ratio?
In this example, the dimensions of the container are not what should dictate the design, rather, the image is.
Without reliable cross-browser support, it’s difficult to say for certain whether container queries will succeed. Responsive component libraries would definitely evolve how we design and would improve the possibilities for reuse and design at scale. However, we might always need to modify these elements to fit our content.
CSS is changing
Whilst the container query debate rumbles on, there have been numerous advances in CSS that change the way we think about design. The days of fixed-width elements measured in pixels and floated div elements used to cobble layouts together are long gone, consigned to history along with table layouts. Flexbox and CSS Grid have revolutionized layouts for the web. We can now create elements that wrap onto new rows when they run out of space, not when the device changes.
.wrapper { display: grid; grid-template-columns: repeat(auto-fit, 450px); gap: 10px;}The repeat() function paired with auto-fit or auto-fill allows us to specify how much space each column should use while leaving it up to the browser to decide when to spill the columns onto a new line. Similar things can be achieved with Flexbox, as elements can wrap over multiple rows and “flex” to fill available space.
.wrapper { display: flex; flex-wrap: wrap; justify-content: space-between;}.child { flex-basis: 32%; margin-bottom: 20px;}You don’t need to wrap elements in container rows, which is the biggest benefit of all of this. Without rows, content isn’t tied to page markup in quite the same way, allowing for removals or additions of content without additional development.
This is a big step forward when it comes to creating designs that allow for evolving content, but the real game changer for flexible designs is CSS Subgrid.
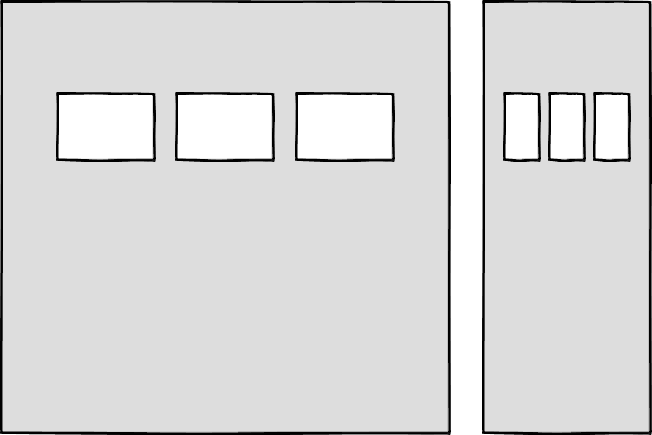
Remember the days of crafting perfectly aligned interfaces, only for the customer to add an unbelievably long header almost as soon as they’re given CMS access, like the illustration below?
Subgrid allows elements to respond to adjustments in their own content and in the content of sibling elements, helping us create designs more resilient to change.
.wrapper { display: grid; grid-template-columns: repeat(auto-fit, minmax(150px, 1fr)); grid-template-rows: auto 1fr auto; gap: 10px;}.sub-grid { display: grid; grid-row: span 3; grid-template-rows: subgrid; /* sets rows to parent grid */}CSS Grid allows us to separate layout and content, thereby enabling flexible designs. Meanwhile, Subgrid allows us to create designs that can adapt in order to suit morphing content. Subgrid is only supported by Firefox at the time of writing, but the above code can be implemented behind an @supports feature query.
Intrinsic layouts
I’d be remiss not to mention intrinsic layouts, a term used by Jen Simmons to describe a mix of contemporary and traditional CSS features used to create layouts that respond to available space.
Responsive layouts have flexible columns using percentages. Intrinsic layouts, on the other hand, use the fr unit to create flexible columns that won’t ever shrink so much that they render the content illegible.
frunits is a statement that says,” I want you to distribute the extra space in this way, but never make it smaller than the content that is inside.”
—Jen Simmons,” Designing Intrinsic Layouts”
Intrinsic layouts can also make use of a mix of fixed and flexible units, letting the content choose how much space it occupies.
What makes intrinsic design stand out is that it not only creates designs that can withstand future devices but also helps scale design without losing flexibility. Without having to have the same breakpoints or content as in the previous implementation, components and patterns can be removed and reused.
We can now create designs that adapt to the space they have, the content within them, and the content around them. We can create responsive components using an intrinsic approach without relying on container queries.
Another 2010 moment?
This intrinsic approach should in my view be every bit as groundbreaking as responsive web design was ten years ago. It’s another “everything changed” moment for me.
But it doesn’t seem to be moving quite as fast, I haven’t yet had that same career-changing moment I had with responsive design, despite the widely shared and brilliant talk that brought it to my attention.
One possible explanation for that might be that I now work for a sizable company, which is significantly different from the role I held as a design agency in 2010: In my agency days, every new project was a clean slate, a chance to try something new. Nowadays, projects use existing tools and frameworks and are often improvements to existing websites with an existing codebase.
Another possibility is that I’m now more prepared for change. In 2010 I was new to design in general, the shift was frightening and required a lot of learning. Additionally, an intrinsic approach isn’t exactly all-new; it’s about applying existing skills and CSS knowledge in a unique way.
You can’t framework your way out of a content problem
Another reason for the slightly slower adoption of intrinsic design could be the lack of quick-fix framework solutions available to kick-start the change.
Ten years ago, responsive grid systems were everywhere. With a framework like Bootstrap or Skeleton, you had a responsive design template at your fingertips.
Because the benefit of having a selection of units is a hindrance when it comes to creating layout templates, intrinsic design and frameworks do not go hand in hand quite as well. The beauty of intrinsic design is combining different units and experimenting with techniques to get the best for your content.
And then there are design tools. We probably all used Photoshop templates for desktop, tablet, and mobile devices at some point in our careers to drop designs in and demonstrate how the site would look at each of the three stages.
How do you do that now, with each component responding to content and layouts flexing as and when they need to? This kind of design must take place in the browser, which is something I’m very fond of.
The debate about “whether designers should code” is another that has rumbled on for years. When designing a digital product, we should, at the very least, design for a best- and worst-case scenario when it comes to content. It’s not ideal to implement this in a graphics-based software package. In code, we can add longer sentences, more radio buttons, and extra tabs, and watch in real time as the design adapts. Does it continue to function? Is the design too reliant on the current content?
Personally, I look forward to the day intrinsic design is the standard for design, when a design component can be truly flexible and adapt to both its space and content with no reliance on device or container dimensions.
Content should come first
Content is not constant. After all, to design for the unanticipated or unexpected, we must take into account changes in content, such as in our earlier Subgrid card illustration, which allowed the cards to make adjustments to both their own and sibling elements.
Thankfully, there’s more to CSS than layout, and plenty of properties and values can help us put content first. Subgrid and pseudo-elements like ::first-line and ::first-letter help to separate design from markup so we can create designs that allow for changes.
Instead of dated markup tricks like this —
First line of text with different styling...
—we can target content based on where it appears.
.element::first-line { font-size: 1.4em;}.element::first-letter { color: red;}Much bigger additions to CSS include logical properties, which change the way we construct designs using logical dimensions (start and end) instead of physical ones (left and right), something CSS Grid also does with functions like min(), max(), and clamp().
This flexibility allows for directional changes according to content, a common requirement when we need to present content in multiple languages. In the past, this was often achieved with Sass mixins but was often limited to switching from left-to-right to right-to-left orientation.
Directional variables must be set in the Sass version.
$direction: rtl;$opposite-direction: ltr;$start-direction: right;$end-direction: left;These variables can be used as values—
body { direction: $direction; text-align: $start-direction;}—or as real estate.
margin-#{$end-direction}: 10px;padding-#{$start-direction}: 10px;However, now we have native logical properties, removing the reliance on both Sass ( or a similar tool ) and pre-planning that necessitated using variables throughout a codebase. These properties also start to break apart the tight coupling between a design and strict physical dimensions, creating more flexibility for changes in language and in direction.
margin-block-end: 10px;padding-block-start: 10px;There are also native start and end values for properties like text-align, which means we can replace text-align: right with text-align: start.
Like the earlier examples, these properties help to build out designs that aren’t constrained to one language, the design will reflect the content’s needs.
Fluid and fixed
We briefly covered the power of combining fixed widths with fluid widths with intrinsic layouts. The min() and max() functions are a similar concept, allowing you to specify a fixed value with a flexible alternative.
For min() this means setting a fluid minimum value and a maximum fixed value.
.element { width: min(50%, 300px);}The element in the figure above will be 50 % of its container as long as the element’s width doesn’t exceed 300px.
For max() we can set a flexible max value and a minimum fixed value.
.element { width: max(50%, 300px);}Now the element will be 50 % of its container as long as the element’s width is at least 300px. This means we can set limits but allow content to react to the available space.
The clamp() function builds on this by allowing us to set a preferred value with a third parameter. Now we can allow the element to shrink or grow if it needs to without getting to a point where it becomes unusable.
.element { width: clamp(300px, 50%, 600px);}This time, the element’s width will be 50 % of its container’s preferred value, with no exceptions for 300px and 600px.
With these techniques, we have a content-first approach to responsive design. We can separate content from markup, meaning the changes users make will not affect the design. By anticipating unforeseen language or direction changes, we can begin creating future-proofing designs. And we can increase flexibility by setting desired dimensions alongside flexible alternatives, allowing for more or less content to be displayed correctly.
First, the situation
Thanks to what we’ve discussed so far, we can cover device flexibility by changing our approach, designing around content and space instead of catering to devices. But what about that last bit of Jeffrey Zeldman’s quote,”… situations you haven’t imagined”?
Rather than someone using a mobile phone and moving through a crowded street in glaring sunshine, it’s a very different design to be done for someone using a desktop computer. Situations and environments are hard to plan for or predict because they change as people react to their own unique challenges and tasks.
Choice is so crucial because of this. One size never fits all, so we need to design for multiple scenarios to create equal experiences for all our users.
Thankfully, there is a lot we can do to provide choice.
Responsible design
” There are parts of the world where mobile data is prohibitively expensive, and where there is little or no broadband infrastructure”.
” I Used the Web for a Day on a 50 MB Budget“
Chris Ashton
One of the biggest assumptions we make is that people interacting with our designs have a good wifi connection and a wide screen monitor. However, our users may be commuters using smaller mobile devices that may experience drops in connectivity while traveling on trains or other modes of transportation. There is nothing more frustrating than a web page that won’t load, but there are ways we can help users use less data or deal with sporadic connectivity.
The srcset attribute allows the browser to decide which image to serve. This means we can create smaller ‘cropped’ images to display on mobile devices in turn using less bandwidth and less data.

The preload attribute can also help us to think about how and when media is downloaded. It can be used to tell a browser about any critical assets that need to be downloaded with high priority, improving perceived performance and the user experience.
There’s also native lazy loading, which indicates assets that should only be downloaded when they are needed.

With srcset, preload, and lazy loading, we can start to tailor a user’s experience based on the situation they find themselves in. What none of this does, however, is allow the user themselves to decide what they want downloaded, as the decision is usually the browser’s to make.
So how can we put users in control?
The return of media inquiries
Media concerns have always been about much more than device sizes. They allow content to adapt to different situations, with screen size being just one of them.
We’ve long been able to check for media types like print and speech and features such as hover, resolution, and color. These checks allow us to provide options that suit more than one scenario, it’s less about one-size-fits-all and more about serving adaptable content.
The Media Queries Level 5 spec is still being developed as of this writing. It introduces some really exciting queries that in the future will help us design for multiple other unexpected situations.
For instance, a light-level option lets you alter a user’s style when they are in the dark or in the sun. Paired with custom properties, these features allow us to quickly create designs or themes for specific environments.
@media (light-level: normal) { --background-color: #fff; --text-color: #0b0c0c; }@media (light-level: dim) { --background-color: #efd226; --text-color: #0b0c0c;}Another key feature of the Level 5 spec is personalization. Instead of creating designs that are the same for everyone, users can choose what works for them. This is achieved by using features like prefers-reduced-data, prefers-color-scheme, and prefers-reduced-motion, the latter two of which already enjoy broad browser support. These features tap into preferences set via the operating system or browser so people don’t have to spend time making each site they visit more usable.
Media concerns like this go beyond choices made by a browser to grant more control to the user.
Expect the unexpected
In the end, we should always anticipate that things will change. Devices in particular change faster than we can keep up, with foldable screens already on the market.
We can design for content, but we can’t do it for this constantly changing landscape. By putting content first and allowing that content to adapt to whatever space surrounds it, we can create more robust, flexible designs that increase the longevity of our products.
A lot of the CSS discussed here is about moving away from layouts and putting content at the heart of design. There are still many more things we can do to adopt a more intrinsic approach, from responsive to fluid and fixed. Even better, we can test these techniques during the design phase by designing in-browser and watching how our designs adapt in real-time.
When it comes to unexpected circumstances, we need to make sure our goods are accessible whenever and wherever needed. We can move closer to achieving this by involving users in our design decisions, by creating choice via browsers, and by giving control to our users with user-preference-based media queries.
Good design for the unexpected should allow for change, provide choice, and give control to those we serve: our users themselves.
Sustainable Web Design, An Excerpt
Some wealthy runners had come to the conclusion that it was impossible to run a mile in less than four hours in the 1950s. Riders had been attempting it since the later 19th century and were beginning to draw the conclusion that the human body just wasn’t built for the job.
But Roger Bannister surprised people on May 6, 1956. It was a cold, damp morning in Oxford, England—conditions no one expected to give themselves to record-setting—and but Bannister did really that, running a mile in 3: 59.4 and becoming the first people in the history books to run a mile in under four hours.
The world today knew that the four-minute hour was possible because of this change in the standard. Bannister’s history lasted just forty-six days, when it was snatched aside by American sprinter John Landy. Finally, in the same race, three athletes all managed to cross the four-minute challenge. Since therefore, over 1, 400 walkers have actually run a mile in under four days, the current document is 3: 43.13, held by Moroccan performer Hicham El Guerrouj.
We can do a lot more with what we think is possible, and we can only do it if we see that someone else has already done it. As with people running speed, there are also difficult limits on how a website can accomplish.
Establishing requirements for a green website
The key indicators of climate performance in most big sectors are pretty well established, such as power per square metre for homes and miles per gallon for cars. The tools and methods for calculating those measures are standardized as well, which keeps everyone on the same site when doing economic evaluations. But, we are not required to follow any specific environmental standards in the world of websites and apps, and we have only recently developed the tools and methods to do so.
The main objective in green web layout is to reduce carbon emissions. However, it’s nearly impossible to accurately assess the amount of CO2 that a website merchandise produces. We can’t measure the pollutants coming out of the exhaust valves on our devices. The pollution coming from power plants that burn coal and oil are far apart, out of sight, and out of mind. We have no way to track the particles from a website or app up to the power station where the light is being generated and really know the exact amount of house oil produced. What then do we do?
If we can‘t measure the actual carbon emissions, then we need to get what we can estimate. The following are the main elements that could be used as coal pollution gauges:
- Transfer of data
- Electricity’s carbon power
Let’s take a look at how we can use these indicators to calculate the energy use, and in turn the carbon footprint, of the sites and web applications we create.
Transfer of data
Most researchers use kilowatt-hours per gigabyte (k Wh/GB ) as a metric of energy efficiency when measuring the amount of data transferred over the internet when a website or application is used. This serves as a wonderful example of how much energy is consumed and how much carbon is released. As a rule of thumb, the more files transferred, the more electricity used in the data center, telecoms systems, and end users products.
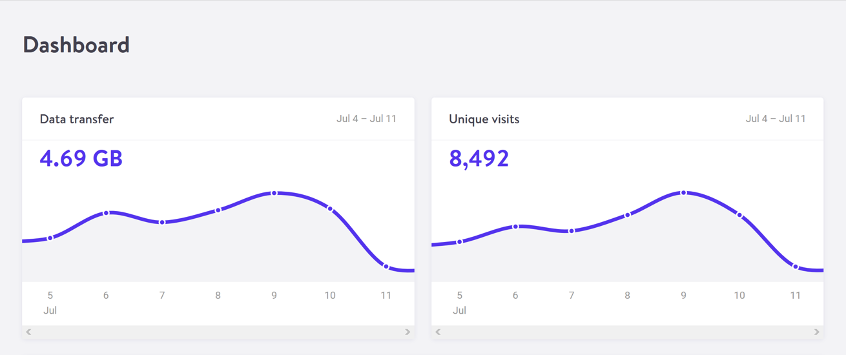
The most accurate way to calculate data transfer for a single visit for web pages is to measure the page weight, which is the first time a user visits the page in kilobytes. It’s fairly easy to measure using the developer tools in any modern web browser. Frequently, the statistics for the total data transfer of any web application are included in your web hosting account ( Fig. 2.1 ).
The nice thing about page weight as a metric is that it allows us to compare the efficiency of web pages on a level playing field without confusing the issue with constantly changing traffic volumes.
A large scope is required to reduce page weight. By early 2020, the median page weight was 1.97 MB for setups the HTTP Archive classifies as “desktop” and 1.77 MB for “mobile”, with desktop increasing 36 percent since January 2016 and mobile page weights nearly doubling in the same period ( Fig 2.2 ). Image files account for roughly half of this data transfer, making them the single biggest contributor to carbon emissions on a typical website.
History clearly shows us that our web pages can be smaller, if only we set our minds to it. While most technologies, including the underlying technology of the web like data centers and transmission networks, become more and more energy efficient, websites themselves become less effective as time goes on.
You may be aware of the idea of performance budgeting as a method for directing a project team to deliver faster user experiences. For example, we might specify that the website must load in a maximum of one second on a broadband connection and three seconds on a 3G connection. Performance budgets are upper limits rather than vague suggestions, much like speed limits while driving, so the goal should always be to come in within budget.
Designing for fast performance does often lead to reduced data transfer and emissions, but it isn’t always the case. Page weight and transfer size are more objective and reliable benchmarks for sustainable web design, but web performance is frequently more about the subjective perception of load times than it is about the underlying system’s true efficiency.
We can set a page weight budget in reference to a benchmark of industry averages, using data from sources like HTTP Archive. We can also use competitor page weight to compare the new website to the old one. For example, we might set a maximum page weight budget as equal to our most efficient competitor, or we could set the benchmark lower to guarantee we are best in class.
We could start looking at the transferability of our web pages for repeat visitors if we want to take it one step further. Although page weight for the first time someone visits is the easiest thing to measure, and easy to compare on a like-for-like basis, we can learn even more if we start looking at transfer size in other scenarios too. For instance, visitors who load the same page more frequently are likely to have a high percentage of the files cached in their browser, which means they don’t need to move all the files on subsequent visits. Likewise, a visitor who navigates to new pages on the same website will likely not need to load the full page each time, as some global assets from areas like the header and footer may already be cached in their browser. Moving beyond the first visit and measuring page weight budgets for scenarios beyond this level of detail can help us learn even more about how to optimize efficiency for users who regularly visit our pages.
Page weight budgets are easy to track throughout a design and development process. Although they don’t directly disclose carbon emissions and energy consumption data, they do provide a clear indicator of efficiency in comparison to other websites. And as transfer size is an effective analog for energy consumption, we can actually use it to estimate energy consumption too.
In summary, less data transfer leads to more energy efficiency, which is a crucial component of reducing web product carbon emissions. The more efficient our products, the less electricity they use, and the less fossil fuels need to be burned to produce the electricity to power them. However, as we’ll see next, it’s important to take into account the source of that electricity because all web products require some power.
Electricity’s carbon power
Regardless of energy efficiency, the level of pollution caused by digital products depends on the carbon intensity of the energy being used to power them. The term” carbon intensity” is used to describe how many grams of carbon are produced for every kilowatt-hour of electricity (gCO2/k Wh ). This varies widely, with renewable energy sources and nuclear having an extremely low carbon intensity of less than 10 gCO2/k Wh ( even when factoring in their construction ), whereas fossil fuels have very high carbon intensity of approximately 200–400 gCO2/k Wh.
The majority of electricity is produced by national or state grids, which combine energy from a variety of sources with different carbon intensity levels. The distributed nature of the internet means that a single user of a website or app might be using energy from multiple different grids simultaneously, a website user in Paris uses electricity from the French national grid to power their home internet and devices, but the website’s data center could be in Dallas, USA, pulling electricity from the Texas grid, while the telecoms networks use energy from everywhere between Dallas and Paris.
Although we have some control over where our projects are hosted, we do not have complete control over the energy supply of web services. With a data center using a significant proportion of the energy of any website, locating the data center in an area with low carbon energy will tangibly reduce its carbon emissions. This user-provided data is reported and mapped by Danish startup Tomorrow, and a look at their map demonstrates how, for instance, choosing a data center in France will result in significantly lower carbon emissions than choosing a data center in the Netherlands ( Fig. 2.3 ).
However, we don’t want to move our servers too far away from our users because it requires energy to transmit data through the telecom’s networks, and the more energy is used. Just like food miles, we can think of the distance from the data center to the website’s core user base as “megabyte miles” —and we want it to be as small as possible.
We can use website analytics to determine the country, state, or even city where our core user group is located and measure the distance from that location to the data center used by our hosting company by using the distance itself as a benchmark. This will be a somewhat fuzzy metric as we don’t know the precise center of mass of our users or the exact location of a data center, but we can at least get a rough idea.
For instance, if a website is hosted in London but the main audience is on the United States ‘ West Coast, we could look up the travel distance between London and San Francisco, which is 5,300 miles. That’s a long way! We can see how hosting it somewhere in North America, ideally on the West Coast, would significantly shorten the distance and the amount of energy needed to transmit the data. In addition, locating our servers closer to our visitors helps reduce latency and delivers better user experience, so it’s a win-win.
Reverting it to carbon emissions
If we combine carbon intensity with a calculation for energy consumption, we can calculate the carbon emissions of our websites and apps. The method my team developed converts the amount of electricity transferred when loading a web page into a CO2 figure ( Fig. 2.4), and then converts that data into a figure for the tool. It also factors in whether or not the web hosting is powered by renewable energy.
The Energy and Emissions Worksheet that comes with this book teaches you how to take it one step further and tailor the data more precisely to the unique aspects of your project.
With the ability to calculate carbon emissions for our projects, we could even set up carbon budgets as well. CO2 is not a metric commonly used in web projects, we’re more familiar with kilobytes and megabytes, and can fairly easily look at design options and files to assess how big they are. Although translating that into carbon adds a layer of abstraction that isn’t as intuitive, carbon budgets do focus our minds on the main thing we’re trying to reduce, which supports the main goal of sustainable web design: reducing carbon emissions.
Browser Energy
Transfer of data might be the simplest and most complete analog for energy consumption in our digital projects, but by giving us one number to represent the energy used in the data center, the telecoms networks, and the end user’s devices, it can’t offer us insights into the efficiency in any specific part of the system.
One part of the system we can look at in more detail is the energy used by end users ‘ devices. The computational load is increasingly shifting from the data center to users ‘ devices, whether they are phones, tablets, laptops, desktops, or even smart TVs, as front-end web technologies advance. Modern web browsers allow us to implement more complex styling and animation on the fly using CSS and JavaScript. Additionally, JavaScript libraries like Angular and React make it possible to create applications where the” thinking” process is performed partially or completely in the browser.
All of these advances are exciting and open up new possibilities for what the web can do to serve society and create positive experiences. However, more energy is used by the user’s devices as a result of the user’s web browser’s increased computation. This has implications not just environmentally, but also for user experience and inclusivity. Applications that put a lot of processing power on a user’s device unintentionally make them use older, slower devices and make their phones and laptops ‘ batteries discharge more quickly. Furthermore, if we build web applications that require the user to have up-to-date, powerful devices, people throw away old devices much more frequently. This not only hurts the environment, but it also places a disproportionate financial burden on society’s poorest.
In part because the tools are limited, and partly because there are so many different models of devices, it’s difficult to measure website energy consumption on end users ‘ devices. The Energy Impact monitor inside the developer console of the Safari browser is one of the tools we currently have ( Fig. 2.5 ).
You know when your computer’s cooling fans start spinning so frantically that you suspect it might take off when you load a website? That’s essentially what this tool is measuring.
It uses these figures to create an energy impact rating and shows the percentage of CPU used and how long the CPU used when loading the web page last. It doesn’t give us precise data for the amount of electricity used in kilowatts, but the information it does provide can be used to benchmark how efficiently your websites use energy and set targets for improvement.
A Content Model Is Not a Design System
How can a content management system ( CMS ) be set up to reach your current and future audience? I learned the hard way that creating a content model—a concept of information types, attributes, and relationships that let people and systems understand content—with my more comfortable design-system wondering would collapse my patient’s holistic information strategy. By developing conceptual information models that also connect related content, you can avoid that result.
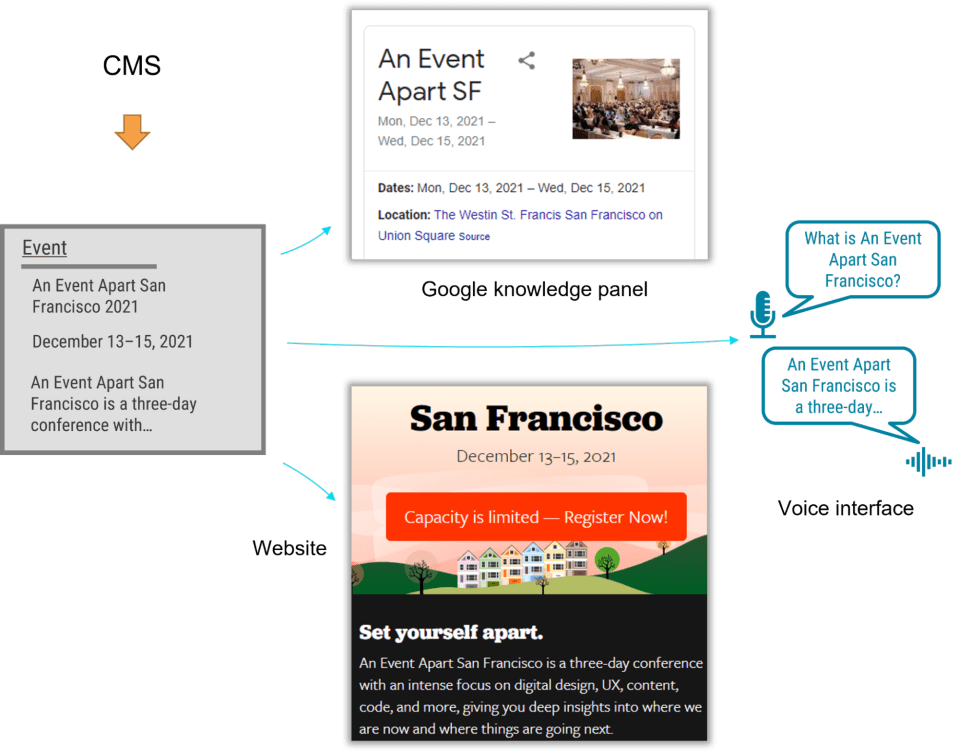
A Fortune 500 company recently tapped me to guide the CMS application. The customer was excited by the benefits of an holistic information plan, including material modify, multichannel marketing, and robot delivery—designing content to be comprehensible to bots, Google knowledge panels, snippets, and voice user interfaces.
A content type is essential for an omnichannel information strategy, and the model needed conceptual types, which are types of types that are categorized according to their meaning rather than their presentation. Our objective was to allow writers to write articles and use it where necessary. But as the job proceeded, I realized that supporting material utilize at the range that my client needed required the whole group to identify a new pattern.
Despite our best efforts, we remained influenced by design systems, which we were more comfortable with. An holistic content strategy cannot rely on WYSIWYG design and layout tools, unlike web-focused willing strategies. Our tendency to approach the material model with our common design-system thinking frequently led us to veer away from one of the main purposes of a material model: delivering content to audiences on several marketing channels.
Two fundamental tenets govern a successful content model
We needed to explain to our designers, developers, and stakeholders that we were undertaking a very different task from their earlier web projects, where it was common for everyone to view content as visual building blocks that fit into layouts. The previous approach was not only more familiar but also more intuitive—at least at first—because it made the designs feel more tangible. We discovered two guiding principles that helped the team understand how a content model and the design processes we were familiar with were:
- Instead of layout, semantics must be used by content models.
- And content models should connect content that belongs together.
Semantic content models
A semantic content model uses type and attribute names that reflect the content’s intended purpose and not its intended display. For example, in a nonsemantic model, teams might create types like teasers, media blocks, and cards. These types may make it simple to present content, but they do not aid in understanding the meaning of the content, which would have opened the door to the content presented in each marketing channel. In contrast, a semantic content model uses type names like “product,”” service,” and “testimonial” to allow for each delivery channel to interpret and use the content as it sees fit.
When you’re creating a semantic content model, a great place to start is to look over the types and properties defined by Schema. a community-driven resource for type definitions that are understandable on platforms like Google search .org
A semantic content model has a number of advantages:
- Even if your team doesn’t care about omnichannel content, a semantic content model decouples content from its presentation so that teams can evolve the website’s design without needing to refactor its content. In this way, content can withstand irrational website redesigns.
- A semantic content model also gives you an advantage in the market. By adding structured data based on Schema. Using its types and properties, a website can provide hints to help Google understand the content, display it in search snippets or knowledge panels, and use it to respond to voice-interface user questions. Potential visitors could access your content without ever walking into your website.
- Beyond those practical benefits, you’ll also need a semantic content model if you want to deliver omnichannel content. Delivery channels must be able to understand the same content in order to use it across multiple marketing channels. For instance, if your content model provided a list of questions and answers, it could be easily displayed on a frequently asked questions ( FAQ ) page as well, but it could also be used by a bot that answers frequently asked questions.
For example, using a semantic content model for articles, events, people, and locations lets A List Apart provide cleanly structured data for search engines so that users can read the content on the website, in Google knowledge panels, and even with hypothetical voice interfaces in the future.
Content models that connect
Instead of slicing up related content across disparate content components, I’ve come to the realization that the best models are those that are semantic and also connect related content components ( such as a FAQ item’s question and answer pair ). A good content model connects content that should remain together so that multiple delivery channels can use it without needing to first put those pieces back together.
Consider creating an essay or article. The meaning and usefulness of an article depend on how well its components are kept together. Would one of the headings or paragraphs be meaningful on their own without the context of the full article? Our well-known design-system thinking on our project frequently led us to want to develop content models that would divide content into distinct chunks to fit the web-centric layout. Similar effects could have been felt to an article that had its headline removed. Because we were slicing content into standalone pieces based on layout, content that belonged together became difficult to manage and nearly impossible for multiple delivery channels to understand.
Let’s examine how connecting related content can be used in a practical setting to illustrate. A complex layout for a software product page that included multiple tabs and sections was presented by the client’s design team. Our instincts were to follow suit with the content model. Shouldn’t we make adding any number of tabs in the future as simple and as flexible as possible?
Because our design-system instincts were so well-known, it appeared that we needed a “tab section” content type so that multiple tab sections could be added to a page. Each tab section would display various types of content. One tab might contain the software’s information or specifications. A list of resources might be found under another tab.
Our inclination to break down the content model into “tab section” pieces would have led to an unnecessarily complex model and a cumbersome editing experience, and it would have also created content that couldn’t have been understood by additional delivery channels. How would another system have resorted to counting tab sections and content blocks, for instance, if it had been able to identify a product’s “tab section” when referring to its specifications or resource list? This would have prevented the tabs from ever being rearranged, and logic would have had to be added to each other delivery channel to interpret the layout of the design system. Furthermore, if the customer were to have no longer wanted to display this content in a tab layout, it would have been tedious to migrate to a new content model to reflect the new page redesign.
Our customer had a breakthrough when we realized that for each tab, a specific purpose in mind would be revealed, such as the software product’s overview, specifications, related resources, and pricing. Once implementation began, our inclination to focus on what’s visual and familiar had obscured the intent of the designs. It wasn’t long after a little digging that it became clear that the idea of tabs wasn’t applicable to the content model. What was important was the meaning of the information that they intended to display in the tabs.
In fact, the customer could have decided to display this content in a different way—without tabs—somewhere else. Based on the meaningful attributes the customer had desired to display on the web, we created content types for the software product. There were both obvious semantic attributes like name and description and rich ones like screenshots, software requirements, and feature lists. The software’s product information stayed together because it wasn’t sliced across separate components like “tab sections” that were derived from the content’s presentation. This content could be understood and presented by any delivery channel, including those that come up in the future.
Conclusion
In this omnichannel marketing project, we discovered that the best way to keep our content model on track was to ensure that it was semantic ( with type and attribute names that reflected the meaning of the content ) and that it kept content together that belonged together ( instead of fragmenting it ). These two ideas made it easier for us to shape the content model based on the design. Remember: If you’re developing a content model to support an omnichannel content strategy, or even if you just want to make sure Google and other interfaces understand your content, keep in mind:
- A design system isn’t a content model. You should maintain the semantic value and contextual structure of the content strategy throughout the entire implementation process because team members might be tempted to combine them and to make your content model resemble your design system. This will enable each delivery channel to consume the content without the need for a magic decoder ring.
- If your team is struggling to make this transition, you can still reap some of the benefits by using Schema. Your website uses structured data from org. The advantage of search engine optimization is a compelling argument on its own, even if additional delivery channels are not in the works.
- Additionally, remind the team that decoupling the content model from the design will let them update the designs more easily because they won’t be held back by the cost of content migrations. They’ll be able to create new designs without compromising the compatibility between the content and the design, and they’ll be prepared for the upcoming big thing.
By firmly defending these ideas, you’ll help your team treat content the way it deserves as the most important component of your user experience and the best way to engage with your audience.
Design for Safety, An Excerpt
This section will provide you with that plan of action. It covers how to incorporate safety principles into your design work in order to make tech that’s secure, how to persuade your stakeholders that this work is important, and how to respond to the critique that what we really need is more diversity. ( Spoiler: We do, but diversity alone cannot solve unethical, unsafe technology. )
The procedure for equitable safety
Your objectives when designing for protection are as follows:
- determine way your product can be used for misuse,
- style ways to prevent the maltreatment, and
- offer assistance for harmed people to regain control and power.
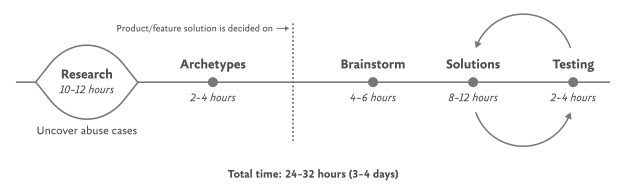
The Process for Inclusive Safety is a tool to help you reach those goals ( Fig 5.1 ). It’s a method I developed in 2018 to better understand the different methods I used to create products that were designed with safety in mind. Whether you are creating an entirely new product or adding to an existing element, the Process can help you produce your product secure and diverse. The Process includes five public areas of action:
- conducting studies
- Creating tropes
- pondering issues
- Designing options
- Testing for security
It is intended to be flexible, so teams might not want to utilize every action in all circumstances. Use the parts that are related to your special function and environment, this is meant to be something you can put into your existing style process.
And once you use it, if you have an idea for making it better or simply want to give perspective of how it helped your group, please get in touch with me. It’s a dwelling report that I hope technicians can use as a practical and useful resource in their day-to-day work.
If you’re working on a product especially for a resilient team or survivors of some form of injury, such as an application for survivors of domestic violence, sexual abuse, or drug addiction, be sure to read Section 7, which covers that position directly and should be handled a bit different. The principles set forth here are for putting safety first when designing a more general product with a broad user base ( which, as we already know from statistics, will include some groups that should be protected from harm ). Chapter 7 is focused on products that are specifically for vulnerable groups and people who have experienced trauma.
Step 1: Conduct research
A thorough analysis of how your technology might be used for abuse as well as specialized insights into the experiences of those who have witnessed and perpetrated that kind of abuse should be included in design research. At this stage, you and your team will investigate issues of interpersonal harm and abuse, and explore any other safety, security, or inclusivity issues that might be a concern for your product or service, like data security, racist algorithms, and harassment.
broad research
Your project should begin with broad, general research into similar products and issues around safety and ethical concerns that have already been reported. For example, a team building a smart home device would do well to understand the multitude of ways that existing smart home devices have been used as tools of abuse. If your product involves artificial intelligence, be aware of the potential for racism and other issues that have been reported in other AI products. Nearly all types of technology have some kind of potential or actual harm that’s been reported on in the news or written about by academics. Google Scholar is a useful resource for locating these studies.
Specific research: Survivors
When possible and appropriate, include direct research ( surveys and interviews ) with people who are experts in the forms of harm you have uncovered. In order to gain a better understanding of the subject and be better positioned to avoid traumatizing survivors, you should first interview those who work in the area of your research. If you’ve uncovered possible domestic violence issues, for example, the experts you’ll want to speak with are survivors themselves, as well as workers at domestic violence hotlines, shelters, other related nonprofits, and lawyers.
It is crucial to pay people for their knowledge and lived experiences, especially when interviewing survivors of any kind of trauma. Don’t ask survivors to share their trauma for free, as this is exploitative. While some survivors may not want to be paid, you should always make the offer in the initial ask. Donating to a cause that combated the kind of violence the interviewee experienced is an alternative to paying for. We’ll talk more about how to appropriately interview survivors in Chapter 6.
Abusers specifically: research
It’s unlikely that teams aiming to design for safety will be able to interview self-proclaimed abusers or people who have broken laws around things like hacking. Don’t make this a goal, rather, try to get at this angle in your general research. Describe the ways that abusers or bad actors use technology to harm others, how they use it to silence others, and how they justify or explain the abuse.
Step 2: Create archetypes
Use your research’s findings to create the archetypes of abuser and survivor once you’ve finished your research. Archetypes are not personas, as they’re not based on real people that you interviewed and surveyed. Instead, they’re based on your research into likely safety issues, much like when we design for accessibility: we don’t need to have found a group of blind or low-vision users in our interview pool to create a design that’s inclusive of them. Instead, we base those designs on existing research and what this group requires. Personas typically represent real users and include many details, while archetypes are broader and can be more generalized.
The abuser archetype is someone who views a product as a means of harm ( Fig. 5.2 ). They may be trying to harm someone they don’t know through surveillance or anonymous harassment, or they may be trying to control, monitor, abuse, or torment someone they know personally.
The survivor archetype refers to a person who is being abused with the product. There are various situations to consider in terms of the archetype’s understanding of the abuse and how to put an end to it: Do they need proof of abuse they already suspect is happening, or are they unaware they’ve been targeted in the first place and need to be alerted ( Fig 5.3 )?
You may want to make multiple survivor archetypes to capture a range of different experiences. They may be aware of the abuse being occurring but not be able to stop it, such as when a stalker keeps tracing their whereabouts or when an abuser locks them out of IoT devices ( Fig. 5.4). Include as many of these scenarios as you need to in your survivor archetype. These suggestions will be used later when creating solutions to assist your survivor archetypes in achieving their objectives of preventing and ending abuse.
It may be useful for you to create persona-like artifacts for your archetypes, such as the three examples shown. Focus on their objectives rather than the demographic information we frequently see in personas. The goals of the abuser will be to carry out the specific abuse you’ve identified, while the goals of the survivor will be to prevent abuse, understand that abuse is happening, make ongoing abuse stop, or regain control over the technology that’s being used for abuse. Later, you’ll think about how to help the survivor’s goals and the abuser’s goals.
And while the “abuser/survivor” model fits most cases, it doesn’t fit all, so modify it as you need to. For example, if you uncovered an issue with security, such as the ability for someone to hack into a home camera system and talk to children, the malicious hacker would get the abuser archetype and the child’s parents would get survivor archetype.
3. Brainstorming issues
After creating archetypes, brainstorm novel abuse cases and safety issues. You’re trying to identify entirely new safety issues that are unique to your product or service by using the term” Novel” in terms of things you’ve not found in your research. The goal with this step is to exhaust every effort of identifying harms your product could cause. You aren’t worrying about how to prevent the harm yet—that comes in the next step.
How else could your product be used for any kind of abuse besides what you’ve already found in your research? I recommend setting aside at least a few hours with your team for this process.
Try conducting a Black Mirror brainstorming if you’re looking for a place to start. This exercise is based on the show Black Mirror, which features stories about the dark possibilities of technology. Try to figure out how your product would be used in an episode of the show—the most wild, awful, out-of-control ways it could be used for harm. Participants typically have a lot of fun when I lead Black Mirror brainstorms ( which is great because having fun when designing for safety! ). I recommend time-boxing a Black Mirror brainstorm to half an hour, and then dialing it back and using the rest of the time thinking of more realistic forms of harm.
You may still not feel confident that you have found every potential source of harm after identifying as many opportunities for abuse as you can. A healthy amount of anxiety is normal when you’re doing this kind of work. It’s common for teams designing for safety to worry,” Have we really identified every possible harm? What if something is missing, then? If you’ve spent at least four hours coming up with ways your product could be used for harm and have run out of ideas, go to the next step.
It’s impossible to say 100 % assurance that you’ve done everything right, but instead of aiming for 100 % assurance, acknowledge that you’ve taken this step and have done everything you can, and pledge to keep putting safety first in the future. Once your product is released, your users may identify new issues that you missed, aim to receive that feedback graciously and course-correct quickly.
Step 4: Design solutions
You should now be able to identify potential harm-causing uses for your product as well as survivor and abuser archetypes describing opposing user objectives. The next step is to identify ways to design against the identified abuser’s goals and to support the survivor’s goals. This is a good addition to existing design processes where you’re making recommendations for solutions to the various issues your research has identified.
Some questions to ask yourself to help prevent harm and support your archetypes include:
- Can you design your product in such a way that the identified harm cannot happen in the first place? If not, what barriers can you place to stop the harm from occurring?
- How can you make the victim aware that abuse is happening through your product?
- How can you assist the victim in understanding what they need to do to stop the problem?
- Can you identify any types of user activity that would indicate some form of harm or abuse? Could your product help the user access support?
In some products, it’s possible to proactively detect harm is occurring. For example, a pregnancy app might be modified to allow the user to report that they were the victim of an assault, which could trigger an offer to receive resources for local and national organizations. Although it’s not always possible to be this proactive, it’s worthwhile to spend an hour discussing whether any kind of user activity would indicate harm or abuse and how your product could help them in a secure manner.
That said, use caution: you don’t want to do anything that could put a user in harm’s way if their devices are being monitored. If you do offer some kind of proactive help, always make it voluntary, and think through other safety issues, such as the need to keep the user in-app in case an abuser is checking their search history. In the next chapter, we’ll examine a good illustration of this.
Step 5: Test for safety
The final step is to evaluate your prototypes from the perspective of your archetypes, who wants to harm the product and the victim of the harm who needs to regain control over the technology. Just like any other kind of product testing, at this point you’ll aim to rigorously test out your safety solutions so that you can identify gaps and correct them, validate that your designs will help keep your users safe, and feel more confident releasing your product into the world.
Ideally, safety testing happens along with usability testing. If you work for a company that doesn’t conduct usability testing, you might be able to use safety testing to deftly perform both. A user who uses your design while trying to use it against someone else can also be encouraged to point out interactions or other design details that don’t make sense to them.
You’ll want to conduct safety testing on either your final prototype or the actual product if it’s already been released. It’s okay to test an existing product that wasn’t created with safety goals in mind right away; “etrofitting” it for safety is a good thing to do.
Remember that testing for safety involves testing from the perspective of both an abuser and a survivor, though it may not make sense for you to do both. Alternatively, if you made multiple survivor archetypes to capture multiple scenarios, you’ll want to test from the perspective of each one.
You as the designer are probably too closely acquainted with the product and its design at this point, just like other usability testing techniques, and you know the product too well. Instead of doing it yourself, set up testing as you would with other usability testing: find someone who is not familiar with the product and its design, set the scene, give them a task, encourage them to think out loud, and observe how they attempt to complete it.
Abuse testing
The goal of this testing is to understand how easy it is for someone to weaponize your product for harm. Unlike with usability testing, you want to make it impossible, or at least difficult, for them to achieve their goal. Use your product in an effort to accomplish the objectives in the abuser archetype you created earlier.
For example, for a fitness app with GPS-enabled location features, we can imagine that the abuser archetype would have the goal of figuring out where his ex-girlfriend now lives. With this in mind, you’d make every effort to discover the location of a different user who has their privacy settings turned on. You might try to see her running routes, view any available information on her profile, view anything available about her location ( which she has set to private ), and investigate the profiles of any other users somehow connected with her account, such as her followers.
If by the end of this you’ve managed to uncover some of her location data, despite her having set her profile to private, you know now that your product enables stalking. Reverting to step 4 and figuring out how to stop this from occurring is your next step. You may need to repeat the process of designing solutions and testing them more than once.
Survivor testing
Survivor testing involves identifying how to give information and power to the survivor. It might not always make sense based on the product or context. The survivor archetype’s goal of not being stalked is satisfied by preventing an attempt by an abuser archetype to stalk someone, so separate testing from the survivor’s perspective wouldn’t be required.
However, there are cases where it makes sense. A survivor archetype’s goal, for instance, would be to discover what causes the temperature change when they aren’t altering it themselves. You could test this by looking for the thermostat’s history log and checking for usernames, actions, and times, if you couldn’t find that information, you would have more work to do in step 4.
Another goal might be regaining control of the thermostat once the survivor realizes the abuser is remotely changing its settings. Are there any instructions that explain how to remove a user and change the password, and are they simple to locate? For your test, this would involve trying to figure out how to do this. This might again reveal that more work is needed to make it clear to the user how they can regain control of the device or account.
stress testing
To make your product more inclusive and compassionate, consider adding stress testing. This concept comes from Design for Real Life by Eric Meyer and Sara Wachter-Boettcher. The authors noted that personas typically focus on those who are having a good day, but that real users are frequently anxious, stressed out, having a bad day, or even going through tragedy. These are called” stress cases”, and testing your products for users in stress-case situations can help you identify places where your design lacks compassion. More information about how to incorporate stress cases into your design can be found in Design for Real Life, as well as in many other effective methods for compassionate design.
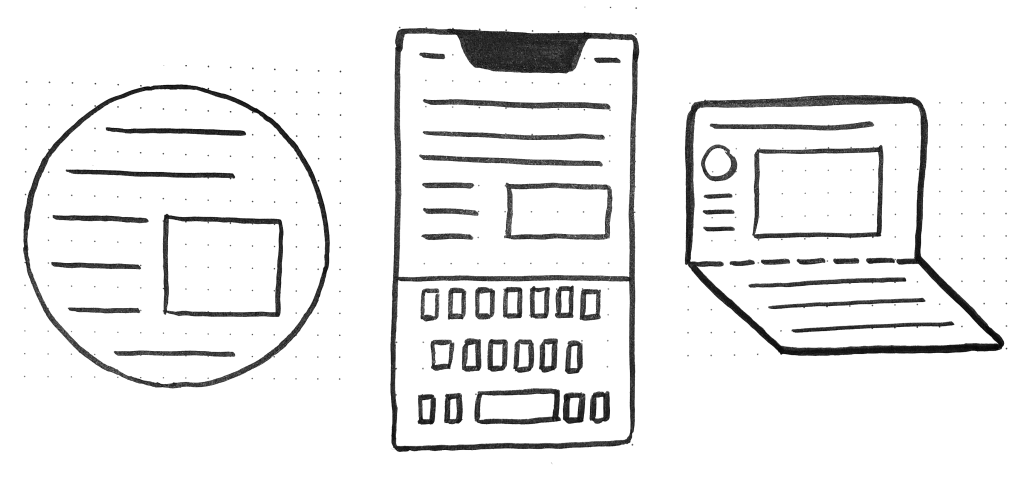
Breaking Out of the Box
CSS is all about appearance containers. In fact, the whole website is made of containers, from the website viewport to components on a webpage. However, every now and then a new element emerges that prompts us to reevaluate our design philosophy.
Square features, for instance, make it fun to play with round picture areas. Mobile display holes and electronic keyboards offer issues to best manage content that stays clear of them. Additionally, dual-screen or portable devices force us to consider how to make the most of the available room in various device configurations.
The design of products has become more challenging and interesting as a result of new changes to the internet system. They’re wonderful opportunities for us to break out of our rectangular boxes.
I’d like to talk about a new feature similar to the above: the Window Controls Overlay for Progressive Web Apps ( PWAs ).
Liberal Web Apps are bridging the gap between websites and apps. They combine the best of both worlds. On the one hand, they are flexible, shareable, and stable, just like websites. On the other hand, they provide more effective features, work online, and read documents just like local apps.
As a style area, PWAs are really exciting because they challenge us to think about what mixing online and device-native user interface can get. We have more than 40 years of experience telling us what software may look like on desktop products in particular, and it can be challenging to get out of this psychological design.
At the end of the day though, PWAs on desktop are constrained to the window they appear in: a rectangle with a title bar at the top.
What a typical desktop PWA app looks like:
Sure, as the author of a PWA, you get to choose the color of the title bar (using the Web Application Manifest theme_color property ), but that’s about it.
What if we could consider other ways and reclaim the entire window in the app? Doing so would give us a chance to make our apps more beautiful and feel more integrated in the operating system.
This is exactly what the Window Controls Overlay provides. This new PWA functionality makes it possible to take advantage of the full surface area of the app, including where the title bar normally appears.
About the title bar and window controls
Let’s get started with an explanation of the title bar and window controls.
The title bar is the area displayed at the top of an app window, which usually contains the app’s name. The controls are displayed at the top of an app’s window, along with the buttons that enable it to minimize, maximize, close, and close it.
Window Controls Overlay removes the physical constraint of the title bar and window controls areas. The title bar and window control buttons can be overlayed on top of the application’s web content, allowing it to free up the entire height of the app window.
If you are reading this article on a desktop computer, take a quick look at other apps. Chances are they’re already doing something similar to this. The top area of the page is used by the web browser you’re using to read this, in fact.
Spotify displays album artwork to the top of the application window at the very top.
Microsoft Word uses the available title bar space to display the auto-save and search functionalities, and more.
The whole point of this feature is to allow you to make use of this space with your own content while providing a way to account for the window control buttons. And it makes it possible to offer this modified experience on a variety of platforms without having a negative impact on the experience on browsers or other devices that don’t support Window Controls Overlay. After all, PWAs are all about progressive enhancement, so this feature is a chance to enhance your app to use this extra space when it’s available.
Let’s use the feature.
For the rest of this article, we’ll be working on a demo app to learn more about using the feature.
The demo app is called 1DIV. Users can create designs using only CSS and a single HTML element in this straightforward CSS playground.
The app has two pages. The first lists your existing CSS designs:
The second page enables you to create and edit CSS designs:
We can install the app as a PWA on the desktop because I added a straightforward web manifest and service worker. Here is what it looks like on macOS:
And on Windows:
Our app is looking good, but the white title bar in the first page is wasted space. It would be really nice if the design area extended to the top of the app window on the second page.
Let’s use the Window Controls Overlay feature to improve this.
Enabling Window Controls Overlay
The feature is still experimental at the moment. To try it, you need to enable it in one of the supported browsers.
It has currently been implemented in Chromium as a result of a collaboration between Microsoft and Google. We can therefore use it in Chrome or Edge by going to the internal about: //flags page, and enabling the Desktop PWA Window Controls Overlay flag.
Using the overlay of Window Controls
To use the feature, we need to add the following display_override member to our web app’s manifest file:
{ "name": "1DIV", "description": "1DIV is a mini CSS playground", "lang": "en-US", "start_url": "/", "theme_color": "#ffffff", "background_color": "#ffffff", "display_override": [ "window-controls-overlay" ], "icons": [ ... ]}On the surface, the feature is really simple to use. The only thing required is for the title bar to disappear and the window controls to become an overlay as a result of this manifest change.
However, to provide a great experience for all users regardless of what device or browser they use, and to make the most of the title bar area in our design, we’ll need a bit of CSS and JavaScript code.
Here is how the app currently looks:
Our logo, search field, and NEW button are now partially obscured by the window controls because our layout now begins at the top of the window, which is what we wanted.
It’s similar on Windows, with the difference that the close, maximize, and minimize buttons appear on the right side, grouped together with the PWA control buttons:
Using CSS to keep clear of the window controls
New CSS environment variables have also been introduced along with the feature:
titlebar-area-xtitlebar-area-ytitlebar-area-widthtitlebar-area-height
You use these variables with the CSS env ( ) function to position your content where the title bar would have been while ensuring it won’t overlap with the window controls. Our header, which includes the logo, search bar, and NEW button, will be placed using two of the variables in our case.
header { position: absolute; left: env(titlebar-area-x, 0); width: env(titlebar-area-width, 100%); height: var(--toolbar-height);}The titlebar-area-x variable gives us the distance from the left of the viewport to where the title bar would appear, and titlebar-area-width is its width. (Remember, this is not equivalent to the width of the entire viewport, just the title bar portion, which as noted earlier, doesn’t include the window controls.)
By doing this, we make sure our content remains fully visible. We’re also defining fallback values (the second parameter in the env() function) for when the variables are not defined (such as on non-supporting browsers, or when the Windows Control Overlay feature is disabled).
Now our header adapts to its surroundings, and it doesn’t feel like the window control buttons have been added as an afterthought. The app appears much more like a native app.
Changing the window controls background color so it blends in
Now let’s take a closer look at our second page: the CSS playground editor.
Not very good. Our CSS demo area does go all the way to the top, which is what we wanted, but the way the window controls appear as white rectangles on top of it is quite jarring.
We can fix this by changing the app’s theme color. There are a few ways to define it:
- PWAs can define a theme color in the web app manifest file using the theme_color manifest member. The OS then uses this color in various ways. On desktop platforms, it is used to provide a background color to the title bar and window controls.
- Websites can use the theme-color meta tag as well. It’s used by browsers to customize the color of the UI around the web page. For PWAs, this color can override the manifest
theme_color.
In our case, we can set the manifest theme_color to white to provide the right default color for our app. The OS will read this color value when the app is installed and use it to make the window controls background color white. This color works great for our main page with the list of demos.
The theme-color meta tag can be changed at runtime, using JavaScript. So we can do that to override the white with the right demo background color when one is opened.
What will we do with this function:
function themeWindow(bgColor) { document.querySelector("meta[name=theme-color]").setAttribute('content', bgColor);}With this in place, we can imagine how using color and CSS transitions can produce a smooth change from the list page to the demo page, and enable the window control buttons to blend in with the rest of the app’s interface.
Dragging the window
Now, getting rid of the title bar entirely does have an important accessibility consequence: it’s much more difficult to move the application window around.
Users can use the Window Controls Overlay feature to move the window, but this area becomes limited to where the control buttons are, and they must carefully aim between these buttons to move the window. However, the title bar offers a sizable area for users to click and drag.
Fortunately, this can be fixed using CSS with the app-region property. This property is, for now, only supported in Chromium-based browsers and needs the -webkit- vendor prefix.
We can use the following to animate any aspect of the app so that the window can drag it toward any point:
-webkit-app-region: drag;
It is also possible to explicitly make an element non-draggable:
-webkit-app-region: no-drag;
These choices might be beneficial to us. We can make the entire header a dragging target, but make the search field and NEW button within it non-draggable so they can still be used as normal.
However, because the editor page doesn’t display the header, users wouldn’t be able to drag the window while editing code. So let’s take a different strategy. We’ll create another element before our header, also absolutely positioned, and dedicated to dragging the window.
... .drag { position: absolute; top: 0; width: 100%; height: env(titlebar-area-height, 0); -webkit-app-region: drag;}With the above code, we’re making the draggable area span the entire viewport width, and using the titlebar-area-height variable to make it as tall as what the title bar would have been. This way, our draggable area is aligned with the window control buttons as shown below.
And, now, to make sure our search field and button remain usable:
header .search,header .new { -webkit-app-region: no-drag;}Users can click and drag where the title bar used to be with the above code. It is an area that users expect to be able to use to move windows on desktop, and we’re not breaking this expectation, which is good.
Adapting to window resize
It may be useful for an app to know both whether the window controls overlay is visible and when its size changes. The search field, logo, and button would need to be pushed down a little bit if the user made the window very narrow.
The Window Controls Overlay feature comes with a JavaScript API we can use to do this: navigator.windowControlsOverlay.
The API offers three intriguing features:
navigator.windowControlsOverlay.visiblelets us know whether the overlay is visible.navigator.windowControlsOverlay.getBoundingClientRect()lets us know the position and size of the title bar area.navigator.windowControlsOverlay.ongeometrychangelets us know when something changes in size or visibility.
Let’s use this to be aware of the size of the title bar area and move the header down if it’s too narrow.
if (navigator.windowControlsOverlay) { navigator.windowControlsOverlay.addEventListener('geometrychange', () => { const { width } = navigator.windowControlsOverlay.getBoundingClientRect(); document.body.classList.toggle('narrow', width < 250); });}In the example above, we set the narrow class on the body of the app if the title bar area is narrower than 250px. We could do something similar with a media query, but using the windowControlsOverlay API has two advantages for our use case:
- It’s only fired when the feature is supported and used, we don’t want to adapt the design otherwise.
- We can see the title bar area across different operating systems, which is great because the window controls ‘ size is different on Mac and Windows. Using a media query wouldn’t make it possible for us to know exactly how much space remains.
.narrow header { top: env(titlebar-area-height, 0); left: 0; width: 100%;}When the window is too small, we can use the above CSS code to move our header down and move the thumbnails down in accordance with this.
Thirty pixels of exciting design opportunities
Our straightforward demo app was transformed into something that felt much more connected to desktop devices by using the Window Controls Overlay feature. Something that reaches out of the usual window constraints and provides a custom experience for its users.
In reality, this feature only gives us about 30 more pixels of room and presents challenges when using the window controls. And yet, this extra room and those challenges can be turned into exciting design opportunities.
More devices of all shapes and forms get invented all the time, and the web keeps on evolving to adapt to them. New features are added to the web platform to make it easier for web authors to integrate more and more fully with those devices. From watches or foldable devices to desktop computers, we need to evolve our design approach for the web. Nowadays, web building enables us to think outside the rectangular box.
So let’s embrace this. Let’s use the standard technologies already at our disposal, and experiment with new ideas to provide tailored experiences for all devices, all from a single codebase!
If you have the chance to try the Window Controls Overlay feature and have feedback on it, you can open issues in the spec’s repository. It’s still early in the development of this feature, and you can help make it even better. You can also check out this demo app and its source code, or the feature’s existing documentation.