Category: Blog

Your blog category

  • A Content Model Is Not a Design System

    A Content Model Is Not a Design System

    Do you remember when having a great website was enough? Now, people are getting answers from Siri, Google search snippets, and mobile apps, not just our websites. Forward-thinking organizations have adopted an omnichannel content strategy, whose mission is to reach audiences across multiple digital channels and platforms.

    But how do you set up a content management system (CMS) to reach your audience now and in the future? I learned the hard way that creating a content model—a definition of content types, attributes, and relationships that let people and systems understand content—with my more familiar design-system thinking would capsize my customer’s omnichannel content strategy. You can avoid that outcome by creating content models that are semantic and that also connect related content. 

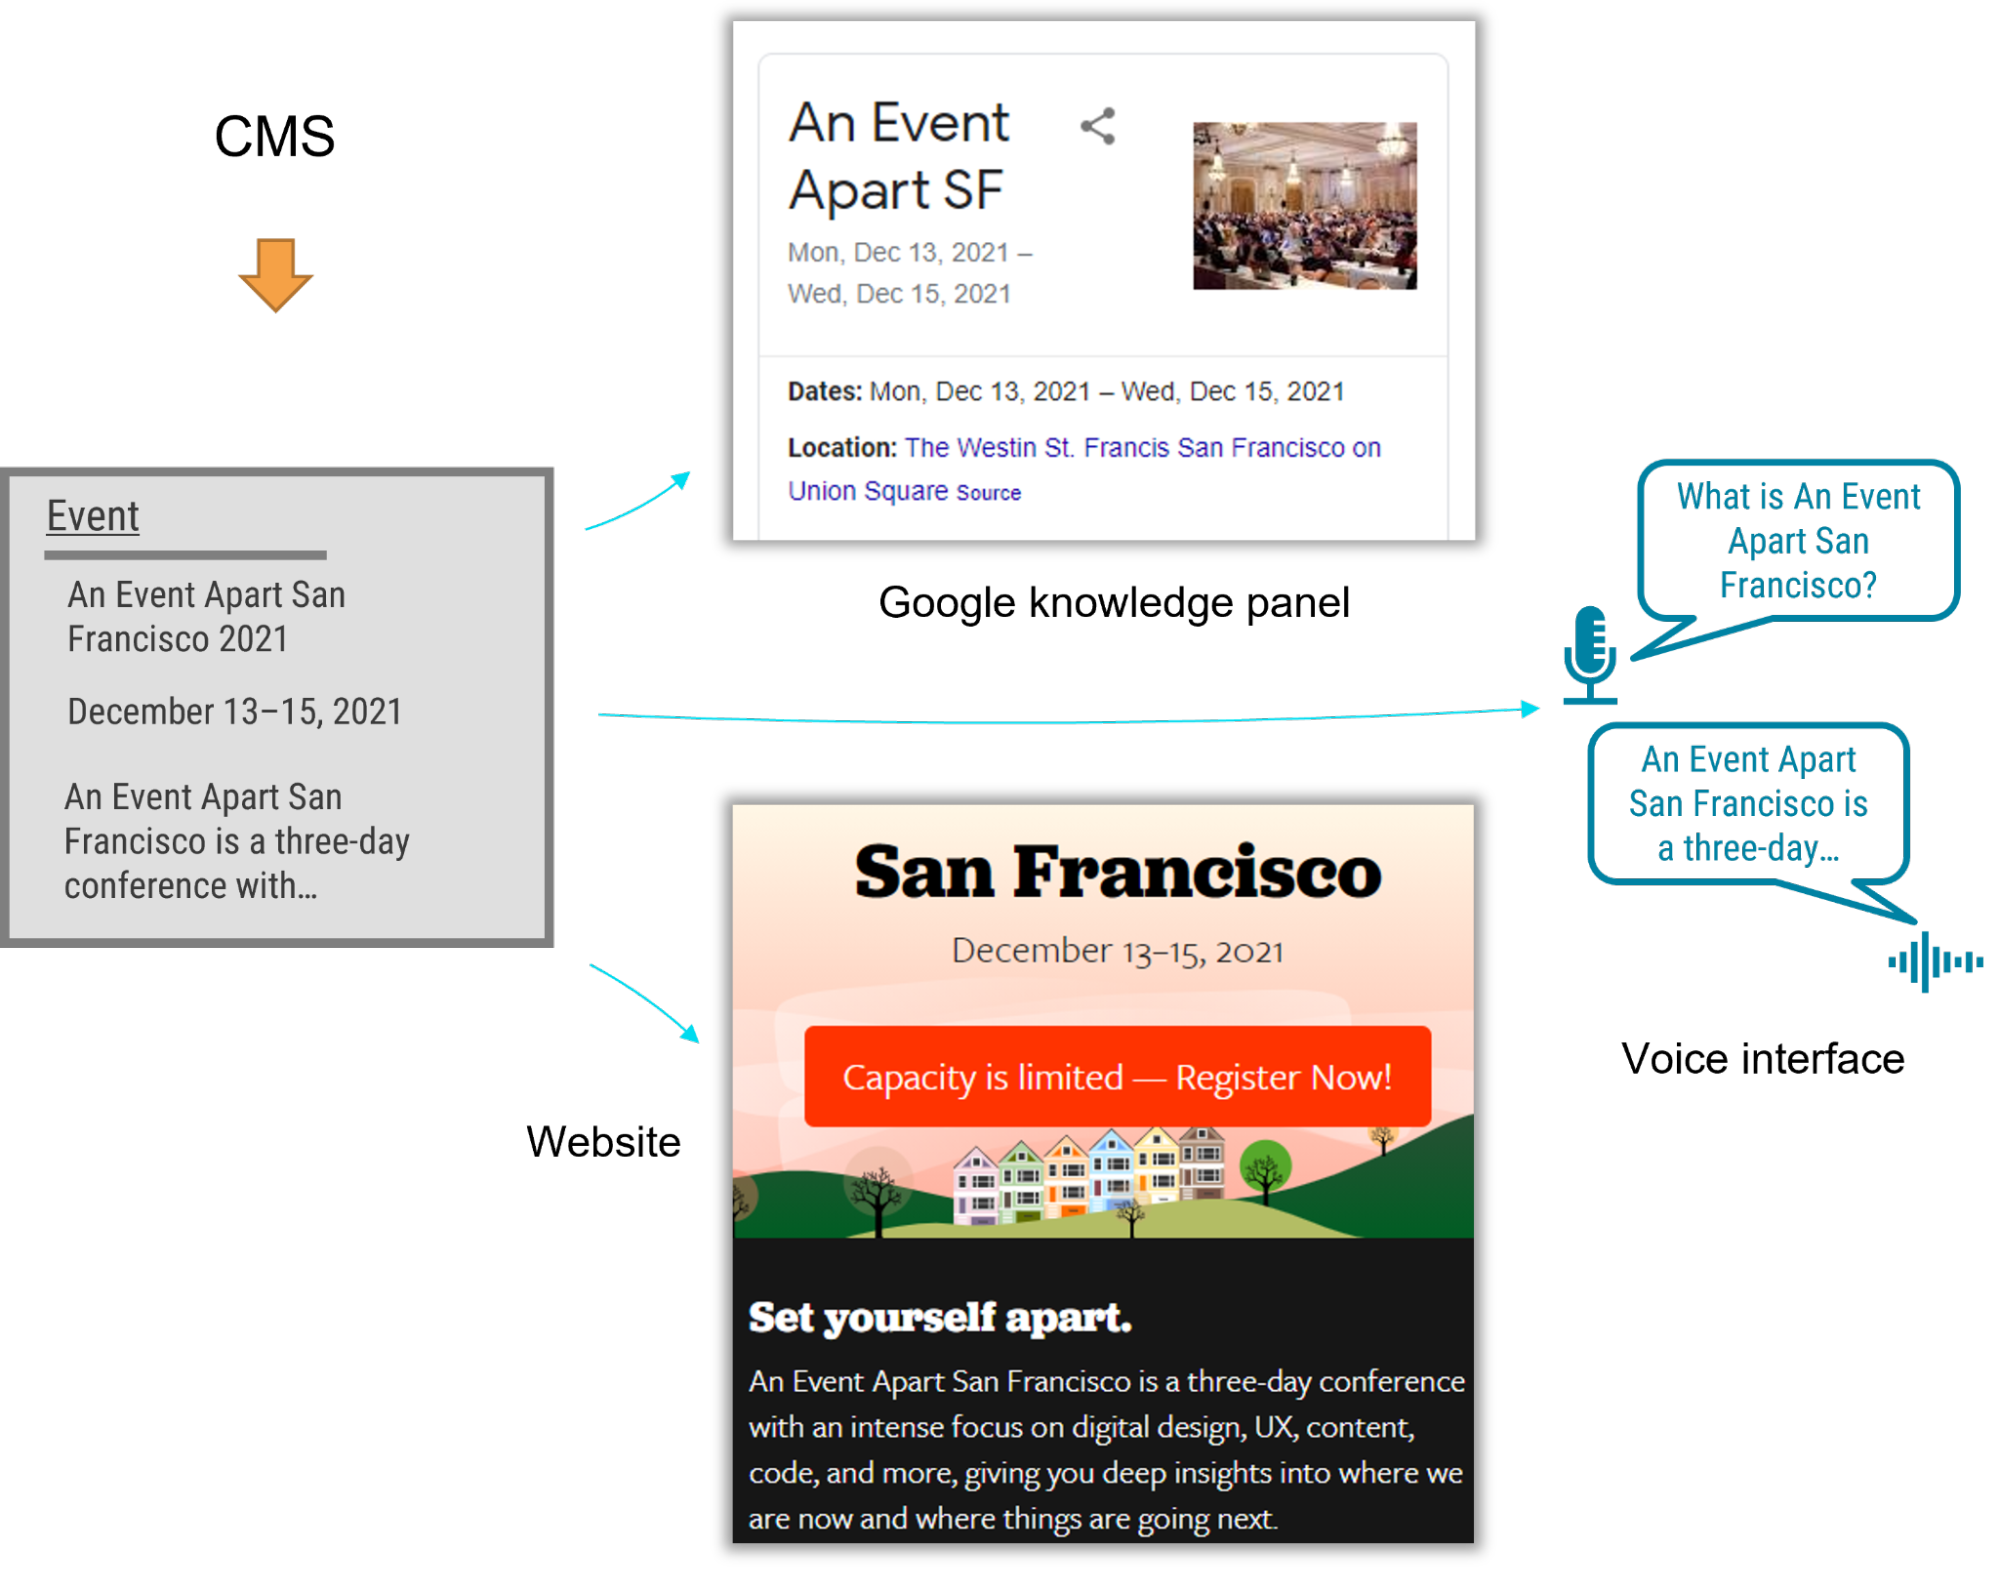
    I recently had the opportunity to lead the CMS implementation for a Fortune 500 company. The client was excited by the benefits of an omnichannel content strategy, including content reuse, multichannel marketing, and robot delivery—designing content to be intelligible to bots, Google knowledge panels, snippets, and voice user interfaces. 

    A content model is a critical foundation for an omnichannel content strategy, and for our content to be understood by multiple systems, the model needed semantic types—types named according to their meaning instead of their presentation. Our goal was to let authors create content and reuse it wherever it was relevant. But as the project proceeded, I realized that supporting content reuse at the scale that my customer needed required the whole team to recognize a new pattern.

    Despite our best intentions, we kept drawing from what we were more familiar with: design systems. Unlike web-focused content strategies, an omnichannel content strategy can’t rely on WYSIWYG tools for design and layout. Our tendency to approach the content model with our familiar design-system thinking constantly led us to veer away from one of the primary purposes of a content model: delivering content to audiences on multiple marketing channels.

    Two essential principles for an effective content model

    We needed to help our designers, developers, and stakeholders understand that we were doing something very different from their prior web projects, where it was natural for everyone to think about content as visual building blocks fitting into layouts. The previous approach was not only more familiar but also more intuitive—at least at first—because it made the designs feel more tangible. We discovered two principles that helped the team understand how a content model differs from the design systems that we were used to:

    1. Content models must define semantics instead of layout.
    2. And content models should connect content that belongs together.

    Semantic content models

    A semantic content model uses type and attribute names that reflect the meaning of the content, not how it will be displayed. For example, in a nonsemantic model, teams might create types like teasers, media blocks, and cards. Although these types might make it easy to lay out content, they don’t help delivery channels understand the content’s meaning, which in turn would have opened the door to the content being presented in each marketing channel. In contrast, a semantic content model uses type names like product, service, and testimonial so that each delivery channel can understand the content and use it as it sees fit. 

    When you’re creating a semantic content model, a great place to start is to look over the types and properties defined by Schema.org, a community-driven resource for type definitions that are intelligible to platforms like Google search.

    A semantic content model has several benefits:

    • Even if your team doesn’t care about omnichannel content, a semantic content model decouples content from its presentation so that teams can evolve the website’s design without needing to refactor its content. In this way, content can withstand disruptive website redesigns. 
    • A semantic content model also provides a competitive edge. By adding structured data based on Schema.org’s types and properties, a website can provide hints to help Google understand the content, display it in search snippets or knowledge panels, and use it to answer voice-interface user questions. Potential visitors could discover your content without ever setting foot in your website.
    • Beyond those practical benefits, you’ll also need a semantic content model if you want to deliver omnichannel content. To use the same content in multiple marketing channels, delivery channels need to be able to understand it. For example, if your content model were to provide a list of questions and answers, it could easily be rendered on a frequently asked questions (FAQ) page, but it could also be used in a voice interface or by a bot that answers common questions.

    For example, using a semantic content model for articles, events, people, and locations lets A List Apart provide cleanly structured data for search engines so that users can read the content on the website, in Google knowledge panels, and even with hypothetical voice interfaces in the future.

    Content models that connect

    After struggling to describe what makes a good content model, I’ve come to realize that the best models are those that are semantic and that also connect related content components (such as a FAQ item’s question and answer pair), instead of slicing up related content across disparate content components. A good content model connects content that should remain together so that multiple delivery channels can use it without needing to first put those pieces back together.

    Think about writing an article or essay. An article’s meaning and usefulness depends upon its parts being kept together. Would one of the headings or paragraphs be meaningful on their own without the context of the full article? On our project, our familiar design-system thinking often led us to want to create content models that would slice content into disparate chunks to fit the web-centric layout. This had a similar impact to an article that were to have been separated from its headline. Because we were slicing content into standalone pieces based on layout, content that belonged together became difficult to manage and nearly impossible for multiple delivery channels to understand.

    To illustrate, let’s look at how connecting related content applies in a real-world scenario. The design team for our customer presented a complex layout for a software product page that included multiple tabs and sections. Our instincts were to follow suit with the content model. Shouldn’t we make it as easy and as flexible as possible to add any number of tabs in the future?

    Because our design-system instincts were so familiar, it felt like we had needed a content type called “tab section” so that multiple tab sections could be added to a page. Each tab section would display various types of content. One tab might provide the software’s overview or its specifications. Another tab might provide a list of resources. 

    Our inclination to break down the content model into “tab section” pieces would have led to an unnecessarily complex model and a cumbersome editing experience, and it would have also created content that couldn’t have been understood by additional delivery channels. For example, how would another system have been able to tell which “tab section” referred to a product’s specifications or its resource list—would that other system have to have resorted to counting tab sections and content blocks? This would have prevented the tabs from ever being reordered, and it would have required adding logic in every other delivery channel to interpret the design system’s layout. Furthermore, if the customer were to have no longer wanted to display this content in a tab layout, it would have been tedious to migrate to a new content model to reflect the new page redesign.

    We had a breakthrough when we discovered that our customer had a specific purpose in mind for each tab: it would reveal specific information such as the software product’s overview, specifications, related resources, and pricing. Once implementation began, our inclination to focus on what’s visual and familiar had obscured the intent of the designs. With a little digging, it didn’t take long to realize that the concept of tabs wasn’t relevant to the content model. The meaning of the content that they were planning to display in the tabs was what mattered.

    In fact, the customer could have decided to display this content in a different way—without tabs—somewhere else. This realization prompted us to define content types for the software product based on the meaningful attributes that the customer had wanted to render on the web. There were obvious semantic attributes like name and description as well as rich attributes like screenshots, software requirements, and feature lists. The software’s product information stayed together because it wasn’t sliced across separate components like “tab sections” that were derived from the content’s presentation. Any delivery channel—including future ones—could understand and present this content.

    Conclusion

    In this omnichannel marketing project, we discovered that the best way to keep our content model on track was to ensure that it was semantic (with type and attribute names that reflected the meaning of the content) and that it kept content together that belonged together (instead of fragmenting it). These two concepts curtailed our temptation to shape the content model based on the design. So if you’re working on a content model to support an omnichannel content strategy—or even if you just want to make sure that Google and other interfaces understand your content—remember:

    • A design system isn’t a content model. Team members may be tempted to conflate them and to make your content model mirror your design system, so you should protect the semantic value and contextual structure of the content strategy during the entire implementation process. This will let every delivery channel consume the content without needing a magic decoder ring.
    • If your team is struggling to make this transition, you can still reap some of the benefits by using Schema.org–based structured data in your website. Even if additional delivery channels aren’t on the immediate horizon, the benefit to search engine optimization is a compelling reason on its own.
    • Additionally, remind the team that decoupling the content model from the design will let them update the designs more easily because they won’t be held back by the cost of content migrations. They’ll be able to create new designs without the obstacle of compatibility between the design and the content, and ​they’ll be ready for the next big thing. 

    By rigorously advocating for these principles, you’ll help your team treat content the way that it deserves—as the most critical asset in your user experience and the best way to connect with your audience.
  • Design for Safety, An Excerpt

    Design for Safety, An Excerpt

    Antiracist economist Kim Crayton says that “intention without strategy is chaos.” We’ve discussed how our biases, assumptions, and inattention toward marginalized and vulnerable groups lead to dangerous and unethical tech—but what, specifically, do we need to do to fix it? The intention to make our tech safer is not enough; we need a strategy.

    This chapter will equip you with that plan of action. It covers how to integrate safety principles into your design work in order to create tech that’s safe, how to convince your stakeholders that this work is necessary, and how to respond to the critique that what we actually need is more diversity. (Spoiler: we do, but diversity alone is not the antidote to fixing unethical, unsafe tech.)

    The process for inclusive safety

    When you are designing for safety, your goals are to:

    • identify ways your product can be used for abuse,
    • design ways to prevent the abuse, and
    • provide support for vulnerable users to reclaim power and control.

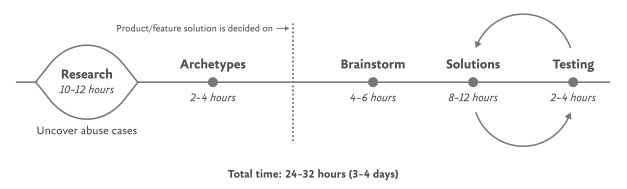
    The Process for Inclusive Safety is a tool to help you reach those goals (Fig 5.1). It’s a methodology I created in 2018 to capture the various techniques I was using when designing products with safety in mind. Whether you are creating an entirely new product or adding to an existing feature, the Process can help you make your product safe and inclusive. The Process includes five general areas of action:

    • Conducting research
    • Creating archetypes
    • Brainstorming problems
    • Designing solutions
    • Testing for safety

    The Process is meant to be flexible—it won’t make sense for teams to implement every step in some situations. Use the parts that are relevant to your unique work and context; this is meant to be something you can insert into your existing design practice.

    And once you use it, if you have an idea for making it better or simply want to provide context of how it helped your team, please get in touch with me. It’s a living document that I hope will continue to be a useful and realistic tool that technologists can use in their day-to-day work.

    If you’re working on a product specifically for a vulnerable group or survivors of some form of trauma, such as an app for survivors of domestic violence, sexual assault, or drug addiction, be sure to read Chapter 7, which covers that situation explicitly and should be handled a bit differently. The guidelines here are for prioritizing safety when designing a more general product that will have a wide user base (which, we already know from statistics, will include certain groups that should be protected from harm). Chapter 7 is focused on products that are specifically for vulnerable groups and people who have experienced trauma.

    Step 1: Conduct research

    Design research should include a broad analysis of how your tech might be weaponized for abuse as well as specific insights into the experiences of survivors and perpetrators of that type of abuse. At this stage, you and your team will investigate issues of interpersonal harm and abuse, and explore any other safety, security, or inclusivity issues that might be a concern for your product or service, like data security, racist algorithms, and harassment.

    Broad research

    Your project should begin with broad, general research into similar products and issues around safety and ethical concerns that have already been reported. For example, a team building a smart home device would do well to understand the multitude of ways that existing smart home devices have been used as tools of abuse. If your product will involve AI, seek to understand the potentials for racism and other issues that have been reported in existing AI products. Nearly all types of technology have some kind of potential or actual harm that’s been reported on in the news or written about by academics. Google Scholar is a useful tool for finding these studies.

    Specific research: Survivors

    When possible and appropriate, include direct research (surveys and interviews) with people who are experts in the forms of harm you have uncovered. Ideally, you’ll want to interview advocates working in the space of your research first so that you have a more solid understanding of the topic and are better equipped to not retraumatize survivors. If you’ve uncovered possible domestic violence issues, for example, the experts you’ll want to speak with are survivors themselves, as well as workers at domestic violence hotlines, shelters, other related nonprofits, and lawyers.

    Especially when interviewing survivors of any kind of trauma, it is important to pay people for their knowledge and lived experiences. Don’t ask survivors to share their trauma for free, as this is exploitative. While some survivors may not want to be paid, you should always make the offer in the initial ask. An alternative to payment is to donate to an organization working against the type of violence that the interviewee experienced. We’ll talk more about how to appropriately interview survivors in Chapter 6.

    Specific research: Abusers

    It’s unlikely that teams aiming to design for safety will be able to interview self-proclaimed abusers or people who have broken laws around things like hacking. Don’t make this a goal; rather, try to get at this angle in your general research. Aim to understand how abusers or bad actors weaponize technology to use against others, how they cover their tracks, and how they explain or rationalize the abuse.

    Step 2: Create archetypes

    Once you’ve finished conducting your research, use your insights to create abuser and survivor archetypes. Archetypes are not personas, as they’re not based on real people that you interviewed and surveyed. Instead, they’re based on your research into likely safety issues, much like when we design for accessibility: we don’t need to have found a group of blind or low-vision users in our interview pool to create a design that’s inclusive of them. Instead, we base those designs on existing research into what this group needs. Personas typically represent real users and include many details, while archetypes are broader and can be more generalized.

    The abuser archetype is someone who will look at the product as a tool to perform harm (Fig 5.2). They may be trying to harm someone they don’t know through surveillance or anonymous harassment, or they may be trying to control, monitor, abuse, or torment someone they know personally.

    The survivor archetype is someone who is being abused with the product. There are various situations to consider in terms of the archetype’s understanding of the abuse and how to put an end to it: Do they need proof of abuse they already suspect is happening, or are they unaware they’ve been targeted in the first place and need to be alerted (Fig 5.3)?

    You may want to make multiple survivor archetypes to capture a range of different experiences. They may know that the abuse is happening but not be able to stop it, like when an abuser locks them out of IoT devices; or they know it’s happening but don’t know how, such as when a stalker keeps figuring out their location (Fig 5.4). Include as many of these scenarios as you need to in your survivor archetype. You’ll use these later on when you design solutions to help your survivor archetypes achieve their goals of preventing and ending abuse.

    It may be useful for you to create persona-like artifacts for your archetypes, such as the three examples shown. Instead of focusing on the demographic information we often see in personas, focus on their goals. The goals of the abuser will be to carry out the specific abuse you’ve identified, while the goals of the survivor will be to prevent abuse, understand that abuse is happening, make ongoing abuse stop, or regain control over the technology that’s being used for abuse. Later, you’ll brainstorm how to prevent the abuser’s goals and assist the survivor’s goals.

    And while the “abuser/survivor” model fits most cases, it doesn’t fit all, so modify it as you need to. For example, if you uncovered an issue with security, such as the ability for someone to hack into a home camera system and talk to children, the malicious hacker would get the abuser archetype and the child’s parents would get survivor archetype.

    Step 3: Brainstorm problems

    After creating archetypes, brainstorm novel abuse cases and safety issues. “Novel” means things not found in your research; you’re trying to identify completely new safety issues that are unique to your product or service. The goal with this step is to exhaust every effort of identifying harms your product could cause. You aren’t worrying about how to prevent the harm yet—that comes in the next step.

    How could your product be used for any kind of abuse, outside of what you’ve already identified in your research? I recommend setting aside at least a few hours with your team for this process.

    If you’re looking for somewhere to start, try doing a Black Mirror brainstorm. This exercise is based on the show Black Mirror, which features stories about the dark possibilities of technology. Try to figure out how your product would be used in an episode of the show—the most wild, awful, out-of-control ways it could be used for harm. When I’ve led Black Mirror brainstorms, participants usually end up having a good deal of fun (which I think is great—it’s okay to have fun when designing for safety!). I recommend time-boxing a Black Mirror brainstorm to half an hour, and then dialing it back and using the rest of the time thinking of more realistic forms of harm.

    After you’ve identified as many opportunities for abuse as possible, you may still not feel confident that you’ve uncovered every potential form of harm. A healthy amount of anxiety is normal when you’re doing this kind of work. It’s common for teams designing for safety to worry, “Have we really identified every possible harm? What if we’ve missed something?” If you’ve spent at least four hours coming up with ways your product could be used for harm and have run out of ideas, go to the next step.

    It’s impossible to guarantee you’ve thought of everything; instead of aiming for 100 percent assurance, recognize that you’ve taken this time and have done the best you can, and commit to continuing to prioritize safety in the future. Once your product is released, your users may identify new issues that you missed; aim to receive that feedback graciously and course-correct quickly.

    Step 4: Design solutions

    At this point, you should have a list of ways your product can be used for harm as well as survivor and abuser archetypes describing opposing user goals. The next step is to identify ways to design against the identified abuser’s goals and to support the survivor’s goals. This step is a good one to insert alongside existing parts of your design process where you’re proposing solutions for the various problems your research uncovered.

    Some questions to ask yourself to help prevent harm and support your archetypes include:

    • Can you design your product in such a way that the identified harm cannot happen in the first place? If not, what roadblocks can you put up to prevent the harm from happening?
    • How can you make the victim aware that abuse is happening through your product?
    • How can you help the victim understand what they need to do to make the problem stop?
    • Can you identify any types of user activity that would indicate some form of harm or abuse? Could your product help the user access support?

    In some products, it’s possible to proactively recognize that harm is happening. For example, a pregnancy app might be modified to allow the user to report that they were the victim of an assault, which could trigger an offer to receive resources for local and national organizations. This sort of proactiveness is not always possible, but it’s worth taking a half hour to discuss if any type of user activity would indicate some form of harm or abuse, and how your product could assist the user in receiving help in a safe manner.

    That said, use caution: you don’t want to do anything that could put a user in harm’s way if their devices are being monitored. If you do offer some kind of proactive help, always make it voluntary, and think through other safety issues, such as the need to keep the user in-app in case an abuser is checking their search history. We’ll walk through a good example of this in the next chapter.

    Step 5: Test for safety

    The final step is to test your prototypes from the point of view of your archetypes: the person who wants to weaponize the product for harm and the victim of the harm who needs to regain control over the technology. Just like any other kind of product testing, at this point you’ll aim to rigorously test out your safety solutions so that you can identify gaps and correct them, validate that your designs will help keep your users safe, and feel more confident releasing your product into the world.

    Ideally, safety testing happens along with usability testing. If you’re at a company that doesn’t do usability testing, you might be able to use safety testing to cleverly perform both; a user who goes through your design attempting to weaponize the product against someone else can also be encouraged to point out interactions or other elements of the design that don’t make sense to them.

    You’ll want to conduct safety testing on either your final prototype or the actual product if it’s already been released. There’s nothing wrong with testing an existing product that wasn’t designed with safety goals in mind from the onset—“retrofitting” it for safety is a good thing to do.

    Remember that testing for safety involves testing from the perspective of both an abuser and a survivor, though it may not make sense for you to do both. Alternatively, if you made multiple survivor archetypes to capture multiple scenarios, you’ll want to test from the perspective of each one.

    As with other sorts of usability testing, you as the designer are most likely too close to the product and its design by this point to be a valuable tester; you know the product too well. Instead of doing it yourself, set up testing as you would with other usability testing: find someone who is not familiar with the product and its design, set the scene, give them a task, encourage them to think out loud, and observe how they attempt to complete it.

    Abuser testing

    The goal of this testing is to understand how easy it is for someone to weaponize your product for harm. Unlike with usability testing, you want to make it impossible, or at least difficult, for them to achieve their goal. Reference the goals in the abuser archetype you created earlier, and use your product in an attempt to achieve them.

    For example, for a fitness app with GPS-enabled location features, we can imagine that the abuser archetype would have the goal of figuring out where his ex-girlfriend now lives. With this goal in mind, you’d try everything possible to figure out the location of another user who has their privacy settings enabled. You might try to see her running routes, view any available information on her profile, view anything available about her location (which she has set to private), and investigate the profiles of any other users somehow connected with her account, such as her followers.

    If by the end of this you’ve managed to uncover some of her location data, despite her having set her profile to private, you know now that your product enables stalking. Your next step is to go back to step 4 and figure out how to prevent this from happening. You may need to repeat the process of designing solutions and testing them more than once.

    Survivor testing

    Survivor testing involves identifying how to give information and power to the survivor. It might not always make sense based on the product or context. Thwarting the attempt of an abuser archetype to stalk someone also satisfies the goal of the survivor archetype to not be stalked, so separate testing wouldn’t be needed from the survivor’s perspective.

    However, there are cases where it makes sense. For example, for a smart thermostat, a survivor archetype’s goals would be to understand who or what is making the temperature change when they aren’t doing it themselves. You could test this by looking for the thermostat’s history log and checking for usernames, actions, and times; if you couldn’t find that information, you would have more work to do in step 4.

    Another goal might be regaining control of the thermostat once the survivor realizes the abuser is remotely changing its settings. Your test would involve attempting to figure out how to do this: are there instructions that explain how to remove another user and change the password, and are they easy to find? This might again reveal that more work is needed to make it clear to the user how they can regain control of the device or account.

    Stress testing

    To make your product more inclusive and compassionate, consider adding stress testing. This concept comes from Design for Real Life by Eric Meyer and Sara Wachter-Boettcher. The authors pointed out that personas typically center people who are having a good day—but real users are often anxious, stressed out, having a bad day, or even experiencing tragedy. These are called “stress cases,” and testing your products for users in stress-case situations can help you identify places where your design lacks compassion. Design for Real Life has more details about what it looks like to incorporate stress cases into your design as well as many other great tactics for compassionate design.

  • How to Sell UX Research with Two Simple Questions

    How to Sell UX Research with Two Simple Questions

    Do you find yourself designing screens with only a vague idea of how the things on the screen relate to the things elsewhere in the system? Do you leave stakeholder meetings with unclear directives that often seem to contradict previous conversations? You know a better understanding of user needs would help the team get clear on what you are actually trying to accomplish, but time and budget for research is tight. When it comes to asking for more direct contact with your users, you might feel like poor Oliver Twist, timidly asking, “Please, sir, I want some more.” 

    Here’s the trick. You need to get stakeholders themselves to identify high-risk assumptions and hidden complexity, so that they become just as motivated as you to get answers from users. Basically, you need to make them think it’s their idea. 

    In this article, I’ll show you how to collaboratively expose misalignment and gaps in the team’s shared understanding by bringing the team together around two simple questions:

    1. What are the objects?
    2. What are the relationships between those objects?

    A gauntlet between research and screen design

    These two questions align to the first two steps of the ORCA process, which might become your new best friend when it comes to reducing guesswork. Wait, what’s ORCA?! Glad you asked.

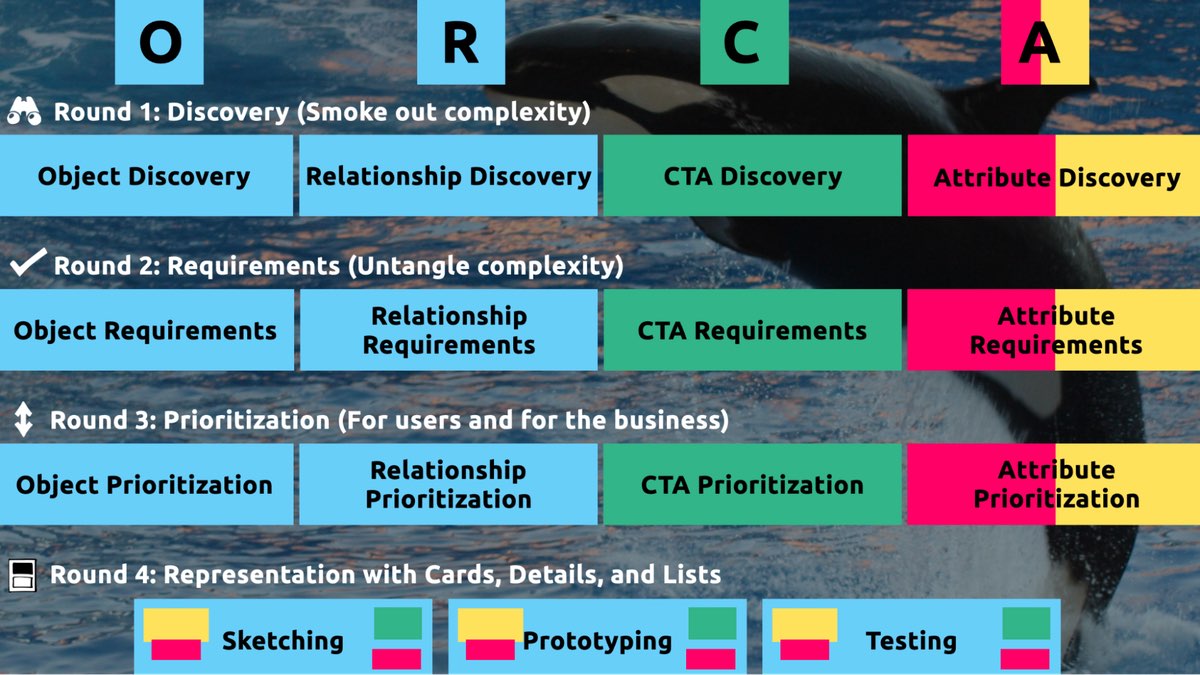
    ORCA stands for Objects, Relationships, CTAs, and Attributes, and it outlines a process for creating solid object-oriented user experiences. Object-oriented UX is my design philosophy. ORCA is an iterative methodology for synthesizing user research into an elegant structural foundation to support screen and interaction design. OOUX and ORCA have made my work as a UX designer more collaborative, effective, efficient, fun, strategic, and meaningful.

    The ORCA process has four iterative rounds and a whopping fifteen steps. In each round we get more clarity on our Os, Rs, Cs, and As.

    I sometimes say that ORCA is a “garbage in, garbage out” process. To ensure that the testable prototype produced in the final round actually tests well, the process needs to be fed by good research. But if you don’t have a ton of research, the beginning of the ORCA process serves another purpose: it helps you sell the need for research.

    In other words, the ORCA process serves as a gauntlet between research and design. With good research, you can gracefully ride the killer whale from research into design. But without good research, the process effectively spits you back into research and with a cache of specific open questions.

    Getting in the same curiosity-boat

    What gets us into trouble is not what we don’t know. It’s what we know for sure that just ain’t so.

    Mark Twain

    The first two steps of the ORCA process—Object Discovery and Relationship Discovery—shine a spotlight on the dark, dusty corners of your team’s misalignments and any inherent complexity that’s been swept under the rug. It begins to expose what this classic comic so beautifully illustrates:

    This is one reason why so many UX designers are frustrated in their job and why many projects fail. And this is also why we often can’t sell research: every decision-maker is confident in their own mental picture. 

    Once we expose hidden fuzzy patches in each picture and the differences between them all, the case for user research makes itself.

    But how we do this is important. However much we might want to, we can’t just tell everyone, “YOU ARE WRONG!” Instead, we need to facilitate and guide our team members to self-identify holes in their picture. When stakeholders take ownership of assumptions and gaps in understanding, BAM! Suddenly, UX research is not such a hard sell, and everyone is aboard the same curiosity-boat.

    Say your users are doctors. And you have no idea how doctors use the system you are tasked with redesigning.

    You might try to sell research by honestly saying: “We need to understand doctors better! What are their pain points? How do they use the current app?” But here’s the problem with that. Those questions are vague, and the answers to them don’t feel acutely actionable.

    Instead, you want your stakeholders themselves to ask super-specific questions. This is more like the kind of conversation you need to facilitate. Let’s listen in:

    “Wait a sec, how often do doctors share patients? Does a patient in this system have primary and secondary doctors?”

    “Can a patient even have more than one primary doctor?”

    “Is it a ‘primary doctor’ or just a ‘primary caregiver’… Can’t that role be a nurse practitioner?”

    “No, caregivers are something else… That’s the patient’s family contacts, right?”

    “So are caregivers in scope for this redesign?”

    “Yeah, because if a caregiver is present at an appointment, the doctor needs to note that. Like, tag the caregiver on the note… Or on the appointment?”

    Now we are getting somewhere. Do you see how powerful it can be getting stakeholders to debate these questions themselves? The diabolical goal here is to shake their confidence—gently and diplomatically.

    When these kinds of questions bubble up collaboratively and come directly from the mouths of your stakeholders and decision-makers, suddenly, designing screens without knowing the answers to these questions seems incredibly risky, even silly.

    If we create software without understanding the real-world information environment of our users, we will likely create software that does not align to the real-world information environment of our users. And this will, hands down, result in a more confusing, more complex, and less intuitive software product.

    The two questions

    But how do we get to these kinds of meaty questions diplomatically, efficiently, collaboratively, and reliably? 

    We can do this by starting with those two big questions that align to the first two steps of the ORCA process:

    1. What are the objects?
    2. What are the relationships between those objects?

    In practice, getting to these answers is easier said than done. I’m going to show you how these two simple questions can provide the outline for an Object Definition Workshop. During this workshop, these “seed” questions will blossom into dozens of specific questions and shine a spotlight on the need for more user research.

    Prep work: Noun foraging

    In the next section, I’ll show you how to run an Object Definition Workshop with your stakeholders (and entire cross-functional team, hopefully). But first, you need to do some prep work.

    Basically, look for nouns that are particular to the business or industry of your project, and do it across at least a few sources. I call this noun foraging.

    Here are just a few great noun foraging sources:

    • the product’s marketing site
    • the product’s competitors’ marketing sites (competitive analysis, anyone?)
    • the existing product (look at labels!)
    • user interview transcripts
    • notes from stakeholder interviews or vision docs from stakeholders

    Put your detective hat on, my dear Watson. Get resourceful and leverage what you have. If all you have is a marketing website, some screenshots of the existing legacy system, and access to customer service chat logs, then use those.

    As you peruse these sources, watch for the nouns that are used over and over again, and start listing them (preferably on blue sticky notes if you’ll be creating an object map later!).

    You’ll want to focus on nouns that might represent objects in your system. If you are having trouble determining if a noun might be object-worthy, remember the acronym SIP and test for:

    1. Structure
    2. Instances
    3. Purpose

    Think of a library app, for example. Is “book” an object?

    Structure: can you think of a few attributes for this potential object? Title, author, publish date… Yep, it has structure. Check!

    Instance: what are some examples of this potential “book” object? Can you name a few? The Alchemist, Ready Player One, Everybody Poops… OK, check!

    Purpose: why is this object important to the users and business? Well, “book” is what our library client is providing to people and books are why people come to the library… Check, check, check!

    As you are noun foraging, focus on capturing the nouns that have SIP. Avoid capturing components like dropdowns, checkboxes, and calendar pickers—your UX system is not your design system! Components are just the packaging for objects—they are a means to an end. No one is coming to your digital place to play with your dropdown! They are coming for the VALUABLE THINGS and what they can do with them. Those things, or objects, are what we are trying to identify.

    Let’s say we work for a startup disrupting the email experience. This is how I’d start my noun foraging.

    First I’d look at my own email client, which happens to be Gmail. I’d then look at Outlook and the new HEY email. I’d look at Yahoo, Hotmail…I’d even look at Slack and Basecamp and other so-called “email replacers.” I’d read some articles, reviews, and forum threads where people are complaining about email. While doing all this, I would look for and write down the nouns.

    (Before moving on, feel free to go noun foraging for this hypothetical product, too, and then scroll down to see how much our lists match up. Just don’t get lost in your own emails! Come back to me!)

    Drumroll, please…

    Here are a few nouns I came up with during my noun foraging:

    • email message
    • thread
    • contact
    • client
    • rule/automation
    • email address that is not a contact?
    • contact groups
    • attachment
    • Google doc file / other integrated file
    • newsletter? (HEY treats this differently)
    • saved responses and templates

    Scan your list of nouns and pick out words that you are completely clueless about. In our email example, it might be client or automation. Do as much homework as you can before your session with stakeholders: google what’s googleable. But other terms might be so specific to the product or domain that you need to have a conversation about them.

    Aside: here are some real nouns foraged during my own past project work that I needed my stakeholders to help me understand:

    • Record Locator
    • Incentive Home
    • Augmented Line Item
    • Curriculum-Based Measurement Probe

    This is really all you need to prepare for the workshop session: a list of nouns that represent potential objects and a short list of nouns that need to be defined further.

    Facilitate an Object Definition Workshop

    You could actually start your workshop with noun foraging—this activity can be done collaboratively. If you have five people in the room, pick five sources, assign one to every person, and give everyone ten minutes to find the objects within their source. When the time’s up, come together and find the overlap. Affinity mapping is your friend here!

    If your team is short on time and might be reluctant to do this kind of grunt work (which is usually the case) do your own noun foraging beforehand, but be prepared to show your work. I love presenting screenshots of documents and screens with all the nouns already highlighted. Bring the artifacts of your process, and start the workshop with a five-minute overview of your noun foraging journey.

    HOT TIP: before jumping into the workshop, frame the conversation as a requirements-gathering session to help you better understand the scope and details of the system. You don’t need to let them know that you’re looking for gaps in the team’s understanding so that you can prove the need for more user research—that will be our little secret. Instead, go into the session optimistically, as if your knowledgeable stakeholders and PMs and biz folks already have all the answers. 

    Then, let the question whack-a-mole commence.

    1. What is this thing?

    Want to have some real fun? At the beginning of your session, ask stakeholders to privately write definitions for the handful of obscure nouns you might be uncertain about. Then, have everyone show their cards at the same time and see if you get different definitions (you will). This is gold for exposing misalignment and starting great conversations.

    As your discussion unfolds, capture any agreed-upon definitions. And when uncertainty emerges, quietly (but visibly) start an “open questions” parking lot. 😉

    After definitions solidify, here’s a great follow-up:

    2. Do our users know what these things are? What do users call this thing?

    Stakeholder 1: They probably call email clients “apps.” But I’m not sure.

    Stakeholder 2: Automations are often called “workflows,” I think. Or, maybe users think workflows are something different.

    If a more user-friendly term emerges, ask the group if they can agree to use only that term moving forward. This way, the team can better align to the users’ language and mindset.

    OK, moving on. 

    If you have two or more objects that seem to overlap in purpose, ask one of these questions:

    3. Are these the same thing? Or are these different? If they are not the same, how are they different?

    You: Is a saved response the same as a template?

    Stakeholder 1: Yes! Definitely.

    Stakeholder 2: I don’t think so… A saved response is text with links and variables, but a template is more about the look and feel, like default fonts, colors, and placeholder images. 

    Continue to build out your growing glossary of objects. And continue to capture areas of uncertainty in your “open questions” parking lot.

    If you successfully determine that two similar things are, in fact, different, here’s your next follow-up question:

    4. What’s the relationship between these objects?

    You: Are saved responses and templates related in any way?

    Stakeholder 3:  Yeah, a template can be applied to a saved response.

    You, always with the follow-ups: When is the template applied to a saved response? Does that happen when the user is constructing the saved response? Or when they apply the saved response to an email? How does that actually work?

    Listen. Capture uncertainty. Once the list of “open questions” grows to a critical mass, pause to start assigning questions to groups or individuals. Some questions might be for the dev team (hopefully at least one developer is in the room with you). One question might be specifically for someone who couldn’t make it to the workshop. And many questions will need to be labeled “user.” 

    Do you see how we are building up to our UXR sales pitch?

    5. Is this object in scope?

    Your next question narrows the team’s focus toward what’s most important to your users. You can simply ask, “Are saved responses in scope for our first release?,” but I’ve got a better, more devious strategy.

    By now, you should have a list of clearly defined objects. Ask participants to sort these objects from most to least important, either in small breakout groups or individually. Then, like you did with the definitions, have everyone reveal their sort order at once. Surprisingly—or not so surprisingly—it’s not unusual for the VP to rank something like “saved responses” as #2 while everyone else puts it at the bottom of the list. Try not to look too smug as you inevitably expose more misalignment.

    I did this for a startup a few years ago. We posted the three groups’ wildly different sort orders on the whiteboard.

    The CEO stood back, looked at it, and said, “This is why we haven’t been able to move forward in two years.”

    Admittedly, it’s tragic to hear that, but as a professional, it feels pretty awesome to be the one who facilitated a watershed realization.

    Once you have a good idea of in-scope, clearly defined things, this is when you move on to doing more relationship mapping.

    6. Create a visual representation of the objects’ relationships

    We’ve already done a bit of this while trying to determine if two things are different, but this time, ask the team about every potential relationship. For each object, ask how it relates to all the other objects. In what ways are the objects connected? To visualize all the connections, pull out your trusty boxes-and-arrows technique. Here, we are connecting our objects with verbs. I like to keep my verbs to simple “has a” and “has many” statements.

    This system modeling activity brings up all sorts of new questions:

    • Can a saved response have attachments?
    • Can a saved response use a template? If so, if an email uses a saved response with a template, can the user override that template?
    • Do users want to see all the emails they sent that included a particular attachment? For example, “show me all the emails I sent with ProfessionalImage.jpg attached. I’ve changed my professional photo and I want to alert everyone to update it.” 

    Solid answers might emerge directly from the workshop participants. Great! Capture that new shared understanding. But when uncertainty surfaces, continue to add questions to your growing parking lot.

    Light the fuse

    You’ve positioned the explosives all along the floodgates. Now you simply have to light the fuse and BOOM. Watch the buy-in for user research flooooow.

    Before your workshop wraps up, have the group reflect on the list of open questions. Make plans for getting answers internally, then focus on the questions that need to be brought before users.

    Here’s your final step. Take those questions you’ve compiled for user research and discuss the level of risk associated with NOT answering them. Ask, “if we design without an answer to this question, if we make up our own answer and we are wrong, how bad might that turn out?” 

    With this methodology, we are cornering our decision-makers into advocating for user research as they themselves label questions as high-risk. Sorry, not sorry. 

    Now is your moment of truth. With everyone in the room, ask for a reasonable budget of time and money to conduct 6–8 user interviews focused specifically on these questions. 

    HOT TIP: if you are new to UX research, please note that you’ll likely need to rephrase the questions that came up during the workshop before you present them to users. Make sure your questions are open-ended and don’t lead the user into any default answers.

    Final words: Hold the screen design!

    Seriously, if at all possible, do not ever design screens again without first answering these fundamental questions: what are the objects and how do they relate?

    I promise you this: if you can secure a shared understanding between the business, design, and development teams before you start designing screens, you will have less heartache and save more time and money, and (it almost feels like a bonus at this point!) users will be more receptive to what you put out into the world. 

    I sincerely hope this helps you win time and budget to go talk to your users and gain clarity on what you are designing before you start building screens. If you find success using noun foraging and the Object Definition Workshop, there’s more where that came from in the rest of the ORCA process, which will help prevent even more late-in-the-game scope tugs-of-war and strategy pivots. 

    All the best of luck! Now go sell research!

  • Breaking Out of the Box

    Breaking Out of the Box

    CSS is all about design containers. In fact, the whole website is made of containers, from the website viewport to components on a webpage. However, every now and then a new element appears that prompts us to reevaluate our design philosophy.

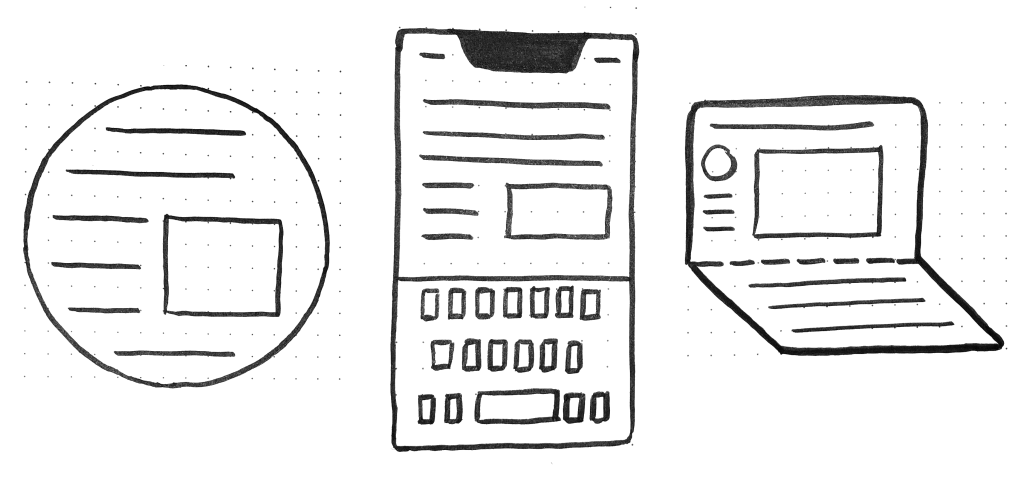
    Square features, for instance, make it fun to play with round picture areas. Mobile screen notches and electronic keyboards present difficulties in how to best coordinate content that stays out of sight. And two display or portable devices make us reassess how to best utilize available space in a number of various device postures.

    These new evolutions of the internet system made it both more demanding and more exciting to design products. They give us a fantastic opportunity to leave our triangular containers.

    I’d like to talk about a new feature similar to the above: the Window Controls Overlay for Progressive Web Apps ( PWAs ).

    Liberal Web Apps are bridging the gap between websites and apps. They combine the best of both worlds. On the one hand, they are flexible, shareable, and stable, just like websites. On the other hand, they provide more effective features, work online, and read documents just like local apps.

    PWAs are really exciting as a style area because they challenge us to consider how to combine online and native user interface. On desktop products in certain, we have more than 40 years of history telling us what applications may look like, and it can be hard to break out of this mental concept.

    PWAs on desktop are ultimately limited to the window they appear in, which is a rectangle with a title bar at the top.

    Here’s what a typical desktop PWA app looks like:

    Sure, as the author of a PWA, you get to choose the color of the title bar (using the Web Application Manifest theme_color property ), but that’s about it.

    What if we could look beyond this box and reclaim the entire window of the app? Doing so would give us a chance to make our apps more beautiful and feel more integrated in the operating system.

    The Window Controls Overlay offers exactly this. This new PWA functionality makes it possible to take advantage of the full surface area of the app, including where the title bar normally appears.

    About the window and title bar controls

    Let’s start with an explanation of what the title bar and window controls are.

    The title bar is the window at the top of an app that typically contains the app’s name. Window controls are the affordances, or buttons, that make it possible to minimize, maximize, or close the app’s window, and are also displayed at the top.

    Window Controls Overlay removes the physical constraint of the title bar and window controls areas. The title bar and window control buttons are overlayed on top of the application’s web content, allowing for full height to be the app window.

    If you are reading this article on a desktop computer, take a quick look at other apps. They’re probably already doing something similar. In fact, the very web browser you are using to read this uses the top area to display tabs.

    Spotify displays album artwork all the way to the top edge of the application window.

    Microsoft Word uses the available title bar space to display the auto-save and search functionalities, and more.

    The goal of this feature is to give you the ability to use this space with your own content while also providing a way to account for the window control buttons. And it enables you to offer this modified experience on a range of platforms while not adversely affecting the experience on browsers or devices that don’t support Window Controls Overlay. PWAs are all about progressive enhancement, so this feature is a chance to make your app use this extra space when it’s available.

    Let’s use the feature

    We’ll be developing a demo app for the remainder of this article to learn more about how to use the feature.

    The demo app is called 1DIV. Users can create designs using only CSS and a single HTML element in this straightforward CSS playground.

    The app has two pages. The first lists the CSS designs you’ve already created:

    The second page enables the creation and editing of CSS designs:

    Since I’ve added a simple web manifest and service worker, we can install the app as a PWA on desktop. What it appears to be on macOS is shown below:

    And on Windows:

    Our app looks good, but the first page’s white title bar is a waste of space. In the second page, it would be really nice if the design area went all the way to the top of the app window.

    Let’s use the Window Controls Overlay feature to make this better.

    Enabling Window Controls Overlay

    The film is still in its experimental phase. To try it, you need to enable it in one of the supported browsers.

    It has currently been incorporated into Chromium as a result of a collaboration between Microsoft and Google. We can therefore use it in Chrome or Edge by going to the internal about: //flags page, and enabling the Desktop PWA Window Controls Overlay flag.

    Using Window Controls Overlay

    To use the feature, we need to add the following display_override member to our web app’s manifest file:

    { "name": "1DIV", "description": "1DIV is a mini CSS playground", "lang": "en-US", "start_url": "/", "theme_color": "#ffffff", "background_color": "#ffffff", "display_override": [ "window-controls-overlay" ], "icons": [ ... ]}

    On the surface, the feature seems to be very simple to use. This manifest change is the only thing we need to make the title bar disappear and turn the window controls into an overlay.

    We’ll need a little bit of CSS and JavaScript code to make the most of the title bar area in our design and make a great experience for all users regardless of device or browser they use.

    Here is what the app looks like now:

    Our logo, search field, and NEW button are now partially covered by the window controls, but the title bar has been removed, which is what we wanted.

    It’s similar on Windows, with the difference that the close, maximize, and minimize buttons appear on the right side, grouped together with the PWA control buttons:

    Screenshot of the Windows operating system’s Window Controls Overlay-enabled 1DIV app thumbnail display. The separate top bar area is gone, but the window controls are now blocking some of the app’s content.

    CSS to stay away from window controls

    Along with the feature, new CSS environment variables have been introduced:

    • titlebar-area-x
    • titlebar-area-y
    • titlebar-area-width
    • titlebar-area-height

    You can use these variables in conjunction with the CSS env function to position your content where the title bar would have been and make sure it doesn’t overlap with the window controls. In our case, we’ll use two of the variables to position our header, which contains the logo, search bar, and NEW button.

    header { position: absolute; left: env(titlebar-area-x, 0); width: env(titlebar-area-width, 100%); height: var(--toolbar-height);}

    The titlebar-area-x variable gives us the distance from the left of the viewport to where the title bar would appear, and titlebar-area-width is its width. (Remember, this is not equivalent to the width of the entire viewport, just the title bar portion, which as noted earlier, doesn’t include the window controls.)

    By doing this, we make sure our content remains fully visible. We’re also defining fallback values (the second parameter in the env() function) for when the variables are not defined (such as on non-supporting browsers, or when the Windows Control Overlay feature is disabled).

    Our header now adapts to its surroundings, and it doesn’t seem like the window control buttons were left out. The app looks a lot more like a native app.

    Changing the window controls the background color so that it blends in

    Now let’s take a closer look at our second page: the CSS playground editor.

    Not very good. Our CSS demo area does go all the way to the top, which is what we wanted, but the way the window controls appear as white rectangles on top of it is quite jarring.

    We can change the theme color of the app to fix this. There are a couple of ways to define it:

      The theme_color manifest member in the web app manifest file can be used by PWAs to define a theme color. This color is then used by the OS in different ways. It is used to give the title bar and window controls a background color on desktop computers.
    • Websites can use the theme-color meta tag as well. It’s used by browsers to customize the color of the UI around the web page. For PWAs, this color can override the manifest theme_color.

    In our case, we can set the manifest theme_color to white to provide the right default color for our app. The OS will read this color value when the app is installed and use it to make the window controls background color white. This color works great for our main page with the list of demos.

    The theme-color meta tag can be changed at runtime, using JavaScript. So we can do that to override the white with the right demo background color when one is opened.

    Here is the function we’ll use:

    function themeWindow(bgColor) { document.querySelector("meta[name=theme-color]").setAttribute('content', bgColor);}

    With this in place, we can envision how using color and CSS transitions can smooth transition from the list page to the demo page and make the window control buttons blend in with the rest of the app’s interface.

    Dragging the window

    Now, getting rid of the title bar entirely does have an important accessibility consequence: it’s much more difficult to move the application window around.

    Users can drag and click their way to a sizable area in the title bar, but when using the Window Controls Overlay feature, they are limited to where the control buttons are, and must carefully place their fingers in between these buttons to move the window.

    Fortunately, this can be fixed using CSS with the app-region property. This property is, for now, only supported in Chromium-based browsers and needs the -webkit- vendor prefix. 

    To make any element of the app become a dragging target for the window, we can use the following:

    -webkit-app-region: drag;

    Additionally, it is possible to expressly make an element non-draggable:

    -webkit-app-region: no-drag; 

    These options can be useful for us. We can make the entire header a dragging target while also making the NEW button and search field non-draggable so they can still be used as normal.

    However, because the editor page doesn’t display the header, users wouldn’t be able to drag the window while editing code. Let’s take a different approach, then. We’ll create another element before our header, also absolutely positioned, and dedicated to dragging the window.

    ...
    .drag { position: absolute; top: 0; width: 100%; height: env(titlebar-area-height, 0); -webkit-app-region: drag;}

    With the above code, we’re making the draggable area span the entire viewport width, and using the titlebar-area-height variable to make it as tall as what the title bar would have been. This way, our draggable area is aligned with the window control buttons as shown below.

    And now to make sure our search field and button are usable:

    header .search,header .new { -webkit-app-region: no-drag;}

    With the above code, users can click and drag where the title bar used to be. Users are expecting to be able to move windows on their desktops, and we don’t violate this expectation, which is good.

    adapting to window resizing

    It may be useful for an app to know both whether the window controls overlay is visible and when its size changes. The search field, logo, and button would need to be pushed down a little bit if the user made the window very narrow.

    The Window Controls Overlay feature comes with a JavaScript API we can use to do this: navigator.windowControlsOverlay.

    The API offers three intriguing features:

    • navigator.windowControlsOverlay.visiblelets us know whether the overlay is visible.
    • navigator.windowControlsOverlay.getBoundingClientRect()lets us know where the title bar’s area is located and how big it is.
    • navigator.windowControlsOverlay.ongeometrychangelets us know when the size or visibility changes.

    Let’s use this to illustrate how large the title bar area is, and move the header down if it’s too small.

    if (navigator.windowControlsOverlay) { navigator.windowControlsOverlay.addEventListener('geometrychange', () => { const { width } = navigator.windowControlsOverlay.getBoundingClientRect(); document.body.classList.toggle('narrow', width < 250); });}

    In the example above, we set the narrow class on the body of the app if the title bar area is narrower than 250px. We could do something similar with a media query, but using the windowControlsOverlay API has two advantages for our use case:

    • It’s only fired when the feature is supported and used, we don’t want to adapt the design otherwise.
    • The title bar area is different for different operating systems, which is great because Mac and Windows have different title bar sizes. Using a media query wouldn’t make it possible for us to know exactly how much space remains.
    .narrow header { top: env(titlebar-area-height, 0); left: 0; width: 100%;}

    When the window is too small, we can move the header down using the above CSS code to avoid hitting the window control buttons, and we can also lower the thumbnails accordingly.

    Thirty pixel of creative challenge


    Using the Window Controls Overlay feature, we were able to take our simple demo app and turn it into something that feels so much more integrated on desktop devices. Something that transcends the typical window restrictions and offers a user with a unique experience.

    In reality, this feature only gives us about 30 pixels of extra room and comes with challenges on how to deal with the window controls. However, these additional space and those difficulties can be used as creative design opportunities.

    More devices of all shapes and forms get invented all the time, and the web keeps on evolving to adapt to them. To make it easier for us web authors to integrate more and more fully with those devices, new features are added to the web platform. From watches or foldable devices to desktop computers, we need to evolve our design approach for the web. Nowadays, web building enables us to think outside the rectangular box.

    So let’s embrace this. Use the common technologies at our disposal and experiment with new concepts to create personalized experiences for all devices using just one codebase!


    If you get a chance to try the Window Controls Overlay feature and have feedback about it, you can open issues on the spec’s repository. You can help make this feature even better because it’s still in its early stages of development. Or, you can take a look at the feature’s existing documentation, or this demo app and its source code.

  • Designers, (Re)define Success First

    Designers, (Re)define Success First

    About two and a half years before, I introduced the concept of normal social style. It was born out of my disappointment with the many obstacles to achieving style that’s accessible and equal, protects people’s protection, firm, and target, benefits society, and restores nature. I argued that we must overcome the difficulties that prevent us from acting morally and that we must functionally integrate design ethics into our daily routine, procedures, and tools to raise it to a more realistic level.

    However, we’re still very far from this best.

    At the time, I didn’t realize yet how to functionally combine morality. Yes, I had found some tools that had worked for me in past projects, such as using checklists, notion monitoring, and “dark truth” sessions, but I didn’t manage to use those in every task. I was still battling for time and support, and at best I had only partially surpassed my goal of having a higher ( moral ) level of design, which is not what I would consider to be structurally integrated.

    I made the decision to investigate deeper the causes of organization that prevent us from practicing regular social style. Today, after much research and experimentation, I believe that I’ve found the code that will let us functionally combine morality. And it’s remarkably easy! However, we must first focus out to understand what we’re going through.

    Control the structure

    Unfortunately, we’re trapped in a capitalist structure that reinforces materialism and inequality, and it’s obsessed with the dream of infinite growth. Sea levels, temperature, and our demand for energy continue to rise unquestioned, while the divide between rich and poor continues to increase. Owners expect ever-higher returns on their investments, and firms feel forced to set short-term goals that reflect this. Over the last years, those targets have twisted our well-intended human-centered mentality into a powerful system that promotes ever-higher levels of consumption. When we’re working for an organization that pursues “double-digit growth” or “aggressive sales targets” ( which is 99 percent of us ), that’s very hard to resist while remaining human friendly. Yet with our best intentions, and even though we like to suggest that we create solutions for people, we’re a part of the problem.

    What can we do to alter this?

    We can begin by acting at the appropriate amount within the structure. Donella H. Meadows, a system scholar, previously listed ways to influence a system in order of success. When you apply these to style, you get:

      At the lowest level of effectiveness, you can change numbers such as accessibility results or the number of layout views. However, none of that will alter a company’s way.
    • Similarly, affecting buffers ( such as team budgets ), stocks ( such as the number of designers ), flows ( such as the number of new hires ), and delays ( such as the time that it takes to hear about the effect of design ) won’t significantly affect a company.
    • Focusing rather on feedback rings such as management power, staff identification, or design-system purchases can help a business become better at achieving its objectives. But that doesn’t alter the goals themselves, which means that the business will also work against your ethical-design ideals.
    • The next level, data flows, is what most ethical-design activities focus on then: the transfer of moral techniques, toolkits, articles, conferences, workshops, and so on. This is where ethical design has largely remained theoretical. We’ve been focusing on the wrong system level all this time.
    • Take rules, for example—they beat knowledge every time. There can be widely accepted rules, such as how finance works, or a scrum team’s definition of done. However, unofficial rules intended to maintain profits, frequently revealed through comments like” the client didn’t ask for it” or “don’t make it too big” can smother ethical design.
    • It is difficult to change the laws without exercising official authority. That’s why the next level is so influential: self-organization. Experimentation, bottom-up initiatives, passion projects, self-steering teams—all of these are examples of self-organization that improve the resilience and creativity of a company. It’s exactly this diversity of viewpoints that’s needed to structurally tackle big systemic issues like consumerism, wealth inequality, and climate change.
    • Yet even stronger than self-organization are objectives and metrics. Every employee of our businesses works hard to increase their profits, which is why everything we do is done. And once I realized that profit is merely a measure, I realized how crucial a very specific, defined metric can be in the direction of a company.

    The takeaway? We must first change the company’s measurable goals from the bottom up if we truly want to incorporate ethics into our daily design practice.

    Redefine success

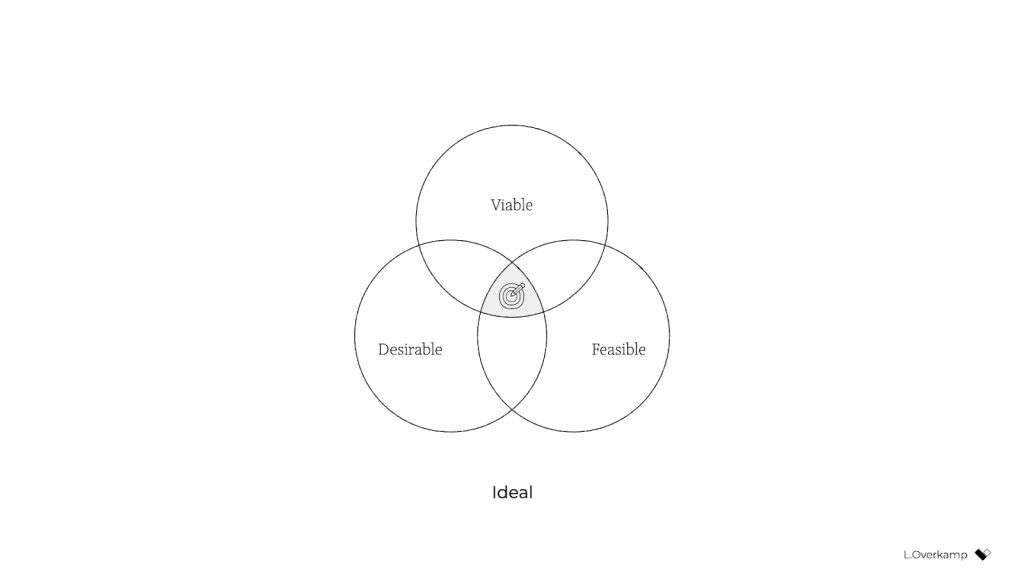
    Traditionally, we consider a product or service successful if it’s desirable to humans, technologically feasible, and financially viable. You tend to see these represented as equals, if you type the three words in a search engine, you’ll find diagrams of three equally sized, evenly arranged circles.

    But in our hearts, we all know that the three dimensions aren’t equally weighted: it’s viability that ultimately controls whether a product will go live. Therefore, a more accurate representation might look like this:

    Viability is the aim, while feasibility and desire are the means. Companies—outside of nonprofits and charities—exist to make money.

    A genuinely purpose-driven company would try to reverse this dynamic: it would recognize finance for what it was intended for: a means. Therefore, both feasibility and viability are important factors in the company’s efforts to accomplish what they stated. It makes intuitive sense: to achieve most anything, you need resources, people, and money. ( Fun fact: the Italian language knows no difference between feasibility and viability, both are simply fattibilità. )

    However, it is insufficient to substitute a desirable for a viable outcome for an ethical one. Consumption is still associated with desirability because the associated activities aim to determine what people want, regardless of whether or not it benefits them. Desirability objectives, such as user satisfaction or conversion, don’t consider whether a product is healthy for people. They don’t stop us from developing products that deceive or deceive people, or do they prevent us from reducing the wealth gap in society. They are unable to restore a healthy relationship with nature.

    There’s a fourth dimension of success that’s missing: our designs also need to be ethical in the effect that they have on the world.

    This is hardly a new idea. Many similar models exist, some calling the fourth dimension accountability, integrity, or responsibility. What I’ve never seen before, however, is the necessary step that comes after: to influence the system as designers and to make ethical design more practical, we must create objectives for ethical design that are achievable and inspirational. There’s no one way to do this because it highly depends on your culture, values, and industry. However, I’ll give you the version I created with a group of coworkers at a design firm. Consider it a template to get started.

    Pursue well-being, equity, and sustainability

    We created objectives that address design’s effect on three levels: individual, societal, and global.

    An individual’s goal on the individual level clarifies what success entails in contrast to the typical user-centric focus on usability and satisfaction, taking into account factors like how much time and effort are required of users. We pursued well-being:

    We create products and services that allow for people’s health and happiness. Our solutions are calm, transparent, nonaddictive, and nonmisleading. We respect our users ‘ time, attention, and privacy, and help them make healthy and respectful choices.

    An objective on the societal level forces us to consider our impact beyond just the user, widening our attention to the economy, communities, and other indirect stakeholders. We called this objective equity:

    We develop goods and services that benefit society. We consider economic equality, racial justice, and the inclusivity and diversity of people as teams, users, and customer segments. We listen to local culture, communities, and those we affect.

    Finally, the global goal of maintaining harmony with humanity’s sole home is the ultimate goal. Referring to it simply as sustainability, our definition was:

    We develop goods and services that reward reuse and sufficiency. Our solutions support the circular economy: we create value from waste, repurpose products, and prioritize sustainable choices. We deliver functionality instead of ownership, and we limit energy use.

    In essence, ethical design ( to us ) meant achieving well-being for each user and an equitable value distribution within society through a design that can sustain our living planet. When we introduced these objectives in the company, for many colleagues, design ethics and responsible design suddenly became tangible and achievable through practical—and even familiar—actions.

    Measure impact

    But defining these objectives still isn’t enough. What truly caught the attention of senior management was the fact that we created a way to measure every design project’s well-being, equity, and sustainability.

    This overview lists example metrics that you can use as you pursue well-being, equity, and sustainability:

    There’s a lot of power in measurement. As the saying goes, what gets measured gets done. Donella Meadows once provided this illustration:

    The system will produce military spending if the desired system state is national security, which is defined as the amount of money spent on the military. It may or may not produce national security”.

    This phenomenon explains why desirability is a poor indicator of success: it’s typically defined as the increase in customer satisfaction, session length, frequency of use, conversion rate, churn rate, download rate, and so on. But none of these metrics increase the health of people, communities, or ecosystems. What if instead we measured success through metrics for ( digital ) well-being, such as ( reduced ) screen time or software energy consumption?

    There’s another important message here. Even if we set an objective to build a calm interface, if we were to choose the wrong metric for calmness—say, the number of interface elements—we could still end up with a screen that induces anxiety. The wrong metric can completely destroy good intentions.

    Additionally, choosing the right metric is enormously helpful in focusing the design team. When you perform the task of selecting metrics for our goals, you are made to consider what success looks like in terms of words and how you can demonstrate that you have met your ethical goals. It also makes you think about what we as designers have control over: what can I add or change in my design process to achieve the desired level of success? The response to this query is very concise and focused.

    And finally, it’s good to remember that traditional businesses run on measurements, and managers love to spend much time discussing charts ( ideally hockey-stick shaped ) —especially if they concern profit, the one-above-all of metrics. For good or ill, to improve the system, to have a serious discussion about ethical design with managers, we’ll need to speak that business language.

    Practice daily ethical design

    Only then do you have a chance to structurally practice ethical design once you have defined your objectives and have a reasonable idea of the potential metrics for your design project. It” simply” becomes a matter of using your imagination and sifting through the knowledge and tools that are already at your disposal.

    I think this is quite exciting! It introduces a whole new set of difficulties and considerations to the design process. Would a brief illustration suffice, or should you go with that enticing video? Which typeface is the most calm and inclusive? What fresh techniques and tools do you employ? When is the website’s end of life? How can you offer the same service to users with less focus? How can you ensure that those who are affected by decisions are present when they are made? How can you measure our effects?

    The definition of success will fundamentally alter what it means to do good design.

    There is, however, a final piece of the puzzle that’s missing: convincing your client, product owner, or manager to be mindful of well-being, equity, and sustainability. For this, it’s essential to engage stakeholders in a dedicated kickoff session.

    Start it off or return to the pre-existing

    The most crucial meeting that it is so easy to forget to include is the kickoff. It consists of two major phases: 1 ) the alignment of expectations, and 2 ) the definition of success.

    In the first phase, the entire ( design ) team goes over the project brief and meets with all the relevant stakeholders. Everyone gets to know one another, shares their hopes for the outcome and their contributions to it. Assumptions are raised and discussed. The goal is to reach the same level of understanding, which will help to prevent mistakes and surprises later on in the project.

    For example, for a recent freelance project that aimed to design a digital platform that facilitates US student advisors ‘ documentation and communication, we conducted an online kickoff with the client, a subject-matter expert, and two other designers. We used a combination of canvases on Miro: one with questions from” Manual of Me” ( to get to know each other ), a Team Canvas ( to express expectations ), and a version of the Project Canvas to align on scope, timeline, and other practical matters.

    The stated purpose of a kickoff is the above. But just as important as expressing expectations is agreeing on what success means for the project—in terms of desirability, viability, feasibility, and ethics. What are the objectives in each dimension?

    You need to be sure that you can trust success at this early stage because it will determine the project’s future. The design team can raise diversity as a specific success criterion during the kickoff if, for instance, they want to create an inclusive app for a diverse user group. If the client consents, the team will be able to recite that promise throughout the project. To create a successful product, we agreed in our first meeting that a diverse user group that includes A and B is necessary. Therefore, we conduct activity X and follow the research procedure Y. Compare those odds to a situation where the team had to ask for permission halfway through the project and didn’t agree to that beforehand. The client might argue that that was in excess of the agreed scope, and she would be correct.

    To define success, I created a round canvas that I call the Wheel of Success in the case of this freelance project. It consists of an inner ring, meant to capture ideas for objectives, and a set of outer rings, meant to capture ideas on how to measure those objectives. The rings are divided into five dimensions of successful design: healthy, equitable, sustainable, desirable, feasible, and viable.

    We went through each dimension, writing down ideas on digital sticky notes. Then we exchanged ideas and verbally agreed on the most crucial ones. Our client, for instance, agreed that the platform’s success depends heavily on sustainability and progressive enhancement. Additionally, the subject-matter expert stressed the value of involving students from underprivileged and low-income groups in the design process.

    In a project brief that adequately described these elements, we followed up our discussions and agreed on them.

      the project’s origin and purpose: why are we doing this project?
    • the problem definition: what do we want to solve?
    • the concrete goals and metrics for each success dimension: what do we want to achieve?
    • the scope, process, and role descriptions: how will we achieve it?

    With such a brief in place, you can use the agreed-upon objectives and concrete metrics as a checklist of success, and your design team will be ready to pursue the right objective—using the tools, methods, and metrics at their disposal to achieve ethical outcomes.

    Conclusion

    Over the past year, quite a few colleagues have asked me,” Where do I start with ethical design”? Create a session with your stakeholders to ( re)define success, which is what my response has always been. Even though you might not always be entirely successful in coming to terms with goals that address all responsibility objectives, that consistently beats the status quo. If you want to be an ethical, responsible designer, there’s no skipping this step.

    To be even more specific: if you consider yourself a strategic designer, your challenge is to define ethical objectives, set the right metrics, and conduct those kick-off sessions. If you think of yourself as a system designer, you need to understand how your industry influences consumerism and inequality, how finance drives business, and how to think creatively about how to use the most powerful tools to influence the system. Then redefine success to give people the ability to use those tools.

    And for those who identify as service designers, UX designers, or UI designers, stay away from the toolkits, meetups, and conferences for a while if you truly want to have a positive, meaningful impact. Instead, gather your colleagues and define goals for well-being, equity, and sustainability through design. Engage your stakeholders in a workshop and challenge them to think about ways to accomplish and evaluate those ethical objectives. Take their input, make it concrete and visible, ask for their agreement, and hold them to it.

    Otherwise, I’m genuinely sorry to say, you’re wasting your precious time and creative energy.

    Of course, engaging your stakeholders in this way can be uncomfortable. Many of my colleagues expressed doubts such as” What will the client think of this”?,” Will they take me seriously”?, and “Can’t we just do it within the design team instead”? In fact, a product manager once questioned why ethics couldn’t just be a set process for design, allowing one to simply pursue it without making the effort to define ethical goals. It’s a tempting idea, right? Without having to deliberate about the appropriate values or key performance indicators, we wouldn’t have to discuss them with stakeholders. It would let us focus on what we like and do best: designing.

    But as systems theory tells us, that’s not enough. That uncomfortable space is where we need to be if we truly want to make a difference, for those of us who aren’t from marginalized groups and have the privilege of speaking up and being heard. We can’t remain within the design-for-designers bubble, enjoying our privileged working-from-home situation, disconnected from the real world out there. If we only keep talking about ethical design and it continues to be contained within articles and toolkits, for those of us who have the opportunity to speak up and be heard, we are not designing ethically. It’s just theory. By challenging them to redefine success in business, we must actively engage with our colleagues and clients.

    With a bit of courage, determination, and focus, we can break out of this cage that finance and business-as-usual have built around us and become facilitators of a new type of business that can see beyond financial value. We simply need to come to terms with the right goals at the start of each design project, identify the appropriate metrics, and acknowledge that we already have everything in place to begin. That’s what it means to do daily ethical design.

    For their inspiration and support over the years, I would like to thank Emanuela Cozzi Schettini, José Gallegos, Annegret Bönemann, Ian Dorr, Vera Rademaker, Virginia Rispoli, Cecilia Scolaro, Rouzbeh Amini, and many others.

  • Personalization Pyramid: A Framework for Designing with User Data

    Personalization Pyramid: A Framework for Designing with User Data

    As a UX skilled in today’s data-driven landscape, it’s extremely likely that you’ve been asked to design a personal digital experience, whether it’s a common website, user portal, or local application. Despite there still be a lot of marketing hype surrounding personalization systems, there are still very some standardized methods for implementing personalized UX.

    That’s where we come in. We set ourselves the challenge of developing a systematic personalization framework especially for UX practitioners after finishing dozens of personalization tasks over the past few years. The Personalization Pyramid is a designer-centric model for standing up human-centered personalisation programs, spanning information, classification, content delivery, and general goals. By using this strategy, you will be able to understand the core components of a modern, UX-driven personalization system ( or at the very least understand enough to get started ).

    Getting Started

    For the sake of this article, we’ll suppose you’re already familiar with the basics of online personalization. A nice guide can be found these: Website Personalization Planning. Although Graphic projects in this field can take a variety of forms, they frequently start from the same place.

    Popular circumstances for launching a personalization task:

    • Your business or client made a purchase to personalize their content management system ( CMS ), marketing automation platform ( MAP ), or other related technology.
    • The CMO, CDO, or CIO has identified personalisation as a target
    • User data is disjointed or confusing
    • You are conducting some sporadic targeting or A/B assessment.
    • On the personalisation approach, parties of contention
    • Mandate of customer privacy rules ( e. g. GDPR ) requires revisiting existing user targeting practices

    A powerful personalization system will need the same fundamental building blocks regardless of where you begin. We’ve captured these as the “levels” on the tower. Whether you are a UX artist, scholar, or planner, understanding the core components may help make your contribution effective.

    From top to bottom, the amounts include:

      North Star: What larger corporate goal is driving the personalization system?
    1. Objectives: What are the specific, tangible benefits of the system?
    2. Touchpoints: Where will the personalized experience become served?
    3. Contexts and Campaigns: What personalization information does the person view?
    4. User Divisions: What constitutes a special, suitable market?
    5. Actionable Data: What trustworthy and credible information is collected by our specialized software to improve personalization?
    6. Natural Data: What wider set of data is potentially available ( now in our environment ) allowing you to optimize?

    We’ll go through each of these amounts sequentially. An associated deck of cards serves as an example of each level’s specific examples to make this more meaningful. We’ve found them useful in brainstorming about personalisation, so we’ll provide examples for you here.

    Beginning at the Top

    The parts of the pyramids are as follows:

    North Star

    With your personalisation plan, whether large or small, you aim for a general north star. The North Star identifies the personalization program’s (one ) overall goal. What do you wish to perform? North Stars cast a ghost. The bigger the sun, the bigger the dark. Example of North Starts may contain:

      Function: Personalize based on basic customer sources. Examples:” Raw” messages, basic search effects, system user settings and settings options, general flexibility, basic improvements
    1. Feature: Self-contained customisation componentry. Examples:” Cooked” notifications, advanced optimizations ( geolocation ), basic dynamic messaging, customized modules, automations, recommenders
    2. Experience: Personal user experiences across numerous interactions and consumer flows. Examples: Email campaigns, landing pages, advanced messaging ( i. e. C2C chat ) or conversational interfaces, larger user flows and content-intensive optimizations ( localization ).
    3. Solution: Highly differentiating customized product experiences. Example: Standalone, branded experience with personalization at their base, like the “algotorial” songs by Spotify quite as Discover Weekly.

    Goals

    As in any great UX design, personalization may help promote designing with client intentions. The goals serve as the military and tangible indicators of the success of the entire program. Start with your existing analytics and measurement system, as well as indicators you can benchmark against. In some cases, new targets may be suitable. The most important thing to keep in mind is that personalisation is certainly a desired outcome. Common targets include:

    • Conversion
    • Time on work
    • Net promoter score ( NPS)
    • Client satisfaction

    Touchpoints

    Touchpoints are where personalisation takes place. As a UX artist, this will be one of your largest areas of responsibility. The touchpoints you have will depend on how your personalization and the related technology are implemented, and they should be based on enhancing a person’s encounter at a specific point in the journey. Touchpoints can be multi-device ( mobile, in-store, website ) but also more granular ( web banner, web pop-up etc. ). Here are some examples:

    Channel-level Touchpoints

    • Email: Role
    • Email: Period of empty
    • In-store display ( JSON endpoint )
    • Native game
    • Search

    Wireframe-level Touchpoints

    • Web overlay
    • Web call bar
    • Web symbol
    • Web content wall
    • Web list

    If you’re designing for online interface, for instance, you will likely need to include personal “zones” in your wireframes. Based on our next action, context, and campaigns, the articles for these can be presented dynamically in touchpoints.

    Contexts and Campaigns

    After you’ve outlined some touchpoints, you may consider the actual personal information a user may acquire. Many personalization tools will refer to these as” campaigns” ( so, for example, a campaign on a web banner for new visitors to the website ). These will be displayed automatically to specific customer sections, as defined by consumer data. At this stage, we find it helpful to contemplate two distinct concepts: a framework design and a willing design. The environment helps you consider the level of user engagement at the customisation moment, for instance, if they are just lightly browsing information rather than engaging in a deep dive. Think of it in terms of behavior in data retrieval. The content model can then guide you in deciding which personalization to use in terms of the context ( for instance, an” Enrich” campaign that features related articles might be a good substitute for extant content ).

    Personalization Context Model:

    1. Browse
    2. Skim
    3. Nudge
    4. Feast

    Personalization Content Model:

    1. Alert
    2. Create Easier
    3. Cross-Sell
    4. Enrich

    We’ve written a lot about each of these concepts abroad, so if you’d like to learn more, check out Colin’s Personalization Content Model and Jeff’s Personalization Context Model.

    User Divisions

    User segments may be created based on consumer research, either prescriptively or flexibly ( for example, using principles and logic tied to set user actions or through A/B testing ). You will need to think about how to treat the logged-in visitor, the guest or returning visitor for whom you may have a stateful cookie ( or another post-cookie identifier ), or the authenticated visitor who is logged in at the very least. The personalisation pyramid has some of the following instances:

    • Unknown
    • Guest
    • Authenticated
    • Default
    • Referred
    • Role
    • Cohort
    • Unique ID

    Actionable Data

    Every business with a online presence has information. It’s a matter of examining what user data you can ethically collect, its inherent reliability and value, and how you can use it ( sometimes referred to as “data activation” ). Fortunately, the tide is turning to first-party information: a recent study by Twilio estimates some 80 % of firms are using at least some type of first-party information to personalize the customer experience.

    First-party information represents multiple benefits on the UX before, including being relatively simple to acquire, more likely to be accurate, and less susceptible to the” creep issue” of third-party information. Therefore, determining which method of data collection is best for your audiences should be a crucial component of your UX strategy. Here are some examples:

    When it comes to recognizing and making decisions about various audiences and their signals, there is a trend of profiling. As time and confidence and data volume increase, it varies to more granular constructs about smaller and smaller cohorts of users.

    Although some combination of implicit and explicit data is typically required for any implementation ( more commonly known as first party and third-party data ), ML efforts are typically not cost-effective right away. This is because optimization requires a strong data backbone and content repository. These approaches, however, should be taken into account as part of the overall plan and may in fact help to speed up the organization’s progress overall. At this point, you will typically work with key stakeholders and product owners to create a profiling model. The profiling model includes a defining framework for setting up profiles, profile keys, profile cards, and pattern cards. A multi-faceted approach to profiling which makes it scalable.

    Pulling it Together

    The cards serve as a starting point for an inventory of sorts ( we offer blanks for you to customize your own ), a set of potential levers and motivations for the personalization activities you aspire to deliver, but they are more valuable when grouped together.

    One can begin to trace the entire course of a card’s “hand” from leadership focus down to a strategic and tactical execution. It serves as the foundation for the workshops that both co-authors have conducted to build a program backlog, which would make a good article topic.

    In the meantime, it is important to note that each colored class of cards is helpful in understanding the range of options that you might have, as well as making informed choices about who, where, when, and how, will be made these choices.

    Lay Down Your Cards

    Any sustainable personalization strategy must consider near, mid and long-term goals. There is simply no “easy button” where a personalization program can be stood up and immediately see meaningful results, even with the leading CMS platforms like Sitecore and Adobe or the most exciting composable CMS DXP out there. That said, there is a common grammar to all personalization activities, just like every sentence has nouns and verbs. These cards attempt to map that territory.

  • Mobile-First CSS: Is It Time for a Rethink?

    Mobile-First CSS: Is It Time for a Rethink?

    The mobile-first style approach is great—it focuses on what really matters to the consumer, it’s well-practiced, and it’s been a popular style design for years. But developing your CSS mobile-first should also be wonderful, too…right?

    Well, not necessarily. Classic mobile-first CSS development is based on the principle of overwriting style declarations: you begin your CSS with default style declarations, and overwrite and/or add new styles as you add breakpoints with min-width media queries for larger viewports (for a good overview see “What is Mobile First CSS and Why Does It Rock?”). But all those exceptions create complexity and inefficiency, which in turn can lead to an increased testing effort and a code base that’s harder to maintain. Admit it—how many of us willingly want that?

    Mobile-first CSS may yet be the best option for your own projects, but you need to first determine how ideal it is in light of the physical design and user interactions you’re working on. To help you get started, here’s how I go about tackling the elements you need to watch for, and I’ll discuss some alternative remedies if mobile-first doesn’t seem to fit your job.

    Benefits of mobile-first

    Some of the points to enjoy with mobile-first CSS creation —and why it’s been the de facto growth strategy for thus long—make a lot of feeling:

    Development order. One thing you definitely get from mobile-first is a great development hierarchy—you only focus on the cellular view and get developing.

    Tried and tested. It’s a tried-and-true method that has worked for years because it solves a problem actually also.

    Prioritizes the smart see. The smart see is the simplest and arguably the most significant because it covers all of the crucial consumer journeys and frequently accounts for more user visits ( depending on the project ) in terms of complexity.

    Stops desktop-centric growth. It can be tempting to first focus on the desktop perspective because desktop computers are used for growth. However, considering mobile from the beginning prevents us from getting stuck eventually; no one wants to spend their day getting a site that is focused on desktops to work on mobile devices!

    Drawbacks of mobile-first

    Model declarations can be set at higher breakpoints and therefore overwritten at higher breakpoints:

    More difficulty. The more unneeded code you inherit from lower thresholds the higher up the target order you ascend.

    Higher CSS precision. Styles that have been returned to the default value in a class name charter then have a higher sensitivity. When you want to preserve the CSS candidates as simple as possible, this can be a headache on massive projects.

    Requires more analysis tests. All higher thresholds must be regression tested if changes to CSS at a lower see ( such as adding a new style ) are to be made.

    The browser can’t prioritize CSS downloads. At wider breakpoints, classic mobile-first min-width media queries don’t leverage the browser’s capability to download CSS files in priority order.

    The issue of home value overrides

    Overwriting values is not necessarily essentially wrong; CSS was created to do that. However, sharing incorrect values is counterproductive and can be burdensome and inadequate. When you have to replace styles to restore them back to their defaults, which may cause issues after, especially if you are using a combination of bespoke CSS and power classes, it can also lead to more fashion specificity. We won’t be able to use a utility class on a style that has been increased in specificity when it was reset.

    With this in mind, I’m developing CSS with a focus on the default values much more these days. Since there’s no specific order, and no chains of specific values to keep track of, this frees me to develop breakpoints simultaneously. I concentrate on finding common styles and isolating the specific exceptions in closed media query ranges (that is, any range with a max-width set). 

    This approach opens up some opportunities, as you can look at each breakpoint as a clean slate. If a component’s layout looks like it should be based on Flexbox at all breakpoints, it’s fine and can be coded in the default style sheet. However, if it appears that Grid would be much better for screens with large screens and Flexbox would be better for mobile, both can be accomplished entirely independently when the CSS is placed into closed media query ranges. Additionally, developing simultaneously requires you to have a thorough understanding of any given component in all breakpoints right away. This can help identify issues with the design more quickly in the development process. We don’t want to travel down the rabbit hole while creating complex mobile components, only to discover that the desktop designs are just as complex and incompatible with the HTML we created for the mobile view!

    Though this approach isn’t going to suit everyone, I encourage you to give it a try. There are plenty of tools out there to help with concurrent development, such as Responsively App, Blisk, and many others.

    Having said that, I don’t feel the order itself is particularly relevant. If you like to work on one device at a time, are comfortable with focusing on the mobile view, and have a good understanding of the requirements for other breakpoints, then you should definitely stick to the classic development order. It’s crucial to find common styles and exceptions in the appropriate stylesheet, which is a manual tree-shaking procedure! Personally, I find this a little easier when working on a component across breakpoints, but that’s by no means a requirement.

    Closed media query ranges in practice

    In classic mobile-first CSS we overwrite the styles, but we can avoid this by using media query ranges. To illustrate the difference ( I’m using SCSS for brevity ), let’s assume there are three visual designs:

    • smaller than 768
    • from 768 to below 1024
    • 1024 and anything larger

    Take a simple example where a block-level element has a default padding of “20px,” which is overwritten at tablet to be “40px” and set back to “20px” on desktop.

    Classic min-width mobile-first

    .my-block { padding: 20px; @media (min-width: 768px) { padding: 40px; } @media (min-width: 1024px) { padding: 20px; }}

    Closed media query range

    .my-block { padding: 20px; @media (min-width: 768px) and (max-width: 1023.98px) { padding: 40px; }}

    The subtle difference is that the mobile-first example sets the default padding to “20px” and then overwrites it at each breakpoint, setting it three times in total. In contrast, the second example sets the default padding to “20px” and only overrides it at the relevant breakpoint where it isn’t the default value (in this instance, tablet is the exception).

    The goal is to: 

    • Only set styles when needed. 
    • Not set them with the expectation of overwriting them later on, again and again. 

    To this end, closed media query ranges are our best friend. If we need to make a change to any given view, we make it in the CSS media query range that applies to the specific breakpoint. We’ll be much less likely to introduce unwanted alterations, and our regression testing only needs to focus on the breakpoint we have actually edited. 

    Taking the above example, if we find that .my-block spacing on desktop is already accounted for by the margin at that breakpoint, and since we want to remove the padding altogether, we could do this by setting the mobile padding in a closed media query range.

    .my-block {  @media (max-width: 767.98px) {    padding: 20px;  }  @media (min-width: 768px) and (max-width: 1023.98px) {    padding: 40px;  }}

    The browser default padding for our block is “0,” so instead of adding a desktop media query and using unset or “0” for the padding value (which we would need with mobile-first), we can wrap the mobile padding in a closed media query (since it is now also an exception) so it won’t get picked up at wider breakpoints. At the desktop breakpoint, we won’t need to set any padding style, as we want the browser default value.

    separating the CSS from combining it

    Back in the day, keeping the number of requests to a minimum was very important because the browser's concurrent request limit (typically around six ) was high. As a consequence, the use of image sprites and CSS bundling was the norm, with all the CSS being downloaded in one go, as one stylesheet with highest priority.

    With HTTP/2 and HTTP/3 now on the scene, the number of requests is no longer the big deal it used to be. This enables us to use a media query to break CSS into multiple files. The obvious benefit of this is that the browser can now request the CSS it currently requires with a higher priority than the CSS it doesn't. This is more effective and can shorten the amount of time a page is blocked overall.

    Which HTTP version are you using?

    To determine which version of HTTP you're using, go to your website and open your browser's dev tools. Next, select the Network tab and check whether the Protocol column is visible. If "h2" is listed under Protocol, it means HTTP/2 is being used.

    Note: to view the Protocol in your browser's dev tools, go to the Network tab, reload your page, right-click any column header ( e. g., Name ), and check the Protocol column.

    Also, if your site is still using HTTP/1... WHY?!! What are you anticipating? The HTTP/2 user support is excellent.

    Splitting the CSS

    Separating the CSS into individual files is a worthwhile task. Linking the separate CSS files using the relevant media attribute allows the browser to identify which files are needed immediately (because they’re render-blocking) and which can be deferred. Based on this, it allocates each file an appropriate priority.

    We can see that the mobile and default CSS are loaded with" Highest" priority in the following example of a website that is visited on a mobile breakpoint, since they are currently required to render the page. The remaining CSS files ( print, tablet, and desktop ) are still downloaded in case they'll be needed later, but with" Lowest" priority.

    Before rendering can begin, the browser will need to download and parse the CSS file when using bundled CSS.

    While, as noted, with the CSS separated into different files linked and marked up with the relevant media attribute, the browser can prioritize the files it currently needs. Using closed media query ranges allows the browser to do this at all widths, as opposed to classic mobile-first min-width queries, where the desktop browser would have to download all the CSS with Highest priority. We can’t assume that desktop users always have a fast connection. For instance, in many rural areas, internet connection speeds are still slow. 

    Depending on project requirements, the media queries and the number of separate CSS files may vary from one project to the next, but the example below may look similar.

    Bundled CSS


    This single file contains all the CSS, including all media queries, and it will be downloaded with Highest priority.

    Separated CSS


    Separating the CSS and specifying a media attribute value on each link tag allows the browser to prioritize what it currently needs. Out of the five files listed above, two will be downloaded with Highest priority: the default file, and the file that matches the current media query. The others will be downloaded with Lowest priority.

    Depending on the project’s deployment strategy, a change to one file (mobile.css, for example) would only require the QA team to regression test on devices in that specific media query range. Compare that to the prospect of deploying the single bundled site.css file, an approach that would normally trigger a full regression test.

    Moving on

    The adoption of mobile-first CSS was a significant development milestone because it allowed front-end developers to concentrate on mobile web applications rather than creating websites for desktop use and attempting to convert them to work on other devices.

    I don't think anyone wants to return to that development model again, but it's important we don't lose sight of the issue it highlighted: that things can easily get convoluted and less efficient if we prioritize one particular device—any device—over others. For this reason, focusing on the CSS in its own right, always mindful of what is the default setting and what's an exception, seems like the natural next step. I've started to notice subtle simplifications in the CSS I write for myself as well as other developers, and that the testing and maintenance work is also a little more organized and effective.

    In the end, simplifying CSS rule creation whenever possible is a more effective strategy than circling around with overrides. But whichever methodology you choose, it needs to suit the project. Mobile-first may—or may not—turn out to be the best choice for what's involved, but first you need to solidly understand the trade-offs you're stepping into.

  • Humility: An Essential Value

    Humility: An Essential Value

    Humility, a writer’s necessary value—that has a good ring to it. What about sincerity, an business manager’s necessary value? Or a surgeon’s? Or a teacher’s? They all good wonderful. When humility is our guiding light, the course is usually available for fulfillment, development, relation, and commitment. In this book, we’re going to discuss about why.

    That said, this is a guide for developers, and to that conclusion, I’d like to begin with a story—well, a voyage, actually. It’s a private one, and I’m going to make myself prone as well. I call it:

    The Tale of Justin’s Preposterous Pate

    When I was coming out of arts school, a long-haired, goateed novice, write was a known quantity to me, design on the web, however, was riddled with complexities to understand and learn, a problem to be solved. Though I had been fully trained in graphic design, font, and design, what fascinated me was how these classic skills may be applied to a budding online landscape. This style may ultimately determine the direction of my job.

    So I devoured HTML and JavaScript novels into the wee hours of the morning and self-taught myself how to code during my freshman year rather than student and go into print like many of my companions. I needed to understand the main ramifications of what my style choices may ultimately result in when rendered in a website.

    The later ‘ 90s and early 2000s were the so-called” Wild West” of website design. All designers at the time were trying to figure out how to incorporate design and visual connection into the online landscape. What were the laws? How may we break them and also engage, entertain, and present information? At a more micro level, how was my values, inclusive of modesty, admiration, and link, coincide in combination with that? I was eager to learn more.

    Those are amazing factors between non-career relationships and the world of style, even though I’m talking about a different time. What are your main passions, or ideals, that elevate medium? The main themes remain the same, much like the clear parallels between what fulfills you, who is independent of the physical or digital worlds.

    First within tables, animated GIFs, Flash, then with Web Standards, divs, and CSS, there was personality, raw unbridled creativity, and unique means of presentment that often defied any semblance of a visible grid. Splash screens and “browser requirement” pages aplenty. Usability and accessibility were typically victims of such a creation, but such paramount facets of any digital design were largely (and, in hindsight, unfairly) disregarded at the expense of experimentation.

    For example, this iteration of my personal portfolio site (” the pseudoroom” ) from that era was experimental, if not a bit heavy- handed, in the visual communication of the concept of a living sketchbook. Very skeuomorphic. On this one, I worked with fellow designer and dear friend Marc Clancy, who is now a co-founder of the creative project organizing app Milanote, to sketch and then play with various user interactions. Then, I’d break it down and code it into a digital layout.

    Along with design folio pieces, the site also offered free downloads for Mac OS customizations: desktop wallpapers that were effectively design experimentation, custom-designed typefaces, and desktop icons.

    From around the same time, GUI Galaxy was a design, pixel art, and Mac-centric news portal some graphic designer friends and I conceived, designed, developed, and deployed.

    Design news portals were incredibly popular during this period, featuring ( what would now be considered ) Tweet-size, small-format snippets of pertinent news from the categories I previously mentioned. If you took Twitter, curated it to a few categories, and wrapped it in a custom-branded experience, you’d have a design news portal from the late 90s / early 2000s.

    We as designers had evolved and created a bandwidth-sensitive, web standards award-winning, much more accessibility-conscious website. Still ripe with experimentation, yet more mindful of equitable engagement. You can see a couple of content panes here, noting general news (tech, design ) and Mac-centric news below. We also provided many of the custom downloads I mentioned earlier as accessible on my folio site with a GUI Galaxy theme and branding.

    The site’s backbone was a homegrown CMS, with the presentation layer consisting of global design + illustration + news author collaboration. And the collaboration effort here, in addition to experimentation on a’ brand’ and content delivery, was hitting my core. We were creating something bigger than just one of us and establishing a global audience.

    Collaboration and connection transcend media in their impact, which have been extremely satisfying for me as a designer.

    Now, why am I taking you on this trip through design memory lane? Two reasons.

    First, there’s a reason for the nostalgia for that design era ( the” Wild West” era, as I called it earlier ): the inherent exploration, personality, and creativity that saturated many design portals and personal portfolio sites. Ultra-finely detailed pixel art UI, custom illustration, bespoke vector graphics, all underpinned by a strong design community.

    Today’s web design has been in a period of stagnation. There’s a good chance you’ve seen a website with a hero image, a banner with text overlays, perhaps with a lovely rotating carousel of images ( laying the snark on heavy there ), three columns of sub-content directly beneath, and three columns of sub-content, according to the theory. Perhaps there are selections that vaguely relate to their respective content in an icon library.

    Design, as it’s applied to the digital landscape, is in dire need of thoughtful layout, typography, and visual engagement that goes hand-in-hand with all the modern considerations we now know are paramount: usability. Accessibility. Load times and bandwidth- sensitive content delivery. A user-friendly presentation that connects with people wherever they are. We must be mindful of, and respectful toward, those concerns—but not at the expense of creativity of visual communication or via replicating cookie-cutter layouts.

    Pixel Problems

    Websites built during this time period were frequently built using Macs with OS and desktops that resembled this. This is Mac OS 7.5, but 8 and 9 weren’t that different.

    Desktop icons fascinated me: how could any single one, at any given point, stand out to get my attention? In this example, the user’s desktop is tidy, but think of a more realistic example with icon pandemonium. Or, say an icon was part of a larger system grouping ( fonts, extensions, control panels ) —how did it also maintain cohesion amongst a group?

    These were 32 x 32 pixel creations, utilizing a 256-color palette, designed pixel-by-pixel as mini mosaics. Under such absurd constraints, this seemed to me to be the embodiment of digital visual communication. And frequently, ridiculous limitations can lead to the purification of concept and theme.

    So I began to research and do my homework. I was a student of this new medium, hungry to dissect, process, discover, and make it my own.

    Expanding upon the notion of exploration, I wanted to see how I could push the limits of a 32×32 pixel grid with that 256-color palette. These absurd restrictions imposed a clarity of concept and presentation that I found incredibly appealing. I was thrown the digital gauntlet, and that challenge fueled my determination. And so, in my dorm room into the wee hours of the morning, I toiled away, bringing conceptual sketches into mini mosaic fruition.

    These are some of my creations that made use of ResEdit, the only program I had at the time, to create icons. ResEdit was a clunky, built-in Mac OS utility that wasn’t really designed for what we were using it for. At the core of all of this work: Research. Challenge. Problem- solving. Again, these core connection-based values are agnostic of medium.

    One more design portal that I want to mention also serves as the second reason for my story to connect this all.

    This is K10k, short for Kaliber 1000. Michael Schmidt and Toke Nygaard founded K10k in 1998, which served as the web’s design news source at the time. With its pixel art-fueled presentation, ultra-focused care given to every facet and detail, and with many of the more influential designers of the time who were invited to be news authors on the site, well… it was the place to be, my friend. The concept of GUI Galaxy was inspired by what these people were doing, respect where respect is due.

    For my part, the combination of my pixel art and web design work started to gain me some notoriety in the design world. K10k eventually added me as one of their very select group of news writers to the website’s content.

    Amongst my personal work and side projects —and now with this inclusion—in the design community, this put me on the map. My design work has also begun to appear on other design news portals, as well as in publications abroad and domestically as well as in various printed collections. With that degree of success while in my early twenties, something else happened:

    I evolved—devolved, really—into a colossal asshole ( and in just about a year out of art school, no less ). What satisfied me was the praise and the press, which went on to completely alter my mind. My ego was inflated by them. I actually felt a little better than my fellow designers.

    The casualties? My design stagnated. Its evolution—my evolution — stagnated.

    I effectively stopped researching and discovering because I felt so confident in my abilities. When I used to lead myself to iterate through concepts or sketches, I leaped right into Photoshop. I got my inspiration from the tiniest of sources ( while wearing a blindfold ). My peers frequently vehemently disapproved of any criticism of my work. The most tragic loss: I had lost touch with my values.

    My ego almost destroyed some of my friendships and blossoming professional relationships. I was toxic in talking about design and in collaboration. But thankfully, those same friends gave me a priceless gift: candor. They called me out on my unhealthy behavior.

    It was a gift I initially did not accept but which I, on the whole, was able to reflect on in depth. I was soon able to accept, and process, and course correct. The realization laid me low, but the re-awakening was essential. I let go of the “reward” of admiration and focused instead on what ignited the fire in my art school. Most importantly: I got back to my core values.

    Always Students

    Following that short-term regression, I was able to push forward in my personal design and career. And as I grew older, I could reflect on myself to help with further development and course correction.

    As an example, let’s talk about the Large Hadron Collider. The LHC was created” to assist in answering some of the fundamental open questions in physics, which concern the fundamental laws governing the interactions and forces between elementary objects, the complex structure of space and time, and in particular the relationship between general relativity and quantum mechanics.” Thanks, Wikipedia.

    In one of my earlier professional roles, I about fifteen years ago created the interface for the application that produced the LHC’s particle collision diagrams. These diagrams are the depiction of what is actually happening inside the Collider during any given particle collision event and are frequently regarded as works of art by themselves.

    I had a fascinating experience designing the interface for this application because I collaborated with Fermilab physicists to understand both what the application was attempting to achieve and how the physicists themselves would be using it. To that end, in this role,

    Working with the Fermilab team to iterate and make improvements to the interface, I cut my teeth on usability testing. To me, their language and the topics they discussed seemed foreign. And by making myself humble and operating under the impression that I was just a student, I made myself available to them in order to form that crucial bond.

    I also had my first ethnographic observational experience, which involved visiting the Fermilab location and observing how the physicists used the tool in their own environments, on their own terminals. One takeaway was that the data columns ended up using white text on a dark gray background rather than black text-on-white because of the facility’s level of ambient light-driven contrast. This made it easier for them to pore over a lot of data during the day and lessen their strain on their eyes. Additionally, since Fermilab and CERN are government entities with strict accessibility standards, my knowledge in that field increased. The barrier-free design was another essential form of connection.

    So to those core drivers of my visual problem-solving soul and ultimate fulfillment: discovery, exposure to new media, observation, human connection, and evolution. Before I entered those values, I checked my ego before entering the door.

    An evergreen willingness to listen, learn, understand, grow, evolve, and connect yields our best work. In particular, I want to focus on the words’ grow’ and ‘ evolve’ in that statement. If we are constantly improving our craft, we are also continuously making ourselves available for improvement. Yes, we have years of practical design experience behind us. or the intensive lab training offered at a UX bootcamp. Or the monogrammed portfolio of our work. Or, ultimately, decades of a career behind us.

    But all that said: experience does not equal “expert”.

    The designer we are is our final form when we close our minds with an inner monologue of “knowing it all” or branding ourselves a” #thoughtleader” on social media. The artist we can be will never be there.

  • User Research Is Storytelling

    User Research Is Storytelling

    I’ve been fascinated by shows since I was a child. I loved the heroes and the excitement—but most of all the stories. I aspired to be an artist. And I backed up the idea that I would get to do the things Indiana Jones did and have interesting adventures. I also dreamed up suggestions for videos that my friends and I could render and sun in. But they never advanced more. However, I did end up in the user experience ( UX) field. Today, I realize that there’s an element of drama to UX— I hadn’t actually considered it before, but consumer research is story. And you must show a compelling story to entice stakeholders, such as the product team and decision-makers, to learn more in order to get the most out of consumer research.

    Think about your favorite film. More than likely it follows a three-act construction that’s frequently seen in story: the layout, the fight, and the quality. The second act provides an overview of the characters, their difficulties, and issues that they face, as well as a description of what is happening now. Act two sets the scene for the fight and introduces the action. Here, issues grow or get worse. And the solution is the third and final work. The figures learn and change as a result of the resolutions and issues are resolved. I believe that this architecture is also a great way to think about customer study, and I think that it can be particularly helpful in explaining person exploration to others.

    Use story as a framework for conducting analysis

    Unfortunately, some people now believe that study is unprofitable. If finances or timelines are small, analysis tends to be one of the first points to go. Some goods managers rely on developers or, worse, their own mind to make the “right” decisions for customers based on their experience or accepted best practices rather than investing in research. That may lead some groups, but that approach can so easily miss the chance to solve clients ‘ real issues. To be user-centered, this is something we really avoid. User study improves pattern. It keeps it on track by pointing out issues and prospects. Being aware of the issues with your product and reacting to them can help you stay away of your competition.

    Each action in the three-act structure is crucial to telling the complete story, and each action corresponds to a specific stage of the process. Let’s examine the various functions and how they relate to customer study.

    Act one: layout

    The basic study comes in handy because the layout is all about understanding the background. Basic research ( also known as conceptual, discovery, or preliminary research ) aids in understanding users and identifying their issues. You’re learning about what exists now, the obstacles people have, and how the problems affect them—just like in the videos. You can conduct contextual inquiries or diary studies ( or both! ) to conduct foundational research. ), which may assist you in identifying both prospects and problems. It doesn’t need to be a great investment in time or money.

    What is the least feasible ethnography that Erika Hall can do is spend fifteen minutes with a consumer and say,” Walk me through your day yesterday. That is it. Provide that one ask. Opened up and spend fifteen minutes listening to them. Do everything in your power to protect both your objectives and yourself. Bam, you’re doing ethnography”. According to Hall, “[This ] will definitely prove quite fascinating. In the unlikely event that you don’t learn anything new or important, move on with more self-assurance in your direction.

    This makes total sense to me. And I adore how consumer research is now so simple. You can only attract participants and do it! You don’t need to make a lot of documentation. This can offer a wealth of knowledge about your customers, and it’ll help you better understand them and what’s going on in their life. That’s exactly what work one is all about: understanding where people are coming from.

    Jared Spool discusses the significance of basic research and how it does make up the majority of your study. If you can pick from any further user data that you can get your hands on, such as surveys or analytics, that can complement what you’ve heard in the fundamental studies or even time to areas that need more research. All of this information along provides a more in-depth understanding of the state of things and all of its flaws. And that’s the start of a gripping tale. It’s the place in the story where you realize that the principal characters—or the people in this case—are facing issues that they need to conquer. This is where you begin to develop compassion for the characters and support their success, much like in films. And presumably, participants are now doing the same. Their love may be with their company, which could be losing wealth because people didn’t complete certain tasks. Or perhaps they feel the challenges of the customers. In either case, action one serves as your main strategy to pique the interest and interest of the participants.

    When partners begin to understand the value of basic research, that is open doors to more opportunities that involve users in the decision-making approach. And that can help product teams become more user-centric. Everyone benefits from this, including the product, users, and stakeholders. It’s like winning an Oscar in movie terms—it often leads to your product being well received and successful. And this might encourage stakeholders to carry out this process with additional products. The secret to this process is storytelling, and knowing how to tell a compelling story is the only way to entice stakeholders to do more research.

    This brings us to act two, where you iteratively evaluate a design or concept to see whether it addresses the issues.

    Act two: conflict

    Act two is all about approving the issues you raised in act one. This usually involves directional research, such as usability tests, where you assess a potential solution ( such as a design ) to see whether it addresses the issues that you found. The issues might be caused by unmet needs or issues with a flow or process that is causing users to fall asleep. More issues will come up in the process, much like in act two of a movie. It’s here that you learn more about the characters as they grow and develop through this act.

    Usability tests should typically consist of five participants, according to Jakob Nielsen, who found that that number of users can typically identify the majority of the issues:” As you add more and more users, you learn less and less because you will keep seeing the same things again and again… After the fifth user, you are wasting your time by observing the same findings repeatedly but not learning much new.”

    There are also similarities to storytelling here: if you try to tell a story with too many characters, the plot may become lost. Having fewer participants means that each user’s struggles will be more memorable and easier to relay to other stakeholders when talking about the research. This can help convey the problems that need to be solved while also highlighting the worth of conducting the research in the first place.

    Usability tests have been conducted in person for tens of thousands of years, but remote testing can also be done using software like Microsoft Teams, Zoom, or other teleconferencing tools. This approach has become increasingly popular since the beginning of the pandemic, and it works well. You might interpret in-person usability tests as a form of theater watching as opposed to remote testing. Each has advantages and disadvantages. In-person usability research is a much richer experience. The sessions are conducted with other stakeholders in mind. Additionally, you’ll also hear their reactions in real-time, including surprises, disagreements, and discussions of what they’re seeing. Much like going to a play, where audiences get to take in the stage, the costumes, the lighting, and the actors ‘ interactions, in-person research lets you see users up close, including their body language, how they interact with the moderator, and how the scene is set up.

    If conducting usability testing in the field is like watching a play that is staged and controlled, where any two sessions may be very different from one another. You can conduct usability testing in real life by creating a replica of the product’s user interface and conducting research there. Or you can go out to meet users at their location to do your research. With either option, you can see how things work in context, how things change, and how conversion can change completely in different ways depending on the circumstances. You have less control over how these sessions end as researchers, but this can occasionally help you understand users even better. Meeting users where they are can provide clues to the external forces that could be affecting how they use your product. Usability tests in person offer a level of detail that is frequently absent from remote testing.

    That’s not to say that the “movies” —remote sessions—aren’t a good option. Remote sessions can reach a wider audience. They make it possible for much more people to participate in the research and learn what’s happening. Additionally, they make access to a much wider user base geographically. But with any remote session there is the potential of time wasted if participants can’t log in or get their microphone working.

    You can ask real users questions to understand their thoughts and understanding of the solution as a result of usability testing, whether it is conducted remotely or in person. This can assist you in both identifying issues and understanding why they were initially issues. Furthermore, you can test hypotheses and gauge whether your thinking is correct. By the end of the sessions, you’ll have a much clearer understanding of how useful the designs are and whether or not they fulfill their intended purpose. The excitement is in the second act, but there are also potential surprises in the third. This is equally true of usability tests. Unexpected things that participants say frequently alter the way you look at things, and these unexpected revelations can lead to unexpected turns in the narrative.

    Unfortunately, user research can occasionally be viewed as unreliable. And too often usability testing is the only research process that some stakeholders think that they ever need. In fact, if the designs you’re evaluating in the usability test aren’t grounded in a thorough understanding of your users ( foundational research ), there isn’t much to be gained by conducting usability testing in the first place. That’s because you’re narrowing down the area of focus on without considering the needs of the users. As a result, there’s no way of knowing whether the designs might solve a problem that users have. In the context of a usability test, it’s only feedback on a particular design.

    On the other hand, if you only do foundational research, you won’t know whether the object you’re building will actually solve the problem you might have intended to solve. This illustrates the importance of doing both foundational and directional research.

    In act two, stakeholders will hopefully be able to observe the story develop during the user sessions, which reveal the conflict and tension in the current design’s highs and lows. And in turn, this can encourage stakeholders to take action on the issues raised.

    Act three: resolution

    The third act is about resolving the issues from the first two acts, while the first two acts are about understanding the background and the tensions that can compel stakeholders to take action. While it’s crucial to have an audience for the first two acts, it’s crucial that they stay for the final act. That means the whole product team, including developers, UX practitioners, business analysts, delivery managers, product managers, and any other stakeholders that have a say in the next steps. It allows the entire team to discuss what’s possible within the project’s constraints, ask questions, and discuss user feedback together. Additionally, it enables the UX design and research teams to clarify, suggest alternatives, or provide more context for their decisions. So you can get everyone on the same page and get agreement on the way forward.

    Voiceover narration of this act is typically used with audience input. The researcher serves as the narrator, who depicts the issues and what the product’s potential future might look like in light of what the team has learned. They give the stakeholders their recommendations and their guidance on creating this vision.

    In the Harvard Business Review, Nancy Duarte describes a method for structuring presentations that follow a persuasive narrative. The most effective presenters employ the same methods as great storytellers: By reaffirming the status quo and then revealing a better way, they create a conflict that needs to be resolved, writes Duarte. ” That tension helps them persuade the audience to adopt a new mindset or behave differently”.

    This kind of structure is in line with research findings, particularly those from usability tests. It provides evidence for “what is “—the problems that you’ve identified. And your suggestions for how to deal with them are “what could be.” And so forth.

    You can reinforce your recommendations with examples of things that competitors are doing that could address these issues or with examples where competitors are gaining an edge. Or they can be visual, like quick sketches of how a new design could look that solves a problem. These can help create momentum and conversation. And this continues until the end of the session when you’ve wrapped everything up in the conclusion by summarizing the main issues and suggesting a way forward. This is the section where you make the most of the main themes or issues and what they mean for the finished product, or the story’s denial. The stakeholders will now have the opportunity to take the next steps, and hopefully the will-power to do so!

    While we are nearly at the end of this story, let’s reflect on the idea that user research is storytelling. The three-act structure of user research contains all the components of a good story:

      Act one: You encounter both the users ‘ protagonists and the antagonists ( the user-related issues ). This is the beginning of the plot. Researchers might use techniques in act one, including contextual inquiry, ethnography, diary studies, surveys, and analytics. These techniques can produce personas, empathy maps, user journeys, and analytics dashboards.
      Act two: Next, there’s character development. The protagonists face problems and difficulties, which they must overcome, and there is conflict and tension. Researchers might employ heuristics evaluation, competitive benchmarking, and usability testing in act two. The output of these can include usability findings reports, UX strategy documents, usability guidelines, and best practices.
      Act three: The main characters win, and the audience is shown a better future. Researchers may use techniques like presentation decks, storytelling, and digital media in act three. The output of these can be: presentation decks, video clips, audio clips, and pictures.

    The researcher performs a number of tasks: they are the producer, the director, and the storyteller. The participants play a small part, but they are significant characters ( in the study ). And the stakeholders are the audience. However, the most crucial thing is to create the right narrative and use storytelling to research user stories. By the end, the parties should have a goal and a desire to solve the product’s flaws.

    So the next time that you’re planning research with clients or you’re speaking to stakeholders about research that you’ve done, think about how you can weave in some storytelling. In the end, user research is beneficial to everyone, and all parties must be interested in the conclusion.

  • To Ignite a Personalization Practice, Run this Prepersonalization Workshop

    To Ignite a Personalization Practice, Run this Prepersonalization Workshop

    This is in the photo. You’ve joined a club at your business that’s designing innovative product features with an focus on technology or AI. Or perhaps your business only started using a personalization engine. In any case, you’re designing using files. Then what? There are many warning stories, no immediately achievement, and some guides for the baffled when it comes to designing for customisation.

    The personalization gap is real, between the dream of getting it right and the worry of it going wrong ( like when we encounter “persofails” similar to a company’s repeated pleas for more toilet seats from regular people ). It’s an particularly confusing place to be a modern professional without a map, a map, or a strategy.

    Because successful personalisation is so dependent on each group’s skill, technology, and market position, there are no Lonely Planet and some tour guides for those of you who want to personalize.

    However, you can make sure your team has properly packed its luggage.

    There’s a DIY method to increase your chances for victory. You’ll at least at least disarm your boss ‘ irrational exuberance. You’ll need to properly plan before the celebration.

    We call it prepersonalization.

    Behind the song

    Take into account the DJ have on Spotify, which was introduced last year.

    We’re used to seeing the polished final outcome of a personalization function. A personal have had to be developed, budgeted, and given priority before the year-end prize, the making-of-backstory, or the behind-the-scenes success chest. Before any customisation function is implemented in your product or service, it lives among a long list of thought-provoking concepts that can be used to create more dynamic user experience.

    So how do you understand where to position your personalization bet? How can you create regular interactions that didn’t irritate users or worse, breed trust? We’ve discovered that several budgeted programs second required one or more workshops to join key stakeholders and domestic customers of the technology in order to justify their continuing investments. Create it count.

    We’ve witnessed the same evolution up near with our clients, from big tech to burgeoning companies. How effective these prepersonalization actions play out, in our experiences working on small and large customisation efforts, and how effective is the program’s best track record and its ability to weather challenging questions, work steadily toward shared answers, and manage its design and engineering efforts.

    Time and again, we’ve seen successful workshops individual coming success stories from fruitless efforts, saving many time, resources, and social well-being in the process.

    A yearlong project of assessment and feature development is a part of a personalization practice. It’s never a technical load switch-flip. It’s ideal managed as a delay that usually evolves through three actions:

    1. customer experience optimization ( CXO, also known as A/B testing or experimentation )
    2. always-on chatbots, whether they are rules-based or machine-generated.
    3. mature features or standalone product development ( such as Spotify’s DJ experience )

    We think there is a basic language, a set of “nouns and verbs” that your business can use to create experiences that are personalized, personalized, or automated, which is why we created our democratic personalization platform and why we’re field-testing an following deck of cards. You won’t require these accounts. But we highly recommend that you create something similar, whether that might be online or natural.

    Set the timer for your house.

    How much time does it take to prepare a prepersonalization studio? The surrounding assessment activities that we recommend including can ( and often do ) span weeks. We suggest aiming for two to three days for the main workshop. Information on the necessary first-day activities are included in a summary of our broad approach.

    The whole episode of the wider studio is twofold:

      Kickstart: This specifies the terms of your wedding as you concentrate on both your team’s and your team’s preparation and travel.
    1. Plan your function: This is where the card-based factory activities take place, giving you a plan of attack and the scope of work.
    2. Work your plan: This stage is all about creating a competitive environment for staff participants to singularly pitch their personal pilots that each contain a proof-of-concept task, its business situation, and its operating model.

    Give yourself at least a day, divided into two long time blocks, to work through a concentrated version of those initial two phases.

    Kickstart: Apt your appetite

    We call the first lesson the “landscape of connected experience“. It looks at the possibilities for personalization in your organization. Any UX that necessitates the orchestration of multiple systems of record on the backend is a connected experience, in our opinion. This could be a content-management system combined with a marketing-automation platform. A customer-data platform and a digital asset manager could be combined.

    Give examples of connected experience interactions that you admire, find familiar, or even dislike, as examples of consumer and business-to-business examples. This should cover a representative range of personalization patterns, including automated app-based interactions ( such as onboarding sequences or wizards ), notifications, and recommenders. These cards contain a catalog, which we have. Here’s a list of 142 different interactions to help you with your thinking.

    This is all about setting the table. What potential avenues might the practice take in your organization? Here’s a long-form primer and a strategic framework for a broader perspective.

    Assess each example that you discuss for its complexity and the level of effort that you estimate that it would take for your team to deliver that feature ( or something similar ). In our cards, we break down connected experiences into five categories: functions, features, experiences, complete products, and portfolios. Build your own size here. This will help to focus the conversation on the merits of ongoing investment as well as the gap between what you deliver today and what you want to deliver in the future.

    The following 2 2 grid, which lists the four enduring justifications for a personalized experience, should be used as the starting point for each idea. This is crucial because it emphasizes how personalization can affect your own methods of working as well as your external customers. It’s also a reminder ( which is why we used the word argument earlier ) of the broader effort beyond these tactical interventions.

    Each team member should vote on where they see your product or service putting its emphasis. Naturally, you can’t give them all a prioritization. Here, the goal is to show how various departments may view their own benefits from the effort, which can vary from one department to the next. Documenting your desired outcomes lets you know how the team internally aligns across representatives from different departments or functional areas.

    The third and final kickstart activity is about filling in the personalization gap. How well documented is your customer journey? Will data and privacy compliance be too big of a challenge? Do you have any needs for content metadata that you must address? It’s just a matter of acknowledging the magnitude of that need and finding a solution ( we’re fairly certain that you do ). In our cards, we’ve noted a number of program risks, including common team dispositions. For instance, our Detractor card lists six protracted behavior that is harmful to the development of our country.

    It is crucial to your success to work together and manage expectations. Consider the potential barriers to your future progress. Ask the participants to list specific actions you can take to help your organization overcome or reduce those obstacles. As research has shown, personalization initiatives face a number of common obstacles.

    You should have, at this point, discussed sample interactions, emphasized a significant benefit, and identified significant gaps. Good—you’re ready to continue.

    Hit the test kitchen

    Next, let’s take a look at what you’ll need to create personalization recipes. Personalization engines, which are robust software suites for automating and expressing dynamic content, can intimidate new customers. They give you a variety of options for how your organization can conduct its activities because of their broad and potent capabilities. When creating a connected experience, where do you start?

    What’s important here is to avoid treating the installed software like it were a dream kitchen from some fantasy remodeling project ( as one of our client executives memorably put it ). Your team can begin creating, testing, and improving the snacks and meals that will be included on your personalizedization program’s regularly evolving menu by using these software engines.

    Over the course of the workshop, the ultimate menu of the prioritized backlog will come together. And by creating “dishes,” you can expect individual team members to create personalized interactions that either serve their or others ‘ needs.

    The dishes will come from recipes, and those recipes have set ingredients.

    Verify your ingredients

    Like a good product manager, you’ll make sure you have everything you need to make your desired interaction ( or that you can figure out what needs to be added to your pantry ) and that you validate with the right stakeholders present. These elements include the audience you’re targeting, the content and design elements, the interaction’s context, and your overall ensemble.

    This isn’t just about discovering requirements. The team can: Describe your personalizations as a series of if-then statements by documenting them as follows:

    1. compare findings to a common strategy for developing features, similar to how artists paint with the same color palette,
    2. specify a consistent set of interactions that users find uniform or familiar,
    3. and establish parity among performance indicators and key performance indicators as well.

    This enables you to streamline your technical and design efforts while delivering a common color palette of the fundamental motifs of your personalized or automated experience.

    Compose your recipe

    What elements are significant to you? Consider the construct “what-what-when-why”

    • Who are your key audience segments or groups?
    • What kind of content will you provide for them, what design elements, and under what circumstances?
    • And what are the business and user benefits?

    We first developed these cards and card categories five years ago. We regularly test their suitability with clients and audience members at conferences. And there are still fresh possibilities. But they all follow an underlying who-what-when-why logic.

    In the cards in the accompanying photo below, you can typically follow along with right to left in three examples of subscription-based reading apps.

    1. When a visitor or an unidentified visitor interacts with a product title, a banner or alert bar appears that makes it simpler for them to read a related title, saving them time.
    2. Welcome automation: When there’s a newly registered user, an email is generated to call out the breadth of the content catalog and to make them a happier subscriber.
    3. Winback automation: A user receives an email before their subscription expires or after a recent failed renewal to request that they reconsider or remind them to do so.

    We’ve also found that sometimes this process comes together more effectively by cocreating the recipes themselves, so a good preworkshop activity might be to think about what these cards might be for your organization. Start with a set of blank cards, and begin labeling and grouping them through the design process, eventually distilling them to a refined subset of highly useful candidate cards.

    The workshop’s later stages could be characterized as shifting from focusing on a cookbook to a more nuanced customer-journey mapping. The team will receive individual” cooks” who will pitch their recipes using a standard jobs-to-be-done format, which will allow for measurement and outcomes, and then prioritize the finished design and production delivery.

    Better kitchens require better architecture

    For those who are inside delivering it, simplifying a customer experience is a challenging task. Avoid those who make up their mind. With that being said,” Complicated problems can be hard to solve, but they are addressable with rules and recipes“.

    When a team overfits: they aren’t designing with their best data, personalization turns into a laughing line. Every organization has metadata debt to go along with its technical debt, which contributes to a drag on the effectiveness of personalization, much like a sparse pantry. Your AI’s output quality, for example, is indeed limited by your IA. Before they acquired a seemingly modest metadata startup that now powers its underlying information architecture, Spotify’s poster-child prowess today was unfathomable.

    You can’t stand the heat, unquestionably…

    Personalization technology opens a doorway into a confounding ocean of possible designs. Only a disciplined and highly collaborative approach can achieve the necessary concentration and intention. Banish your ideal kitchen. Instead, hit the test kitchen to save time, preserve job satisfaction and security, and safely dispense with the fanciful ideas that originate upstairs of the doers in your organization. There are mouths to feed and meals to be served.

    This framework of the workshop gives you a strong chance at long-term success as well as solid ground. Wiring up your information layer isn’t an overnight affair. However, if you use the same cookbook and the same recipe combination, you’ll have solid ground for success. We created these activities to ensure that your organization’s needs are clear and concise before the risks start to accumulate.

    While there are associated costs toward investing in this kind of technology and product design, your ability to size up and confront your unique situation and your digital capabilities is time well spent. Don’t waste it. The pudding is the proof, as they say.